MONITOR
HEATING
SYSTEMS
Section
3:
Operation
C.
Press
HOUR
and MINUTE push-button
Sm:
Reprogramming Current Time
switches to program 1st desired time.
(if
necessary)
IMPORTAKT:
Be
sure
to
set
the
dock
AM or PM,
A.
.Press
the
TIMER
SELECTOR
push-button
as
appropriate.
switch to illuminate the
CLOCK
SET
indicator
light
D.
Immediately after programming
the
1st desired
8,
Press
HOUR
and MINUTE push-button
time. press the
SET
push-button switch. This
switches to program new current time.
Set
step must
be
completed within fifteen seconds
applicable time by watching Clock display.
after programming the time.
C.
Press
SET
push-button switch.
E,
Press
TEMP
push-button switch.
F,
Press
UP
and
for
DOWN
push-button switch(es)
to program 1st desired temperature.
G,
Immediately after programming the
1st
desired
temperature.
Pressthe
SET
push-button switch.
This step must
be
completed within fifteen
seconds
after programming
the
temperature.
STEP3:
Program
the
Remaining Times
By pressing
the
TIMER
SELECSTOR
push-button
switch
again,
the
2nd Indicator Light will illuminate,
at which
time
the
2nd setting
can
be
programmed.
Press
again
to
set
3rd
and again
to
set
4th.
IMPORTAHT:
The
SET
push-button
swnch
must
be
pressed
attar
each
setting
b
lock
into
memory.
Should
heater power
be
interruptad
by
a
power failure
or
by
disconnsction
of
he
power
owd
beyond
5
minutes,
heater
roveris
to
MANUAL
operation,
and
all
AVTO programming
ts
ed
STEP4:
Salad
Automatic Operation
Press
AUTO
push-button switch. The
AUTO
in-
dicator light will illuminate.
-5:
Turn
Monitor
ON
Press
ON/-
push-button
switch
to
position
ON.
The
RUN
indicator light will illuminate to indicate
that power
has
been.
applied
to
the
heater.
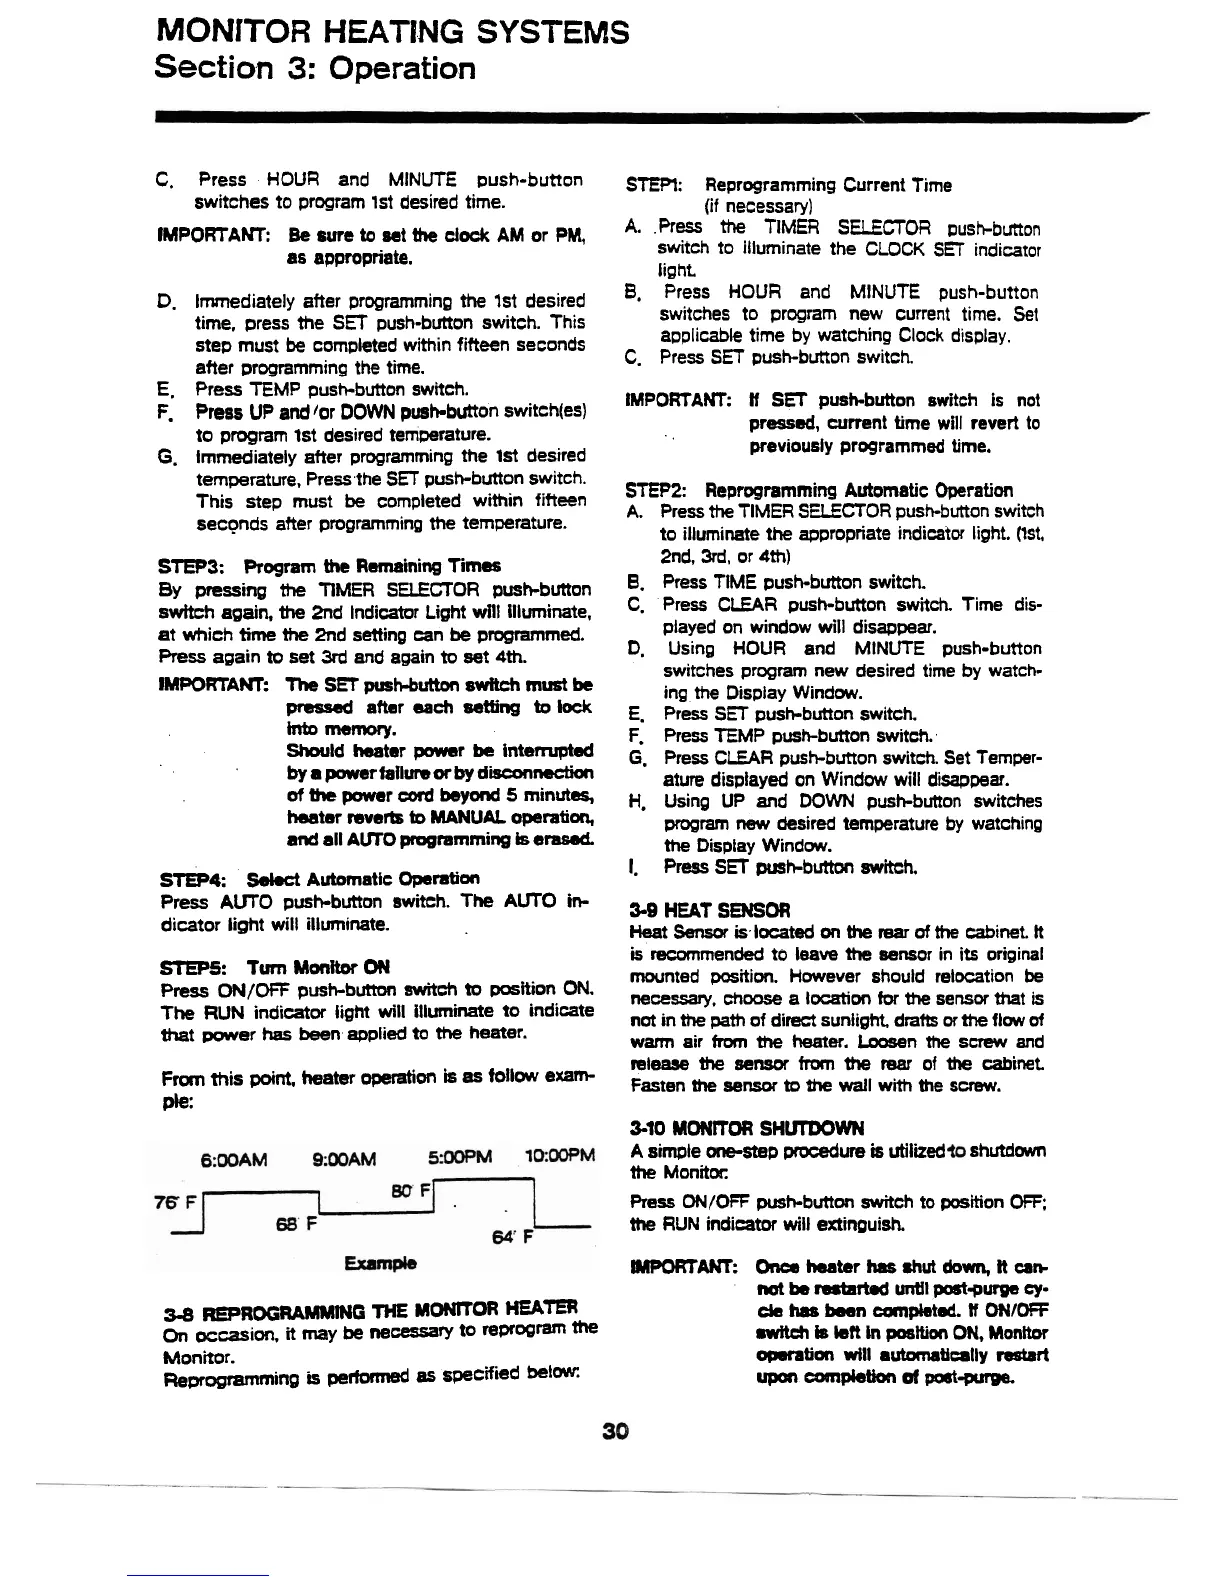
Fm
this
point,
heater
operation
is
as
follow
exam-
ple.
34
REPROGRAMMHG
THE
MONerOR
HEATER
On
occasion.
it
my
be
ne-ry
to
rf3PrOgm
the
Monitor.
Remagramming
is
pertwmed
as
specified
belaw:
IMPORTANT:
If
SET
push-button switch is not
pressed,
wrrent time will
revert
to
previously programmed
time.
STEP2:
Reprogramming Automatic Operation
A.
Press
the
TIMER SELECTOR push-button switch
to
illuminate
the
appropriate indicator light. (Ist,
2nd,
3rd,
or
4th)
8.
Press
TIME push-button switch.
C.
Press
CLEAR
push-button switch. Time dis-
played on window will disappear.
D,
Using
HOUR
and MINUTE push-button
switches program new desired time
by
watch-
ing
the
Display Window.
E,
Press
SET
push-button switch.
F,
Press
TEMP
push-button switch.
G,
Press
CLEAR
push-button switch. Set Temper-
ature
displayed on Window will disappear.
H,
Using UP and
DOWN
push-button switches
program
new
desired temperature by watching
the
Display Window.
I.
Press
SET
pusbbutton switch.
3-9
HEAT
SENSOR
Heat
Sensor
islocated
on
the
rear
of
the
cabinet.
It
is
recommended to leave
the
aensor in its original
mounted position. However should relocation
be
necessary,
choose
a
location
for
the
sensor
that
is
not
in
the
path of direct sunlight
drafts
or
the
flow
of
wm
air
fm
the
heater.
Loosen
the
screw
and
release
the
sensor
from
the
mar
of
the
cabinet
Fasten
the
sensor
to
Zhe
wall
with
the
screw.
3-10
MONITOR SHVrOOWN
A
simple one-step
procedure
Q
utilized
shutdown
the
Monitor.
Press
ON/OFF
push-button
switch
to position
OFF,
the
RUN
indicator will extinpuish.
-ANT:
Orrcs
hater
has
shut
down,
It
an-
not
bs
rsrtarted
until
poa-putge
ey-
da
has
been
canpletd.
If
ONIOFF
switch
is
kR
in
posttion
ON,
Monttor
ommtiar
will
automatically
resbrt
m
-pie-
m-purga.