EasyManua.ls Logo

Mooney M20K - Page 228

Mooney M20K
437 pages
Print Icon
To Next Page IconTo Next Page
To Previous Page IconTo Previous Page
Loading...
MOONEY
AIRCRAFT
CORPORATION
M20K
SERVICE
AND
MAINTENANCE
MANUAL
0.5
Y
STOP
D.LL
I
CRACK
I...´•
OLmJNE
OF
CHAMFER
AREA
(SEE
SECTION
1.......´•--´•´•´•´•´•-\´•´•´•´•´•-´•´•´•´•´•-´•-´•1
51-13-00.
B.
2)
CRACK
15---I--
CHAMFER
EACH
SIDE
OF
CRACK
51--13--00,
B,
2)
(SEE
SECTION
FINISHED
SURFACE
THICKNESS
.02
TO
.04
ABCDE
C
O
I
,LAMINATE
FINISHED
SURFACE
MASKING
TAPE
SM51-20
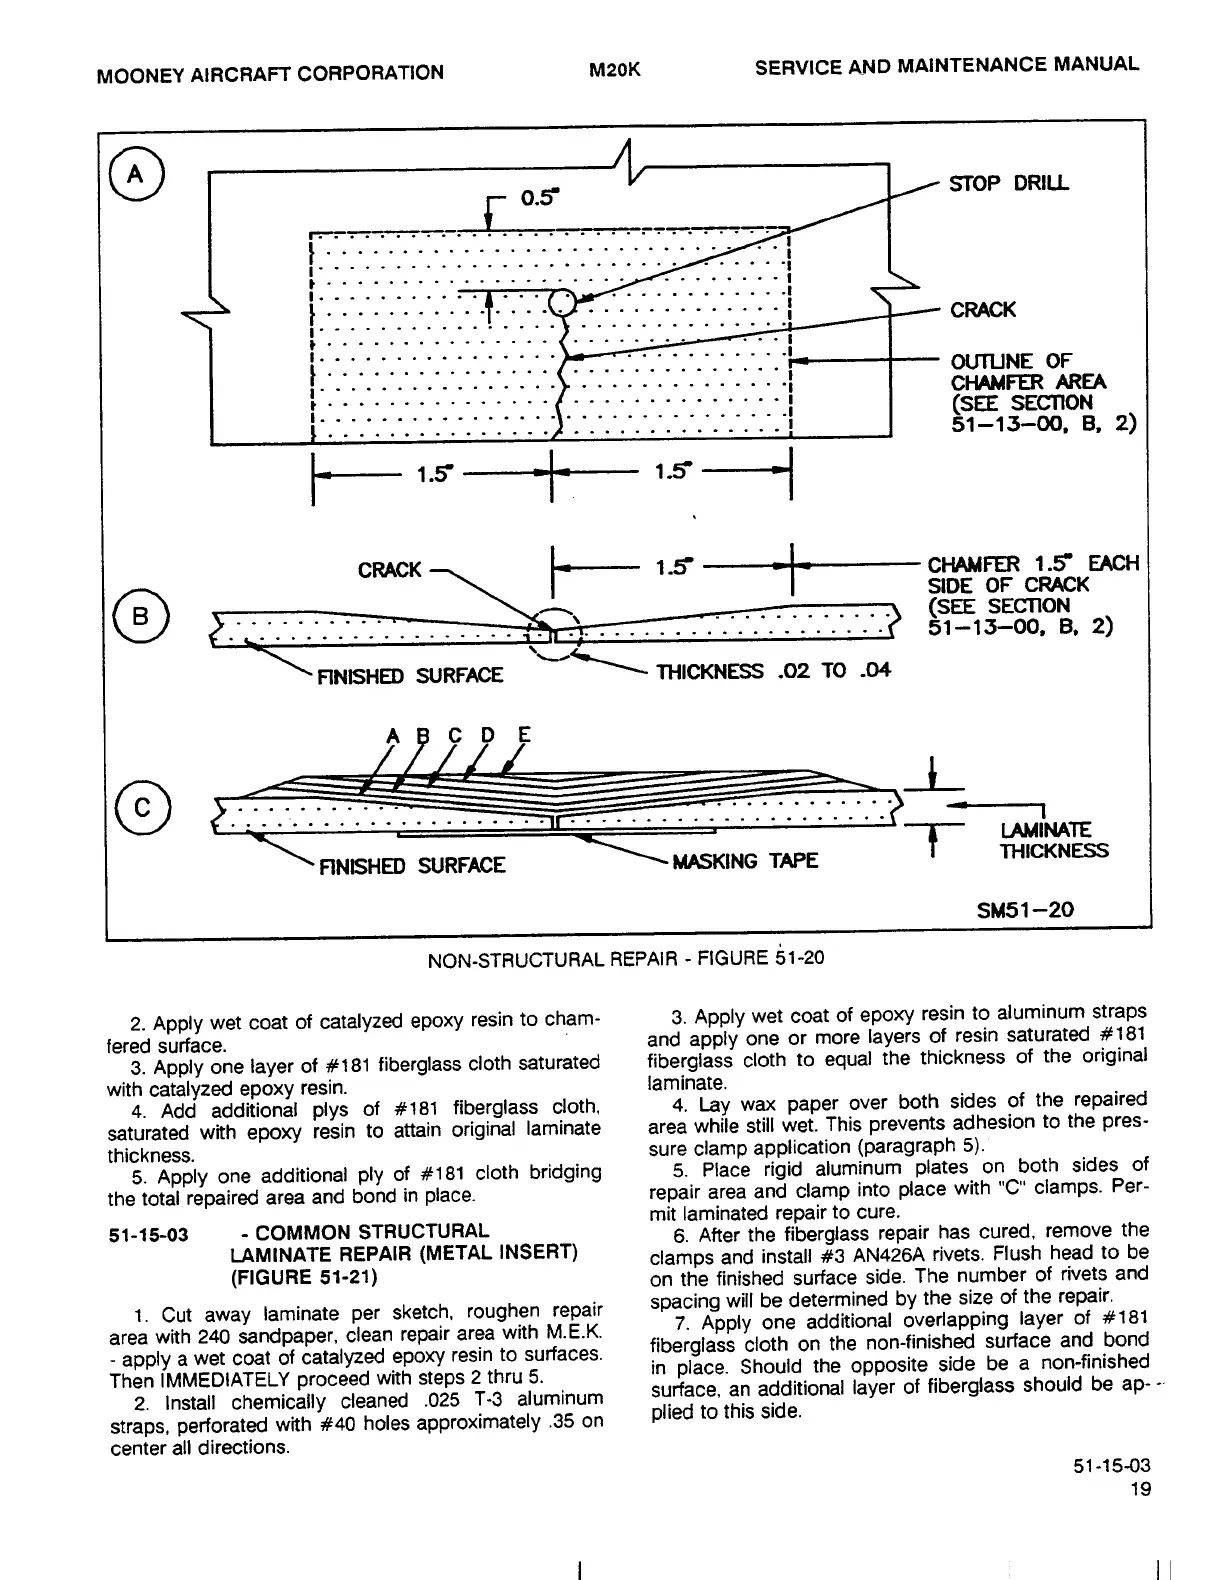
NON-STRUCTURAL
REPAIR
FIGURE
~1-20
2.
Apply
wet
coat
of
catalyzed
epoxy
resin
to
cham-
3.
Apply
wet
coat
of
epoxy
resin
to
aluminum
straps
fered
surface.
and
apply
one
or
more
layers
of
resin
saturated
#181
3.
Apply
one
layer
of
#181
fiberglass
cloth
saturated
fiberglass
cloth
to
equal
the
thickness
of
the
original
with
catalyzed
epoxy
resin.
laminate.
4.
Add
additional
plys
of
#181
fiberglass
cloth,
4.
Lay
wax
paper
over
both
sides
of
the
repaired
saturated
with
epoxy
resin
to
attain
original
laminate
area
while
still
wet.
This
prevents
adhesion
to
the
pres-
thickness.
sure
clamp
application
(paragraph
5).
5.
Apply
one
additional
ply
of
#181
cloth
bridging
5.
Place
rigid
aluminum
plates
on
both
sides
of
the
total
repaired
area
and
bond
in
place.
repair
area
and
clamp
into
place
with
"C"
clamps.
Per-
mit
laminated
repair
to
cure.
51-15-03
COMMON
STRUCTURAL
6.
After
the
fiberglass
repair
has
cured,
remove
the
LAMINATE
REPAIR
(METAL
INSERT)
clamps
and
install
#3
AN426A
rivets.
Flush
head
to
be
(FIGURE
51-21)
on
the
finished
surface
side.
The
number
of
rivets
and
1.
Cut
away
laminate
per
sketch,
roughen
repair
spacing
will
be
determined
by
the
size
of
the
repair.
area
with
240
sandpaper,
clean
repair
area
with
M.E.K.
7.
Apply
one
additional
overlapping
layer
of
#181
apply
a
wet
coat
of
catalyzed
epoxy
resin
to
surfaces.
fiberglass
cloth
on
the
non-finished
surface
and
bond
Then
IMMEDIATELY
proceed
with
steps
2
thru
5.
in
place.
Should
the
opposite
side
be
a
non-finished
surface,
an
additional
layer
of
fiberglass
should
be
ap--´•
2.
Install
chemically
cleaned
.025
T-3
aluminum
plied
to
this
side.
straps,
perforated
with
#40
holes
approximately
.35
on
center
all
directions.
51-15-03
19
OLDWILLWAYNE

Table of Contents