EasyManua.ls Logo

Mortara H3+ - User Manual

Mortara H3+
2 pages
Print Icon
To Next Page IconTo Next Page
Loading...
H3
+
3-CHANNEL HOLTER ELECTRODE PL ACEMENT
V
RA
RL
LL
LA
LEAD PLACEMENT
RA Right clavicle as shown.
LA Left clavicle as shown.
RL Reference or ground lead. Should be placed to
maximize patient comfort.
LL Lower left side of the rib cage or body.
V Precordial exploring lead.
The V lead can be positioned according to clinician
preference. (Shown in V1 position in illustration.)
Left leg electrode positioned on lower left rib cage may lessen
amount of artifact; however, to be comparable with a standard
12-lead ECG lead II, the LL lead should be placed on the
lower left side of the body, as close to hip as possible.
IEC AHA
R
RA
L
LA
N
RL
F
LL
C
V
Question and Answer IconNeed help?

Do you have a question about the Mortara H3+ and is the answer not in the manual?

Summary

3-CHANNEL HOLTER ELECTRODE PLACEMENT

RA Lead Placement

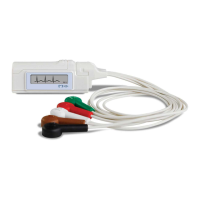
Right clavicle placement as shown in the illustration.

LA Lead Placement

Left clavicle placement as shown in the illustration.

RL Lead Placement

Reference or ground lead for patient comfort.

LL Lead Placement

Lower left side of the rib cage or body for electrode placement.

V Lead Placement

Precordial exploring lead positioned according to clinician preference.

H3+ DIGITAL HOLTER RECORDER OPERATION

To Begin a Session

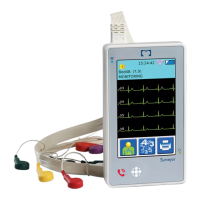
Steps to attach cable, insert battery, and navigate menu to start recording.

Entering Optional Diary Events

Marking an event during recording using the Enter button.

End of Recording

Indicates full memory, and steps for battery removal and data transfer.

Ending a Recording Early

Procedure to stop an in-progress recording before its set duration.

Overview

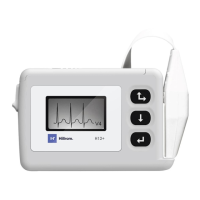
The Mortara H3+ Digital Holter Recorder is a compact, 3-channel device designed for continuous electrocardiogram (ECG) recording, typically over a 24-hour to 48-hour period, to aid in the diagnosis of cardiac conditions. It is intended for use in a clinical setting by healthcare professionals.

Function Description

The primary function of the H3+ is to record a patient's ECG signals over an extended period while they go about their daily activities. This allows for the detection of intermittent arrhythmias or other cardiac events that might not be captured during a standard, short-duration ECG. The device records three channels of ECG data, which are then stored internally for later download and analysis using specialized software.

Important Technical Specifications

  • Channels: 3-channel ECG recording.
  • Battery: Uses a single AAA battery.
  • Recording Duration: Capable of recording for durations such as 48 hours (as indicated by "3-CH 48H" on the device display).
  • Data Transfer: Recorded data is transferred via a USB cable.
  • Certifications: ISO 13485 certified, indicating compliance with quality management systems for medical devices. It also carries CAN/CSA C22 and CE markings, signifying compliance with Canadian, US, and European safety and performance standards for medical equipment.
  • Gain Representation: Waveform is shown at 4 mm/mV gain to allow full representation of ECG.

Usage Features

Electrode Placement: The device uses a 3-channel holter electrode placement system with specific locations for optimal signal acquisition:

  • RA (Right Arm): Right clavicle.
  • LA (Left Arm): Left clavicle.
  • RL (Right Leg): Reference or ground lead, placed to maximize patient comfort.
  • LL (Left Leg): Lower left side of the rib cage or body. For comparability with a standard 12-lead ECG lead II, the LL lead should be placed on the lower left side of the body, as close to the hip as possible.
  • V (Precordial): Precordial exploring lead, positioned according to clinician preference (e.g., V1 position). The left leg electrode positioned on the lower left rib cage may lessen artifact, but for standard 12-lead ECG lead II comparability, it should be placed on the lower left side of the body, as close to the hip as possible.

Starting a Session:

  1. Cable Attachment: The patient cable is attached to the H3+.
  2. Battery Installation: A new AAA battery is inserted after removing the battery door.
  3. Menu Navigation: The "Enter" button is used to navigate through menu displays.
  4. Verification: Users verify the current time setting and the device's ID number.
  5. Signal Quality Check: The device allows for verification of ECG signal quality (e.g., "CH1" display).
  6. Initiating Recording: Recording begins by pressing and holding the "Enter" button for 3 seconds, indicated by an "R" on the display.

Optional Diary Events:

  • Patients can mark events by pressing the "Enter" button. A "down arrow" symbol indicates that a new event cannot be entered while a "up arrow" symbol is displayed. This feature allows patients to log symptoms or activities that correlate with specific ECG changes.

Ending a Recording:

  • Automatic End: When the recording period is complete, the ID is displayed in reversed color, indicating that the H3+ memory is full.
    1. Remove the battery door.
    2. Remove and properly dispose of the battery.
    3. Replace the battery door.
    4. Remove the patient cable from the recorder.
    5. The recorded data is then ready for transfer via USB.
  • Early End: An in-progress recording can be ended prematurely.
    1. Remove the battery door.
    2. Remove the battery.
    3. Reinsert the battery to display the ID in reversed color.
    4. Replace the battery door.

Maintenance Features

  • Battery Replacement: The device uses a single AAA battery, which is easily accessible by removing the battery door. This allows for quick replacement between recordings.
  • Data Transfer: Data is transferred via a standard USB cable, simplifying the process of offloading recorded ECG information for analysis.
  • Cleaning: While not explicitly detailed in the provided excerpts, as a medical device, it would typically require regular cleaning and disinfection protocols as per institutional guidelines and manufacturer recommendations to ensure patient safety and device longevity.
  • Software Updates: Although not mentioned, digital holter recorders often rely on accompanying software for data analysis and may require periodic software updates for optimal performance and feature enhancements.

Mortara H3+ Specifications

General IconGeneral
BrandMortara
ModelH3+
CategoryMedical Equipment
LanguageEnglish

Related product manuals