EasyManua.ls Logo

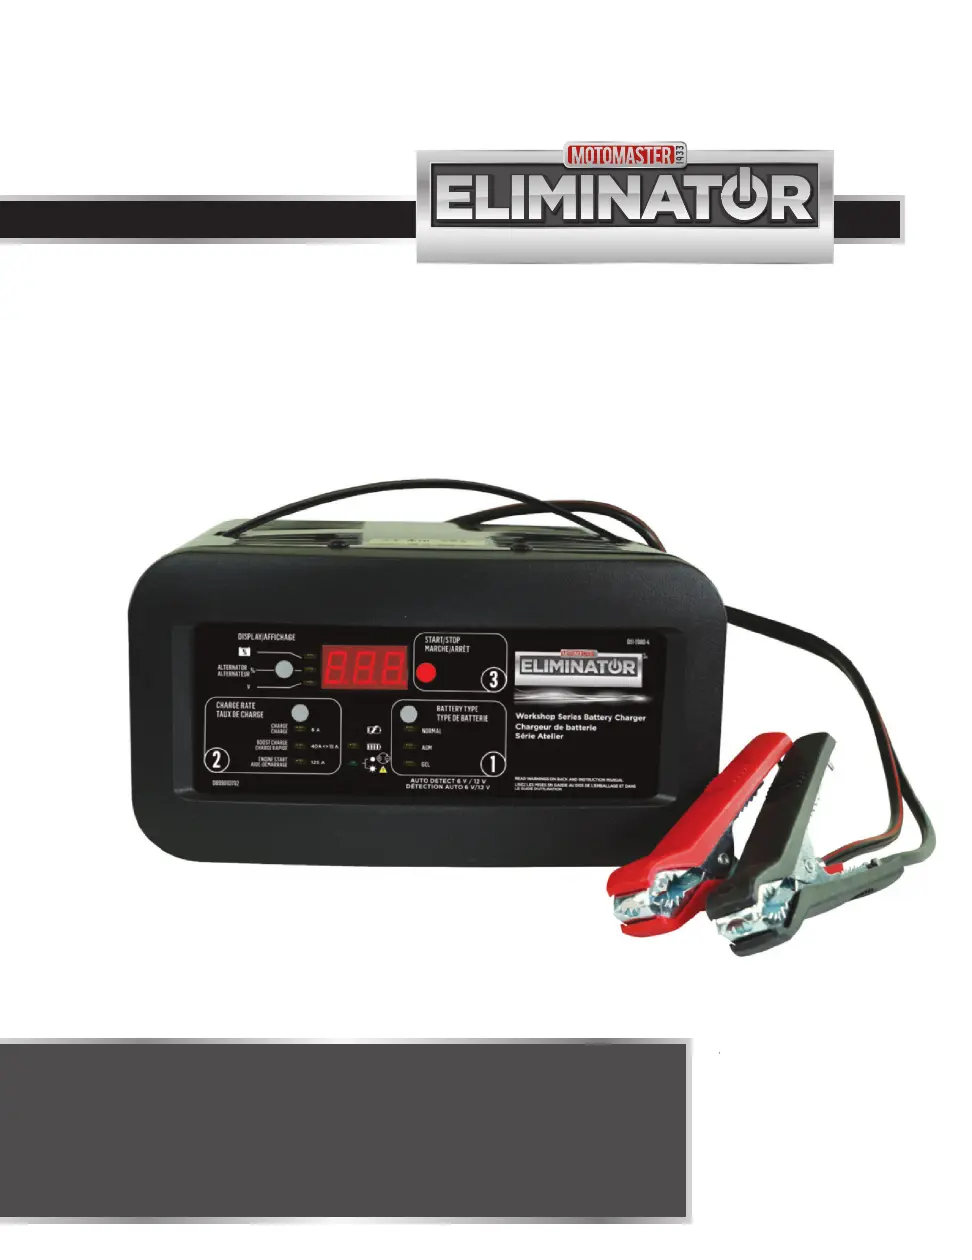
Motomaster ELIMINATOR WORKSHOP 011-1980-4 - User Manual

Motomaster ELIMINATOR WORKSHOP 011-1980-4
36 pages
Print Icon
To Next Page IconTo Next Page
Loading...
headline bars
continuation tabs
notes
warnings
headline bars
continuation tabs
notes
warnings
model no. 011-1980-4
IMPORTANT:
Please read this manual carefully before running this battery
charger and save it for reference.
®
MD
INSTRUCTION
MANUAL
WORKSHOP SERIES
Battery Charger
0099002120-00

Questions and Answers

  • M
    mcguiremarkAug 15, 2025
    What to do if connections to the battery are reversed on Motomaster Battery Charger?
    • J
      Janet CooperAug 15, 2025
      If the connections to the battery are reversed on your Motomaster Battery Charger, it means the battery is connected backwards. Unplug the charger and reverse the connections to the battery.
  • S
    Shannon BrownAug 19, 2025
    Why won't my Motomaster ELIMINATOR WORKSHOP 011-1980-4 turn on?
    • S
      Stephanie KerrAug 19, 2025
      If the Motomaster Battery Charger won't turn on even when properly connected, it could be due to several reasons. First, the AC outlet might be dead, so check the fuse or circuit breaker. Second, there might be a poor electrical connection; inspect the power and extension cords for loose plugs. Finally, the battery itself could be defective, in which case you should have it checked.
  • T
    tmartinezAug 22, 2025
    What to do if Motomaster Battery Charger has short or no start cycle when cranking engine?
    • L
      Latoya JuarezAug 22, 2025
      If you experience a short or no start cycle when cranking the engine with the Motomaster Battery Charger, several factors could be at play. You might be drawing more than the Engine Start Rate, in which case the crank time may be less than 5 seconds. Ensure you wait 3 minutes between cranks to allow the battery and charger to cool down. Check for poor connections at the battery and frame. Also, make sure the AC cord and/or extension cord isn't loose, and verify that there's power at the receptacle by checking the fuse or circuit breaker. Overheating can also cause this issue, so ensure the charger vents are not blocked. If the battery is severely discharged, use the Boost Charge setting for a few minutes to assist in cranking.
  • J
    John KleinAug 26, 2025
    What to do if the battery voltage dropped too low during the maintain mode of Motomaster Battery Charger?
    • K
      kelly21Aug 26, 2025
      If the battery voltage dropped too low during maintain mode on your Motomaster Battery Charger, it may be due to a drain on the battery, or the battery itself could be faulty. Ensure there are no loads on the battery. If there are, remove them. If there are none, have the battery checked or replaced.
  • S
    sandra04Aug 28, 2025
    Why the battery was unable to reach the “full charge” voltage with Motomaster ELIMINATOR WORKSHOP 011-1980-4 Battery Charger?
    • S
      Shirley WilsonAug 28, 2025
      If the battery was unable to reach the “full charge” voltage on your Motomaster Battery Charger, it may be caused by trying to charge a large battery or bank of batteries on too low of a current setting. Try again with a higher current setting or have the battery checked or replaced.
  • S
    Steven BatesSep 1, 2025
    Why Motomaster Battery Charger was unable to keep the battery fully charged in maintain mode?
    • B
      bryanterinSep 1, 2025
      If your Motomaster Battery Charger was unable to keep the battery fully charged in maintain mode, the battery might not be holding a charge. Make sure there are no loads on the battery. If there are, remove them. If there are none, have the battery checked or replaced.
  • M
    mhernandezSep 4, 2025
    What to do if the battery voltage is still under 10 V after 2 hours of charging with Motomaster ELIMINATOR WORKSHOP 011-1980-4?
    • S
      stephaniesaundersSep 4, 2025
      If the battery voltage is still under 10 V (for a 12 V battery) or 5 V (for a 6 V battery) after 2 hours of charging with the Motomaster Battery Charger, the battery could be bad. Have it checked or replaced.
  • E
    Eric BenderSep 7, 2025
    What to do if Motomaster ELIMINATOR WORKSHOP 011-1980-4 Battery Charger detected that the battery may be getting too hot (thermal runaway)?
    • S
      Sarah GaySep 7, 2025
      If the Motomaster Battery Charger detects that the battery may be getting too hot (thermal runaway), have the battery checked or replaced.
  • J
    Justin HunterSep 12, 2025
    Why Motomaster ELIMINATOR WORKSHOP 011-1980-4 Battery Charger shut off because its internal temperature exceeds limit?
    • A
      Andrew BrooksSep 12, 2025
      If your Motomaster Battery Charger shut off because its internal temperature exceeds the limit, ensure that the side ventilation holes are not blocked. Move the charger out of the sun and into the shade.

Summary

SAFETY

INTRODUCTION

Brief overview of the safety section.

SAFETY INFORMATION

General precautions for using the charger and battery.

PERSONAL SAFETY INSTRUCTIONS

Guidelines for personal protection during operation.

WARNING! RISK OF EXPLOSIVE GASES

Critical warning about battery gases.

USING AN EXTENSION CORD

Guidelines for using extension cords safely with the charger.

PREPARING TO CHARGE

Steps to prepare the charger and battery before charging.

CONNECTING YOUR BATTERY

BATTERY IN VEHICLE (NEGATIVE GROUNDED)

Connecting the charger to a vehicle with a negative ground.

BATTERY IN VEHICLE (POSITIVE GROUNDED)

Connecting the charger to a vehicle with a positive ground.

BATTERY REMOVED FROM VEHICLE

Connecting the charger to a battery removed from the vehicle.

KNOW YOUR CHARGER

START;STOP BUTTON

Controls for starting and stopping the charging process.

DIGITAL DISPLAY

Information shown on the digital screen.

DISPLAY MODE BUTTON

How to cycle through display options.

RATE SELECTION BUTTON

Button to choose charging current.

LED INDICATORS

Status lights explaining charger operation.

BATTERY TYPE BUTTON

Selects the type of battery to be charged.

OPERATION

CHARGING YOUR BATTERY

Step-by-step guide to charging a battery.

BATTERY CHARGING TIMES

Estimated times for charging different battery sizes.

AUTOMATIC VOLTAGE DETECTION

How the charger detects battery voltage.

ABORTED CHARGE

What to do if charging is interrupted or fails.

DESULFATION MODE

Process for removing battery sulfation.

COMPLETION OF CHARGE

How to know when charging is finished.

MAINTAIN MODE (FLOAT MODE MONITORING)

Charger's mode for maintaining charge.

MAINTAINING A BATTERY

Tips for long-term battery maintenance.

USING THE ENGINE START FEATURE

How to use the charger to jump-start a vehicle.

ENGINE STARTING NOTES

Important details about the engine start sequence.

USING THE BATTERY VOLTAGE TESTER

How to use the charger's battery testing function.

TESTER AND CHARGER

Switching between charger and tester modes.

TESTING AFTER CHARGING

Performing tests after a charging session.

POWER-UP AUTO START

How the charger starts automatically.

USING THE ALTERNATOR PERFORMANCE TESTER

Using the charger to test the alternator.

MAINTENANCE

MAINTENANCE

Steps to keep the charger in good working order.

TROUBLESHOOTING

TROUBLESHOOTING

Solutions for common problems encountered with the charger.

ERROR CODES

ERROR CODES

Explains error codes and their solutions.

TECHNICAL SPECIFICATIONS

TECHNICAL SPECIFICATIONS

Detailed technical data and specifications of the charger.

Motomaster ELIMINATOR WORKSHOP 011-1980-4 Specifications

General IconGeneral
Model Number011-1980-4
BrandMotomaster
ModelELIMINATOR WORKSHOP
TypeBattery Charger
Voltage12V
Warranty3 years

Related product manuals