EasyManua.ls Logo

Motomaster Nautilus - User Manual

Motomaster Nautilus
9 pages
Print Icon
To Next Page IconTo Next Page
Loading...
Model no. 011-1973-2
Battery Charger
INSTRUCTION
MANUAL
IMPORTANT SAFETY INSTRUCTIONS.
SAVE THESE INSTRUCTIONS.
This manual contains import ant safet y and operat ing instruct ions.
®/MD
Question and Answer IconNeed help?

Do you have a question about the Motomaster Nautilus and is the answer not in the manual?

Summary

Introduction

Important Safety Instructions

Crucial safety guidelines to follow for safe operation and to prevent hazards.

Warning: Risk of Explosive Gases

Warns about explosive gases generated by lead-acid batteries and necessary precautions.

Personal Safety Instructions

Personal safety measures to take when working near lead-acid batteries.

Safety

Connecting Your Battery

Controls and Indicators

Charging Your Battery

Using Reconditioning Mode

Guidelines for using reconditioning mode to restore battery capacity.

Understanding Factors Affecting Charging Time

Understanding the Multi-Stage Charging Process

Maintenance and Care

Troubleshooting;Fault Codes

Error Code 888

Troubleshooting for when the charger does not detect a battery.

Error Code F01

Troubleshooting for low battery voltage after charging begins.

Error Code F02

Troubleshooting for when battery voltage is too high.

Error Codes F03-F06

Troubleshooting for charge rate, temperature, maintenance mode, and polarity errors.

Overview

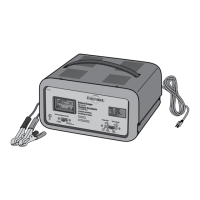
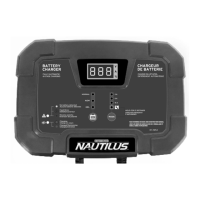
This document describes the MotoMaster Nautilus Battery Charger, Model no. 011-1973-2, a fully-automatic, 6-stage battery charger designed for various 12-volt lead-acid batteries.

Function Description

The MotoMaster Nautilus Battery Charger is an advanced device engineered to charge and maintain 12-volt lead-acid batteries. Its primary function is to provide faster, easier, and safer battery charging, while also aiming to maximize battery performance and extend battery life. The charger employs a 6-stage charging process, which includes Desulphation, Soft Start, Bulk, Absorption, Analyze, and Maintain stages, to ensure optimal charging for different battery conditions. It is suitable for charging batteries with capacities ranging from 10 to 300 Amp-hours and maintaining batteries from 10 to 500 Amp-hours. The charger also features a special Reconditioning mode to address capacity loss due to sulphation or stratification in deeply discharged or poorly maintained batteries.

Usage Features

The charger is designed for use with all types of 12-volt lead-acid batteries, including Wet (flooded), Maintenance-free (MF), Calcium (Ca), Enhanced Flooded (EFB), Absorbed Glass Mat (AGM), and Gel batteries.

Connecting Your Battery: Before connecting, ensure the area around the battery is well ventilated and clean the battery terminals. If removing the battery from a vehicle, always disconnect the grounded terminal first. For batteries installed in a vehicle, connect the POSITIVE (RED) clip to the POSITIVE battery post and the NEGATIVE (BLACK) clip to the vehicle chassis or engine block, away from the battery, carburetor, or fuel lines. For batteries outside a vehicle, connect the POSITIVE (RED) clip to the POSITIVE battery post and the NEGATIVE (BLACK) clip to a 6-gauge insulated battery cable attached to the NEGATIVE battery post, ensuring the free end of the cable is as far away from the battery as possible before connecting the charger clip. Always connect the charger clamps to the battery before plugging the AC cord into an electrical outlet.

Controls and Indicators: The charger features a digital display that alternates between showing Volts (V), Amperage (A), and Battery State of Charge (%). It can also display Fault Codes if a charging error occurs.

  • Volts: Displays the actual charging voltage, which can reach up to 14.4 V.
  • Amps: Shows the actual charging amperage. While you can select 2 A, 8 A, or 15 A charge modes, the charger adjusts the actual current based on battery feedback.
  • Stage of Charge: Indicates the approximate battery state of charge, from "LO" (below 50%) to "100%" (fully charged), displaying in 10% increments. After about 30 minutes of full charge, the display enters a power-saving mode and turns off.
  • Fault Codes: If an abnormal condition is detected, charging stops, and a fault code (e.g., "F01") may be displayed, accompanied by an illuminating LED.
  • Fault/Error Indicator (B): An LED that lights up if a problem is detected. Amber (solid) indicates no battery detected or a severely discharged battery. Red (blinking) signifies a fault that aborted charging. Red (solid) indicates reverse polarity.
  • Charge Status Indicator (C): A blinking LED indicates the battery is charging. A solid LED means charging is complete, and the charger has entered the Maintain stage.
  • Battery Type Selector (D): The "12V" button allows selection of battery types: NORMAL (14.4 V for Wet, MF, Ca, EFB, and many AGM), AGM (14.8 V for some AGM), and GEL (14.1 V for most Gel batteries). The charger retains the last selected mode in memory.
  • Charging Modes Selector (E): The "MODE" button cycles through 2 A, 8 A, and 15 A charging modes. To select the special RECONDITIONING mode, hold the MODE button for 3 seconds. Charging begins automatically about 5 seconds after mode selection. The charger also retains the last selected mode in memory.

Charging Process:

  1. Connect the charger clamps to the battery.
  2. Plug the charger AC plug into an electrical outlet.
  3. Press the "12V" button to select the battery type.
  4. Press the "MODE" button to select a charging program. If no selection is made within 5 seconds, the charger defaults to the last selected mode.
  5. The indicator turns solid green and the display reads "100%" when the battery is fully charged.
  6. To stop charging, disconnect the charger AC plug from the electrical outlet.

Reconditioning Mode: This mode is used for 12 V lead-acid batteries suffering from capacity loss due to sulphation or stratification. It can help restore lost battery capacity. It is recommended to recondition your battery once per year or after deep discharges. For best results, fully charge the battery normally before using this mode. A reconditioning charge can take up to 4 hours. CAUTION: This mode uses a high charging voltage and may cause water loss. It is best suited for wet (flooded) batteries with removable vent caps. It is not recommended for AGM or Gel batteries. Disconnect the battery from the vehicle or other equipment to minimize risk to sensitive electronics.

Factors Affecting Charging Time: Charging time is influenced by:

  • Battery Depth of Discharge: Deeper discharge means longer charging time.
  • Battery Size: Larger capacity batteries require more time to charge at the same current.
  • Battery Age and Condition: Older batteries with increased internal resistance take longer to accept current.
  • Battery Type: AGM and Gel batteries, with lower internal resistance, can charge faster than traditional wet battery types.
  • Charge Rate: Higher charge rates lead to faster charging, but excessively high rates can cause overheating and premature battery failure. A good rule of thumb is 1/10th of the Amp-hour capacity.
  • Cold Temperature: Cold temperatures slow down the chemical reaction, increasing charging time.

Maintenance Features

To ensure the longevity and proper functioning of your MotoMaster Nautilus Battery Charger, follow these maintenance guidelines:

  • After each use, wipe clean the cords and clamps.
  • Store the power and output cables neatly to prevent damage.
  • The charger housing can be cleaned with a damp cloth and a mild cleaning agent.
  • Always unplug the charger when not in use.
  • Store the charger in a cool, dry place.

Troubleshooting/Fault Codes: The charger continuously monitors charge progress and provides fault codes on the digital display if an abnormal condition is detected. Common fault codes and their solutions include:

  • 888 (No battery detected): Ensure clean, solid clamp connections. If connections are good, the battery may be severely discharged (<1.5 V) and unsafe to charge. Check battery voltage with a voltmeter; if less than 1.5 V, replace the battery or try boosting it with booster cables to raise the voltage.
  • F01 (Battery voltage less than 10 V after some time charging): Indicates a defective battery or a load connected to the battery. Replace the battery or disconnect any loads.
  • F02 (Battery voltage too high): Confirm that the battery is 12 V, not 24 V.
  • F03 (Actual charge rate exceeds selected charging rate): A load may be connected to the battery. Disconnect the load and attempt to charge again.
  • F04 (Charger temperature too high): Indicates a charger error, high ambient temperature, or poor ventilation. Disconnect the battery and AC power, then reconnect. Ensure adequate ventilation; the charger will resume after cooling.
  • F05 (Battery does not go into Maintenance mode after 24 hours): The charge current is too low, or there is a load on the battery. Try charging at a higher rate or remove any loads.
  • F06 (Reverse polarity): The battery clamps are incorrectly connected. Reverse clamp connections.

Motomaster Nautilus Specifications

General IconGeneral
TypeBattery Charger
BrandMotomaster
ModelNautilus
Battery Voltage6V/12V
Battery Type CompatibilityAGM, Standard, Gel and Deep Cycle batteries
Safety FeaturesReverse polarity protection

Related product manuals