Selecting a Trunked Zone and Talkgroup
1. Turn Zone Selector knob to appropriate trunked zone.
2. + or ? until you see desired preprogrammed talkgroup on the display.
Sending a Trunked Call
1. Press PTT. If trunked system access was successful — LED = steady red;
if unsuccessful — LED = blinking red; low pitched tone sounds.
2. Speak clearly into microphone. Release PTT to listen.
Selecting a Conventional Zone and Channel
1. Turn Zone Selector knob to appropriate conventional zone.
2. + or ? until you see desired conventional channel on the display.
Sending a Conventional Call
• Press PTT and speak clearly into microphone. LED = steady red while call is
being sent. Release PTT to listen.
Receiving a Trunked or Conventional Call
•Turn Zone Selector knob to desired trunked or conventional zone. Make sure
PTT is released. When a call is received, the LED blinks red.
Making a Selective Call
1. From Selective Call menu, select or enter desired radio ID number.
2. Press PTT to send the call. The radio sounds a continuous tone.
3. Press PTT and talk; release PTT to listen.
Receiving a Selective Call
• When a Selective Call is received, the radio displays F symbol and name or
ID of calling radio; the LED blinks yellow. Press PTT to answer.
Sending a Call Alert™ Page
1. From Call Alert menu, select or enter desired radio ID number.
2. Press PTT to send the page. You will see Call In Prog (if programmed).
3. If received by target radio, you will see Acknowledge; if not received, you will
see No Acknowledge.
Receiving a Call Alert™ Page
• When a Call Alert page is received — radio continuously sounds 4 alert tones
and displays F symbol until you respond. Press PTT to answer; press any
other key to cancel.
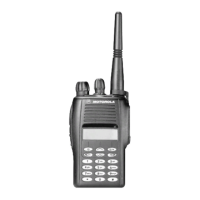
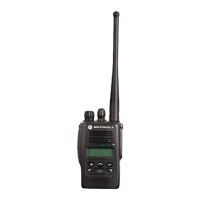
EX560•XLS
™
Radio Quick Reference Card
Record the functions for your radio’s programmable buttons in the table provided
below. For further information, see pages 12 and 13 in this User’s Guide.
LCD Screen
Microphone
(programmable)
Side Button 1 (A)
(programmable)
Top Button (C)
LED Indicator
Push-to-Talk
Button
Zone, Talkgroup, or
On/Off Volume Knob
Menu Keys
(programmable)
(programmable)
Side Button 2 (B)
(P1, P2, P3)
Channel Selector Knob
(Programmable)
Button Function Short Press Long Press Hold Down Page
M
EX560XLS.book Page 63 Thursday, September 27, 2007 3:28 PM
 Loading...