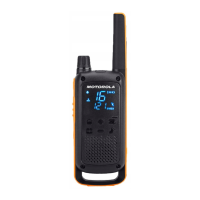
Radio Display
1
2
3
4
9 10
8
11
13
14
15
16
12
5
6
7
17
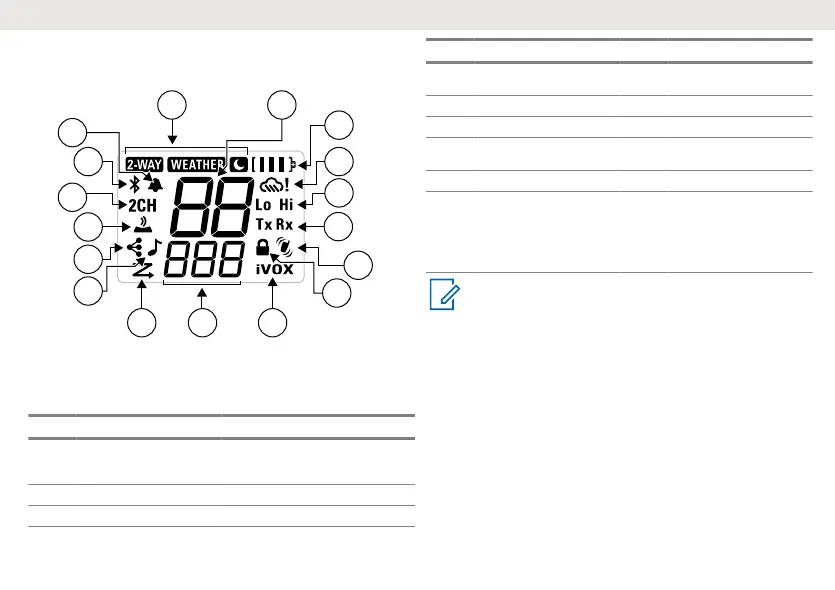
Figure 2: Radio Display for T802 and T803
Table 2: Radio Display Components
No. Name No. Name
1 Mode 10 iVOX [OFF, L1,L2,
L3]; VOX [OFF,
L1,L2, L3]
2 Roger Tone [On/Off] 11 Keypad Lock
3 Bluetooth [On/Off] 12 Vibracall [On/Off]
No. Name No. Name
4 Dual Watch [On/Off] 13 Status (Transmit/Re-
ceive)
5 Keypad Tone [On/Off] 14 Power (High-Low)
6 Easy Pairing [On/Off] 15 Weather Alert
7 Call Tone [number] 16 Battery (3 Battery
Levels)
8 Scan 17 Channel
9 Interference Elimina-
tor Code Number
(used for Call Tone)
On/Off; OFF/L1/L2/L3
(used for IVOX and
VOX)
Note: After the last button is pressed, the radio screen dims
after five seconds. After another five seconds, the radio screen
turns off for battery saving purposes, with only the LED blinking.
To resume the display, you must press any button except the
Flashlight button.
Getting Started
This section helps you to get familiar with the basic operations of the
radio.
Personalization Stickers
Stickers are provided to personalize and keep track of radios. You can
use permanent markers for blank stickers.
Installing Batteries
The radio can use either one NiMH rechargeable battery pack or three
AA alkaline batteries. The radio beeps when the battery levels are low.
1. Turn the radio off.
English
7

 Loading...