Do you have a question about the MSI Z68A-GD55 series and is the answer not in the manual?
Legal notice regarding the document's intellectual property and usage rights.
List of registered trademarks and their owners mentioned in the manual.
Details the version history of the manual, including release dates.
Provides contact information and resources for obtaining assistance with the product.
Critical guidelines for safe operation and handling of the mainboard to prevent damage or injury.
Information on compliance with FCC regulations regarding radio frequency interference.
Information on the proper disposal and recycling of electronic equipment according to EU directives.
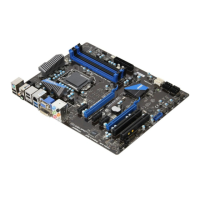
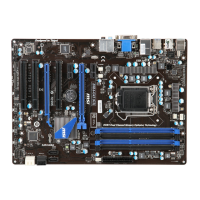
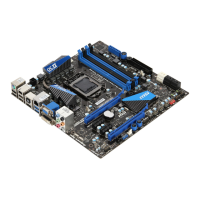
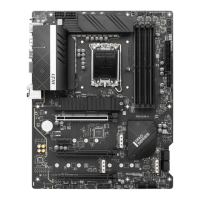
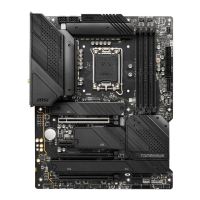
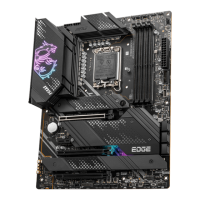
Diagram illustrating the placement and identification of key components on the mainboard.
Detailed technical specifications of the mainboard, including chipset, memory, and connectivity.
Description and location of various connectors available on the back panel and on-board.
Information on available PCI Express and PCI slots for expansion cards.
List of items included in the mainboard package.
List of optional accessories that can be purchased separately for enhanced functionality.
Visual guide identifying major components and their locations on the mainboard.
Instructions for correctly positioning the mainboard in the chassis using screw holes.
Details on installing and handling the CPU, including thermal paste and overheating precautions.
Step-by-step instructions for securely installing the CPU and its cooler assembly.
Information on installing DDR3 memory modules and understanding Dual-Channel mode.
Procedure for correctly inserting memory modules into DIMM slots for optimal seating.
Connection details for ATX 24-pin and 8-pin power connectors to the mainboard.
Description of ports and connectors located on the mainboard's rear I/O panel.
Details on various on-board connectors for storage, fans, and audio.
Information on the serial communication port for connecting legacy devices.
Setup for front panel USB 2.0 ports, including Super-Charger technology.
Setup for front panel USB 3.0 ports, including SuperSpeed data transfer.
Connection for front panel audio jacks, compliant with Intel Front Panel I/O.
Details on connecting an optional Trusted Platform Module for enhanced security.
Connection for digital audio output via S/PDIF interface.
Connector for chassis intrusion detection switch to alert on unauthorized access.
Connections for front panel power switches, LEDs, and reset buttons.
Overview of on-board buttons like OC Genie, Power, and Reset for system control.
Locations for measuring key system voltages using a multimeter for diagnostics.
Explanation of LED indicators for CPU power phases and BIOS status.
Configuration of jumpers, specifically the Clear CMOS jumper for system settings.
Information on PCI Express and PCI slots, including interrupt request routing.
Instructions on how to access the BIOS Setup menu during system startup.
Explanation of keyboard and mouse controls used within the BIOS interface.
Overview of the main BIOS interface, including access to different configuration sections.
Settings related to power management and energy saving features.
Access to system utilities like Memory Test, Live Update, and HDD Backup.
Advanced settings for adjusting CPU and memory frequencies for performance enhancement.
Includes simple games available within the BIOS interface for entertainment.
Configuration options for system date, time, SATA ports, and general system information.
Detailed configuration options for PCI, ACPI, integrated peripherals, and hardware monitoring.
Setup for administrator and user passwords, and chassis intrusion detection.
Configuration of boot device priorities, boot logo, and related settings.
Options for saving changes, discarding them, restoring defaults, and exiting the BIOS.
Step-by-step guide for installing the necessary drivers for the audio codec.
Overview of the Realtek HD Audio Manager panel for configuring sound settings.
Diagrams illustrating default audio jack connections for various speaker configurations.
Overview of Intel RAID capabilities, supported levels, and features.
Instructions for accessing and using the Intel RAID configuration utility during boot.
Procedure for creating new RAID volumes, selecting RAID levels, and configuring disks.
Steps to delete existing RAID volumes, with a warning about data loss.
Process to reset RAID disks to their original non-RAID state.
Configuration settings for managing RAID recovery volumes and update policies.
Guide for installing Intel RAID drivers during operating system installation.
Procedures for handling degraded RAID arrays, including replacing failed drives.
Instructions for enabling SSD caching to improve system performance with RAID.
Manual synchronization process for Intel Rapid Storage Technology to ensure data consistency.
| Socket | LGA 1155 |
|---|---|
| Chipset | Intel Z68 |
| Form Factor | ATX |
| Memory Slots | 4 |
| Max Memory | 32GB |
| Memory Type | DDR3 |
| PCI Express x16 | 2 |
| PCI Express x1 | 2 |
| SATA 6Gb/s | 2 |
| SATA 3Gb/s | 4 |
| USB 3.0 | 2 |
| Audio | Realtek ALC892 |
| LAN | Realtek 8111E |
| RAID Support | 0, 1, 5, 10 |
| Memory Standard | DDR3 1066/1333/1600 |