Assembly& Set-Up
3
Contents of Carton
One Log Splitter
One Tongue Assembly
One Operator's Manual One Engine Operator's Manual
l_ll WARNING! Use extreme caution when unpacking
this machine. Some components are very heavy and
will require additional people or mechanical
handling equipment.
NOTE:All references in this manual to the left or right side of the
log splitter are from the operating position only. Exceptions, if
any, will be specified.
Assembly
Attaching the JackStand
The jack stand is shipped in the transport position.
1. Remove the spring clip and clevis pin and then pivot the
jack stand towards the ground into the operating position.
2. Secure the jack stand in position with the clevis pin and
spring clip. See Fig. 3-1.
!
Clevis Pin
Attachingthe Tongue
1. With the log splitter still standing upright, remove the two
hex bolts and hex nuts from the tank bracket. See Fig. 3-2.
(_ Tongue He× Nuts "_
Tank Bracket .......
J
2.
Figure 3-2
Align the holes in the tongue with the holes in the tank
bracket and secure with the hardware just removed. See
Fig. 3-2.
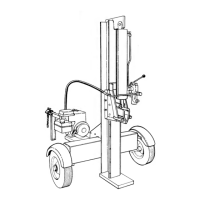
NOTE:The high pressure hose, which runs from the gear
pump the bottom of the control valve, must be above the
tongue assembly. See Section 9 (Illustrated Parts List) if you
are unsure of which hose is the high pressure hose.
Figure 3-1