9 +12V TRIGGER IN: This input allows the M2 to be switched remotely
to standby mode or ON by ancillary equipment, such as an amplier,
preamp, AV processor, etc. The controlling device must be equipped
with a 12 V trigger output to use this feature.
10 +12V TRIGGER OUT: The +12V TRIGGER OUT is used for controlling
external equipment that is equipped with a +12V trigger input. This
output will be 12V when the M2 is ON and 0V when the unit is either
OFF or in standby mode.
11 RIGHT SPEAKERS: Connect the right speaker to the terminals marked
“R +” and “R-” ensuring that the “R+” is connected to the “+” terminal
on your loudspeaker and the “R-” is connected to the loudspeaker’s “-”
terminal. There are two sets of RIGHT SPEAKER outputs and these are
identical in function (parallel connection) and are provided for ease of
Bi-wiring with heavy audiophile cables. Double check your speaker
connections before powering up the M2.
Always use heavy duty (16 gauge; 1.5mm, or thicker) stranded wire
to connect loudspeakers to your M2. The high-current binding post
terminals can be used as a screw terminal for cables terminating in
spade or pin sockets or for cables with bare wire ends.
BI-WIRING
Most modern high quality loudspeakers oer the option of Bi-wiring.
This separates the HF crossover from the LF crossover and oers
enhanced performance by preventing LF return currents from aecting
the HF performance. If you decide to bi-wire, be sure to remove the
“links” at the loudspeaker that connect the LF and HF sections (these are
provided for convenience when single wire connection is used). Your
loudspeaker instruction manual should cover this subject as well.
WARNING
The M2 employs a “oating” ground design. External devices (such as
speaker switching or headphone adaptors) that connect the left and
right channels together must not be used with the M2. Left and right
channels must never be connected to each other.
12 POWER SWITCH: The POWER switch supplies the master AC mains
power for the M2. When this switch is at ON position, the M2 is in
standby mode as shown by the amber status condition of the standby
LED. Toggle the front panel’s STANDBY button to switch ON the M2 or
back to standby mode. If you intend not to use the M2 for long periods
of time (such as when on vacation), switch the POWER switch to the
OFF position. When the POWER switch is at OFF position, the front
panel STANDBY button or M2 remote control cannot activate the M2.
13 AC MAINS INPUT: The M2 comes supplied with a separate AC Mains
cable. Before connecting the cable to a live wall socket ensure that
it is rmly connected to the M2’s AC Mains input socket rst. Always
disconnect the AC Mains cable plug from the live wall socket rst,
before disconnecting the cable from the M2’s Mains input socket.
14 FUSE HOLDER: In the unlikely event a fuse may need to be replaced,
unplug the AC cord from the wall. Disconnect also the AC cord from
M2’s AC Mains input socket. Then, remove all connections from the
amplier. Use a athead screw or similar to open the fuse holder via the
slot located on the top edge of the fuse holder. With the screw driver
in place, push it outward to unlatch and open the fuse holder. Only
replace the fuse with the same type, size, and specication.
IMPORTANT NOTICE
Do not use any substitute fuses of dierent types, ratings or values.
Failure to observe this precaution may cause damage to the amplier
circuits and may create a re hazard and/or defeat the safety built into
the M2 thus voiding the warranty.
15 LEFT SPEAKERS: Connect the left speaker to the terminals marked “L
+” and “L-” ensuring that the “L+” is connected to the “+” terminal on your
loudspeaker and the “L-” is connected to the loudspeaker’s “-” terminal.
There are two sets of LEFT SPEAKER output and these are identical in
function (parallel connection) and are provided for ease of Bi-wiring
with heavy audiophile cables. Refer also to “RIGHT SPEAKERS” above.
16 RS-232: Connect this interface via RS-232 serial cable (not supplied)
to any Windows® compatible PC to allow remote control of the M2
through NAD’s proprietary PC software or other compatible external
controllers. NAD is a certied partner of AMX, Control4, Crestron and
Savant and fully supports these external devices. See your NAD audio
specialist for more information.
17 IR IN: This input is connected to the output of an IR (infrared) repeater
(Xantech or similar) or the IR output of another component to allow
control of M2 from a remote location.
18 GROUND TERMINAL: The M2 requires a grounded AC receptacle or a
separate earth ground. Use this terminal to properly ground your M2. A
ground lead wire or similar can be used to connect the M2 to ground
via this ground terminal. After insertion, tighten the terminal to secure
the lead.
BARE WIRES AND PIN CONNECTORS
Bare wires and pin connectors should be inserted into the hole in the shaft
of the terminal. Unscrew the terminal’s bushing until the hole in the screw
shaft is revealed. Insert the pin or bare cable end into the hole and secure
the cable by tightening down the terminal’s bushing. Avoid any danger
of bare metal from the cables touching the rear panel or another connector.
SPADE CONNECTORS
These should be slotted under the terminal’s screw bushing, which is then
fully tightened. Ensure the connector is tightly secured and there is no
danger of bare metal from spade connectors touching the rear panel or
another connector as this may cause damage.
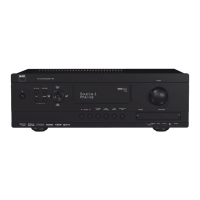
IDENTIFICATION OF CONTROLS
REAR PANEL
9
ENGLISHFRANÇAISESPAÑOLITALIANODEUTSCHNEDERLANDSSVENSKAРУССКИЙ

 Loading...