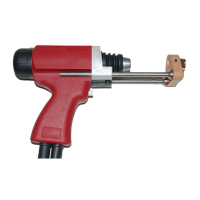
NS20A & NS20N Heavy Duty Gun Page 12 Revision 1.20 2/19/08
MAINTENANCE INSTRUCTIONS
Examination and Cleaning of Gun Parts
A. The inside diameters of adjustable core screw
(9), the lifting ring (18d) and mating diameters
on the lifting rod should be carefully examined
for wear or rust. Although the lubrication
should prevent any oxidation on these surfaces,
if they reveal signs of dirt or a dull reddish
brown stain, clean and polish with a fine (600
grit or finer) abrasive paper.
Disassembly of the lifting module should not be
necessary to inspect or clean the lifting ring,
item (18d). However, if the lifting ring shows
signs of wear or excessive dirt the module may
be disassembled as described in the Gun
Disassembly Procedure (Step 7). Mark the
position of the lifting ring. When reassembling,
consult Figure 8. The lifting ring should be
rotated 180° so the lifting hook engages the
unused hole or “window” in the lifting ring to
distribute the wear evenly. This will maximize
the life of the gun.
B. Lubricate lifting rod and cable clamp assembly
(13) surfaces with a thin coat of high
temperature bearing grease, Lubrico M-24-M
(#523-001-013) or equivalent.
NOTE: Do not over-lubricate.
Reassembly of Gun
A. Step-By-Step reassembly of gun - refer to
exploded view.
1. Reassembly of lifting module assembly
(Figure 8)
Insert ring core spring (18b) into lifting
module housing (18a). Install the lifting
ring (18d) onto the lifting hook and
movable core assembly (18c) by inserting
the hook through a "window" of the lifting
ring (18d) with the flat side of the ring
towards the lifting hook and movable core
assembly.
NOTE: The lifting ring should be
reinstalled, rotated 180° from the position it
was in when removed, to distribute the wear
evenly.
Insert the assembled lifting ring and lifting
hook and movable core assembly into the
lifting module housing (18a). Place lifting
module stop (18e) in position, flat side
towards lifting ring and apply thumb
pressure depressing the lifting mechanism
into the lifting module housing. Complete
the assembly by reinstalling the internal
retaining ring (18f).
2. Replace the lifting module assembly (18)
and the main spring (7) in the gun body.
3. Reinstall the plunge dampener assembly (5)
by extending the piston rod of the plunge
dampener. Insert the plunge dampener into
front cover (2). Inspect the O-Ring (8) on
the free travel adjustment sleeve (10) and
replace if necessary. Screw the free travel
adjustment sleeve in place.
4. Inspect and replace if necessary front
bearing (19) in front cover. Install lifting
rod (13) through rear of front cover.
Engage the hook of lifting rod on the spool
of plunge dampener.
5. Reinstall the front cover (2) and lifting rod
(13) into gun inserting the lifting rod
through main spring (7) and lifting module
assembly (18). Secure front cover with
cover nuts (17).
6. Install dust seal bellows (4) over lifting rod
and screw shaft extension (13a) into lifting
rod. Torque to 20-25 ft. lbs. Install cable
onto shaft extension and secure with chuck
adaptor (31).
7. Reinstall foot and leg assembly. Adjust the
plunge, free travel, and lift.
8. Replace rear cover (3) and secure with
screw (35).