1
Network Camera Installation Manual
1. Hardware installation
1.1 Hardware connection
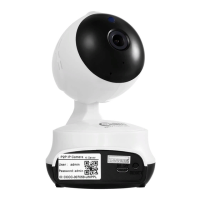
Connect the power supply and network cable. Check if the power indicator
(green) and the network indicator (yellow) is working properly. Then the
camera head will rotate automatically.
Note: picture is for reference only. Actual product may vary.
Power indicator: Green LED is on while power is on.
I/O port:Connect to a PIR or alarm sensors.
Network indicator: Yellow LED blinks when transferring data
Power supply: 5V
RJ45: Connect to the WiFi router
SD slot: Micro SD card
WIFI antenna: Receiving a wireless signal
Audio output: Connect to a speaker.
To reset the camera, please find the “RESET” button at the bottom of the pan and
tilt camera or at the end of the tail wire of the dome camera. Then use paper clip
to reach the reset button to press and hold for 30 seconds until you hear ticking
noise and/or device rebooting. PLEASE NOTE: resetting the camera is only
necessary if you have forgotten the password or moving the camera from one
network to another network.
Tips
T/F
Fig 1.1
WIFI antenna
I/O port
Power input
Power indicator
RJ45
Network indicator
Audio out
Reset Button
SD slot
 Loading...