5.
A(tiustment/tQ!fl
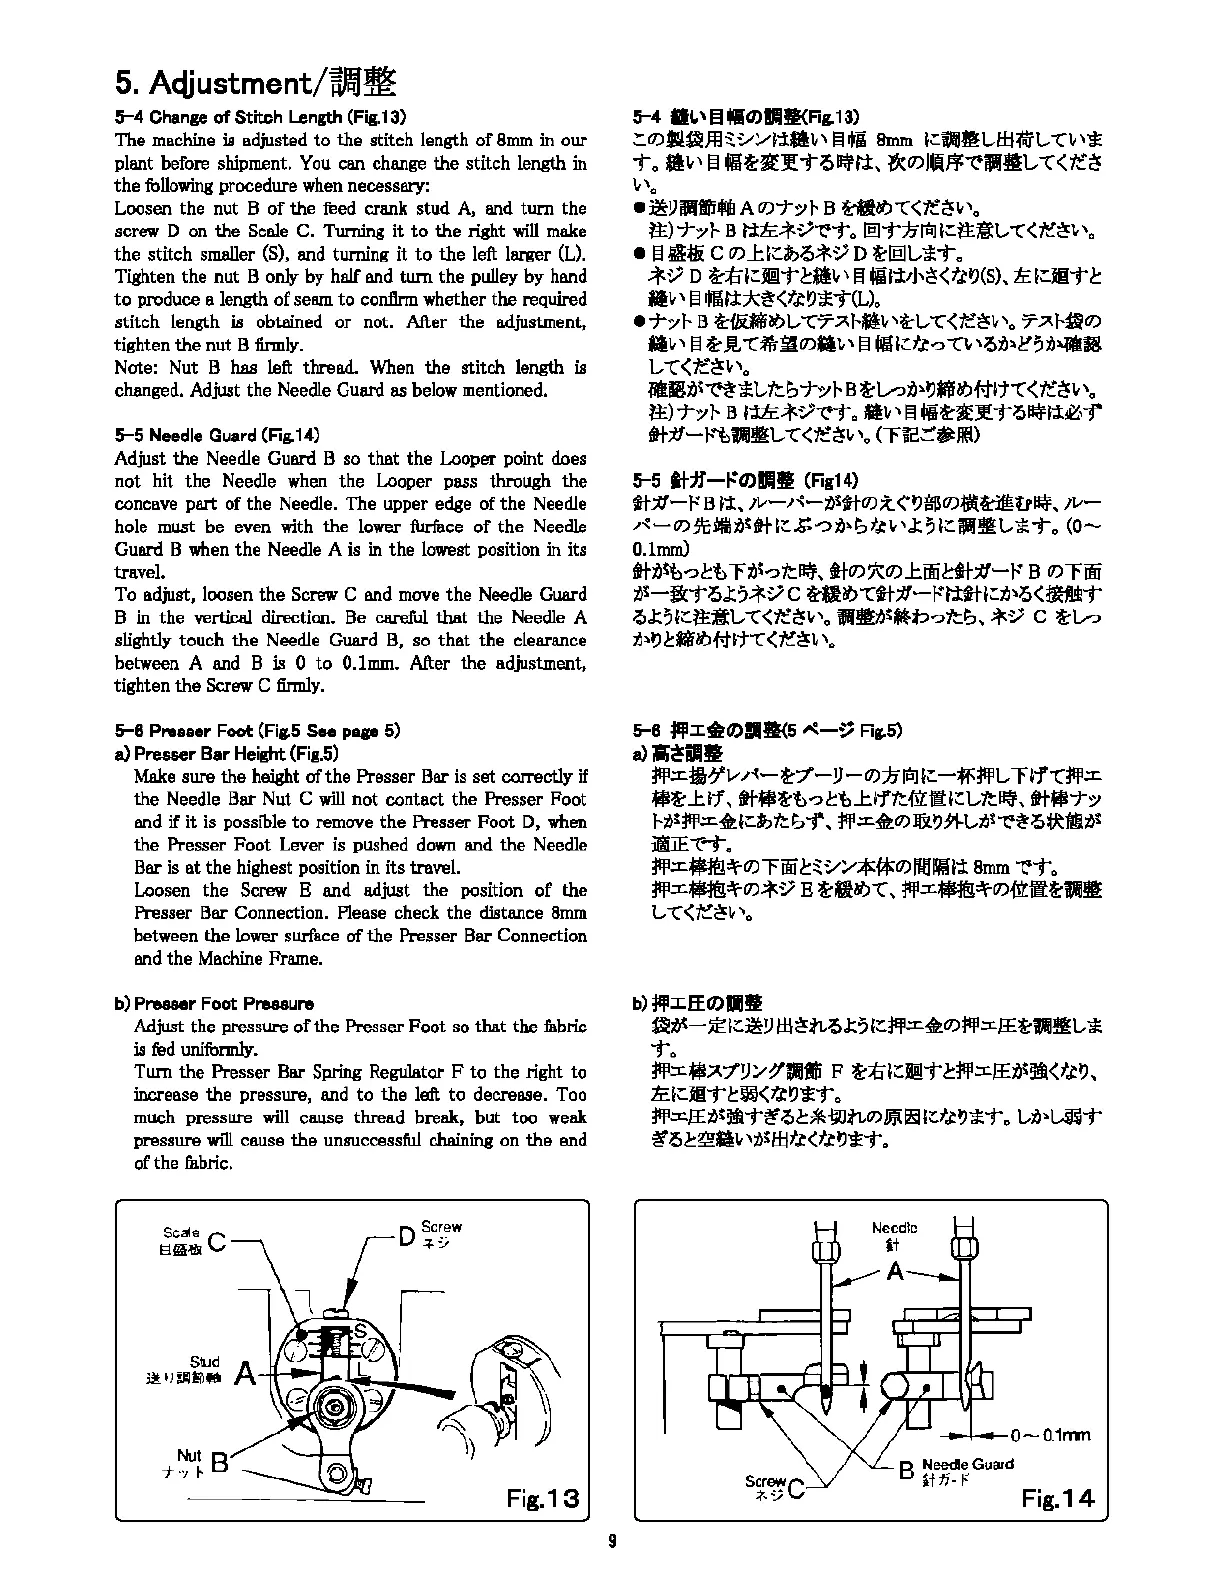
~4
Change
of Stitch
Length
(Fig.13)
The
machine is adjusted
to
the
stitch length
of
8mm
in
our
plant before shipment.
You
can change
the
stitch length
in
the
following procedure when necessary:
Loosen
the
nut B
of
the
feed crank
stud
A,
and turn the
screw
D on
the
Scale
C.
Turning
it
to
the
right
will
make
the
stitch smaller
(S),
and turning
it
to
the
left larger (L).
Tighten
the
nut
B on]y by half and turn
the
pulley
by
hand
to
produce a length
of
seam
to
confirm whether
the
required
stitch length is obtained
or
not. Aft.er
the
adjustment,
tighten
the
nut
B firmly.
Note: Nut
B has left thread. When
the
stitch length is
changed. Adjust the Needle Guard
as
below mentioned.
~5
Needle
Guard
(Fig.14)
Adjust
the
Needle Guard B
so
that
the
Looper point does
not
hit
the
Needle when
the
Looper pass throUgh
the
concave
part
of
the
Needle.
The
upper edge
of
the
Needle
hole must
be
even with
the
lower furface
of
the Needle
Guard
B when
the
Needle A is
in
the
lowest position
in
its
travel.
To
adjust,
loosen
the
Screw C and move
the
Needle Guard
B
in
the
vertical direction. Be careful
that
the
Needle A
slight]y touch
the
Needle Guard
B,
so
that
the
clearance
between A and B is
O
to
0.1mm.
After
the
adjustment,
tighten
the
Screw C tinnly.
~6
Pntaaer
Foot
(Fig.5
See
pap
5)
a)
Presser
Bar
Height
(Fig.5)
Make
sure
the
height of
the
Presser Bar is
set
COJTectly
if
the
Needle
Bar
Nut C will
not
contact
the
Presser Foot
and
if
it
is possible
to
remove
the
Presser
Foot
D,
when
the
Presser
Foot
Lever is pushed
down
and
the
Needle
Bar is
at
the
highest position
in
its
travel.
Loosen the Screw B and ad.just
the
position
of
the
Presser Bar Connection. Please check
the
distance 8mm
between
the
lower
surface of
the
Presser Bar Connection
and
the
Machine Frame.
b)
Presser Foot Pressure
Adjust the pressure
of
the
Presser
Foot
so
that
the
fabric
is
fed
uniformly.
Turn
the
Presser Bar
Spring
Regu]ator F to
the
right to
increase
the
pressure, and to
the
left
to
decrease.
Too
much pressure
will
cause thread break,
but
too weak
pressure will cause
the
unsuccessful chaining
on
the
end
of the mbric.
Sca
le C
S!Ri~
Nut
B
-r·
:;
I-
Fig.13
9
~•
a1.,
l!l
•0•1f<Fig.1
a>
~O)IU~ffl~~YJ'i:.1,'
El
.I
8mm
l.:1,\Hlt.A±i7-G't..
"'(1,Yi
To
fii,,
El
-~~J!To~tJ:,
*17)JU(J¥~111tt..
--c<tt-ts
\,\,
•~!Jillffifdl
A
0)77}-
B
ait~-C<te-ts1,,o
1±)
'To/
t-
B t.tft-*
~~To
~Tjj~
l.:&•t..
--C
<
r.:~v
'a
•
B•tt
C
17)J::l::ib.S*~D
~~L-*To
*~
D t,til::!11--t~ai,'
I!!
tll'11J,~<t.ttJ(S),
ftl::Jll--t.!::
til1i,
El
iMtJ:*~<tl~t*"'t<L)o
•1"o/r
B
~flil'laf)L,
--C7Af-ltt,,t,l,
--C<te~1,,o
7AJ-Ql7)
a1i, B
~
.i.
-c~:i1.11)a1,,
B Cll.:t.t--:>--C"''°""t°?ti~•
l,
--C<'fe~l,
\o
illMil~~~:fl,'ft~-ro/l-B~L--?tJi.tJ.W~#lt-C<tt~1,\,
i±)"To/r
B 1'1ft*V~T
••
1,,
El
·~~J!To~l'i:~,-r
ttP-t-~
at!!IL-
--c
<tt~1,
'o
(rE.::.'•
JffO
~5
ttfl-i:0••
(Fig14)
ttP-l-'
B
•-1,
1v-.1~-t,Sftl1)
*.
~tJi617)•~tr~,
1v-
r~-11)
.9f:J4UStH::~-?tii.lI,t.n
,.,t;
l::!1.l!RL-*T
O
(0-
0.lmm)
ttti~?.!::b
ril~?'ft~,
ftl7)1cO)J::ffi~;t/-f: B
17)""fffi
t,s-!fcTo.t;*~
c
~ao--cttff-t:t.tttl::ti\o<BT
.S.t::it::1±B:L---C<tt~1,,
0
flf!1)S.b?'ft~,
*V
C ~l--?
tJ'-tJ~-ab#lt--C
<~~l,
'·
~6
jip:c*O>IHIC5
~-~
Fig.5)
a)jlj~--
jlp;r.it~v .1~-~7"-!J-17)JJ~t.:-~¥Pt...
ri1--c¥P;r.
-~
J::lf, tt•~b?.!::bl:lf'ftttt:IU::t..'ft~,
tt•-ro/
f-tJ!jlp;r..f;::cb'ft~-r,
jlp:::c..O)J&t;)~L,tJS~~o~fllit,i
iliE--C-t.,
jlp:::c.·#}~17)rffi.!::$;~Y*f*O)IJU~l-;t
8mm
~To
¥P:::c.n~l7)*vE~•~--c,~:::c.n~l7)~•~••
l.,
--C<'fe~l,
'o
b)
jlp:cEEO>II•
~~-~·=~!J
l±i~.tL,o.t;1::¥11:::c.~11)jlp:::c.J£~al!!IL-*
To
jlp:::c..A
:l°!JY
!/1,IJtli
F
~:;{:jl;::Jl!1T
.!::jlp:::c.J£t,~!Mt<
flt),
ftl.:fflT
.!::ffil<t.ttJj:T
Q
jlp:::c.J£t,S!Mt--t~
,o.!::*Wti,17)
ffi
ml
1::tttJ*T o
t..t>i.
L-ftT
~Q~~-1,,t,tlfitt<fttJ°*T·
---
-o-o.1rrm
B
Needle
Guard
if
;Ii-
t-'
Fig.14
From the Library of Superior Sewing Machine & Supply LLC