EasyManua.ls Logo

Next MILANO 896267 User Manual

Next MILANO 896267
8 pages
To Next Page IconTo Next Page
Page #1 background imageLoading...
Page #1 background image
Tools Needed
Helpline
If you have any problems with this product or require
any replacement fittings please contact Customer
Services Tel: 0333 777 8999
• Keep fittings out of children's reach and keep children well away from the construction area.
ASSEMBLY INSTRUCTIONS
Regrettably self assembly items cannot be returned once assembly is part or fully completed unless the item is found to be
faulty. Should you need to return the unassembled product, please repack in the original packaging.
IMPORTANT
• Carefully check that you have all parts before beginning assembly.
• We suggest you spend a short time reading through this leaflet and then follow the simple step-by-step instructions.
IMPORTANT - RETAIN FOR FUTURE REFERENCE - READ CAREFULLY
896267 MILANO BLACK GLOSS
SMALL SIDEBOARD
• Wall fixings are not included.
• A minimum of two persons is required to assemble this product.
• Do not use furniture polish.
• All assembly fixings should always be tightened properly and periodically check all fixings and tighten if necessary.
• Do not put hot dishes directly on the surfaces of the item.
• Ensure the product is protected with mats and coasters when items are placed on the surfaces, to prevent scratching or
damage.
• Avoid keeping furniture in direct sunlight or close to any heat sources as this can cause cracking, discolouration or
warping.
• Made in China.
CARE INSTRUCTIONS
•Gloss finishes are prone to light surface scratch and it is therefore very important that
you care for this item correctly.
• Do not rub or scrub the surface when cleaning.
• Any spills should be removed immediately with a soft clean damp cloth and dried immediately.
• Never drag pieces of furniture across the floor as this will cause damage to the joints.
• Keep fittings out of children's reach and keep children well away from the construction area.
• We recommend that the packaging is used to protect the surfaces during assembly.
• We recommend the use of the wall attachment bracket/strap provided for safety reasons.
PRODUCT INFORMATION
• Made from PB,MDF,hollow board & Honeycomb board with a pvc foil finish.
• For general cleaning, periodically dust with a soft clean lint-free cloth or a soft micro fibre cloth. Please note soft cloths
(including yellow dusters) contain abrasive fibres which can lightly scratch the surface, if in doubt please try your cloth in
an inconspicuous area of the furniture first to assess its suitability. A sample of a suitable cloth for cleaning is included
within the hardware pack
Page 1 of 8
Question and Answer IconNeed help?

Do you have a question about the Next MILANO 896267 and is the answer not in the manual?

Next MILANO 896267 Specifications

General IconGeneral
BrandNext
ModelMILANO 896267
CategoryIndoor Furnishing
LanguageEnglish

Summary

Important Safety and Assembly Guidance

Important Assembly Instructions

Read through the leaflet and follow step-by-step instructions. Check all parts before assembly. Keep fittings away from children.

Product Information

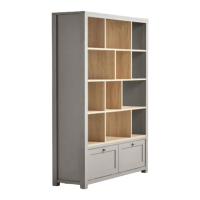
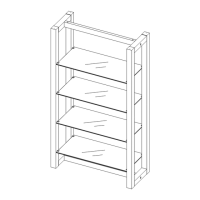
Details the materials used (PB, MDF, hollow board, Honeycomb board) and manufacturing origin (China).

Care Instructions for Gloss Finishes

Guidance on cleaning gloss surfaces to prevent scratches, avoiding abrasive cloths, polish, hot dishes, and direct sunlight.

Assembly Steps

Step One: Attach Side Panels

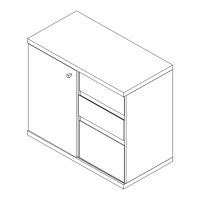
Attach panels 14, 15, and 18 to panel 20 using six screws (G).

Step Two: Insert Drawer Frame Panel

Slide panel 11 into the assembled drawer frame and repeat for the other drawer frame.

Step Three: Attach Back Panel

Insert cambolts (E) into panel 19, add dowels (B) to panels 14, 15, 18, attach panel 19, and insert camlocks (D).

Step Four: Attach Top Panel

Insert cambolts (E) into panel 13, add dowels (B) to panels 14, 15, 18, attach panel 13, and insert camlocks (D).

Step Five: Assemble Outer Frame

Attach panels 16, 17, and 18 to panel 21 using six screws (G).

Step Six: Insert Internal Panel

Slide panel 11 into the assembled drawer frame.

Step Seven: Attach Shelf Panel

Insert cambolts (E) into panel 12, add dowels (B) to panels 16, 17, 18, attach panel 12, and insert camlocks (D).

Step Eight: Prepare Base Panel

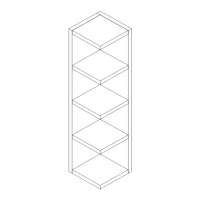
Insert eight cambolts (E) into panel 9 and tighten.

Step Nine: Attach Base to Sides

Attach panel 9 to panels 3, 1, and 2 using nine screws (K) with an Allen key (L).

Step Ten: Attach Drawer Supports

Glue and insert eight big wooden dowels (A) into panels 4 (x2) and attach panels 4 to panels 1 and 2.

Step Eleven: Assemble Cabinet Sides

Insert cambolts (E) into panels 7 & 24, add dowels (A) to panels 6 (x2), attach panels 7 & 24 to panels 6, and insert camlocks (D).

Step Twelve: Attach to Base

Add dowels (A) to panel 9, attach the frame to panel 9, and insert camlocks (D) into panels 6, 7, & 24.

Step Thirteen: Insert Back Panels

Turn the unit up and slide panels 10 and 22 into the back panel groove.

Step Fourteen: Attach Top Section

Insert cambolts (E) into panel 8, add dowels (A) to panels 3, 1, 2, attach panel 8, and insert camlocks (D).

Step Fifteen: Install Drawer Fittings

Insert fittings (N) into panels 3 & 1, slide panels 5 onto fittings, and cover camlock holes with stickers (F).

Step Sixteen: Insert Drawer Units

Insert the completed drawer units into the assembled unit.

Step Seventeen: Attach Door and Runners

Secure fittings (M) to panel 23, attach door handles (O), and insert panel 23 into the groove of top panel 8.

Step Eighteen: Install Back Fasteners

Insert 12 plastic fasteners (H) into the back panel grooves and tighten with screws.

Step Nineteen: Wall Securing

Secure nylon straps (I) to the unit and the wall using appropriate fixings for safety.

Related product manuals