17
G
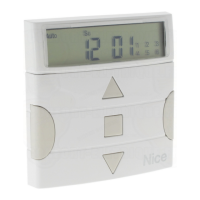
1. Press key ■ repeatedly until the text Auto starts flashing
2. Press key three times to select programming mode Prog
▼
3. Press key to confirm programming mode
▼
4. Press key to confirm events programming
▼
5. Press key three times to select the event copy function COPY
▼
6. Press key to confirm event copying
▼
7. Press key or to select the event to copy. Events are displayed chronologically
according to the order in which they are performed, starting from the most
recent; press to move to the next event, or to move to the previous.
▼
▼
▼
▼
From this point modifications to the copied event are according to the same procedure for programming a new event
(see chapter 5.2.1) in which all properties of the event can be modified or confirmed as required. After modifying and
confirming the last parameter, the copied event is saved as a new event and PLANOTIME is ready for copying another
event; in this case, proceed from point N°6 in this table.
5.2.4) Programming: copying events COPY
For rapid programming of an event similar to one already present, the latter can be copied for subsequent modifica-
tion of the relative parameters.
... Auto
8. Press key to confirm the selected event
▼
or
1. Press key ■ repeatedly until the text Auto starts flashing
2. Press key three times to select programming mode Prog
▼
3. Press key to confirm programming mode
▼
4. Press key to select timer settings
▼
5. Press key to confirm timer settings
▼
5.3) Timer settings
Timer settings are made immediately after inserting the battery, but may require adjustments at other times, such as
when changing from winter time (sun time) to summer time (legal time).
... Auto
7. Press key to confirm the hours
▼
9. Press key to confirm the minutes
▼
11. Press key to confirm the weekday
▼
13. Press key to confirm the day
▼
15. Press key to confirm the month
▼
17. Press key to confirm the year
▼
6. Press keys or to set the hours
▼
▼
or
8. Press keys or to set the minutes
▼
▼
or
12. Press key or to select the day of the month
▼
▼
or
or
10. Press key or to select the day of the week
(Su=Sunday; Mo=Monday; Tu=Tuesday; We=Wednesday; Th=Thursday; Fr=Friday; Sa=Saturday)
▼
▼
o
14. Press key or to select the number of the month
(01=January; 02=February….12= December)
▼
▼
or
16.
Press key
or
to select the year (from 2000 to 2059)
▼
▼
Table 28
Setting the timer
Example
Table 27
Programming an event by copying one already present
Example
Nota: if the special command “planetary time” is used, the hour, minutes, weekday, date, month and year must be set
whether the current time is winter (solar time) or summer (legal time); see table 30.
 Loading...