What does the error "Memory failure on RAM, Clock Error Err a, d" mean on my Nidek Medical Equipment?
- JJoseph MeltonSep 8, 2025
The internal battery may be dead. Turn the power on and leave it on for 24 hours to recharge the battery.
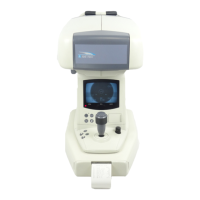
What does the error "Memory failure on RAM, Clock Error Err a, d" mean on my Nidek Medical Equipment?
The internal battery may be dead. Turn the power on and leave it on for 24 hours to recharge the battery.
How to fix a rolling screen on my Nidek Medical Equipment?
The screen may not be horizontally or vertically locked. Adjust it with the H or V control.
What does "" mean on the TV monitor of my Nidek Medical Equipment?
Make sure that the PD measuring window is not blocked.
What does the message "Check measuring window" mean on my Nidek Medical Equipment?
Clean the measuring window. If the measuring window is not dirty, make sure that the measuring window is not blocked on.
| Type | Auto Ref/Keratometer |
|---|---|
| Minimum Pupil Diameter | 2.0 mm |
| Printer | Built-in Thermal Printer |
| Measurement Range (Cylinder) | 0D to ±10D |
| Axis | 1° to 180° |
| Corneal Curvature Radius of Curvature | 5.0 to 10.0mm |
| Corneal Curvature Corneal Refraction | 33.75D to 67.5D |
| Corneal Diameter | 2.0 to 12.0 mm |
| Pupil Diameter | 2.0mm to 9.0mm |
| Target | Internal Fixation Target |
| Display | LCD Monitor |
| Power Supply | AC100-240V, 50/60Hz |
| Pupil Diameter Measurement Range | 2.0mm to 9.0mm |
| Vertex Distance | 0mm, 12mm, 13.75mm |
| Measurement Mode | Auto, Manual |
| Power Saving | Auto power off function |
Overview of the auto ref/keratometer's components and basic functionality.
Purpose and application of the device for vision correction measurements.
Device classifications based on safety and regulatory standards (e.g., Class I, Type B).
Explanation of symbols used in the operator's manual and on the device interface.
Guidelines for safe handling, storage, and installation of the device to prevent damage or injury.
Procedures for safe electrical connection and power cord management to avoid hazards.
Important safety precautions to follow during device operation to ensure user and patient safety.
Safety considerations related to device maintenance, cleaning, and servicing procedures.
Recommendations for safe and responsible disposal of the device components according to regulations.
Identification and explanation of safety labels and warnings affixed to the device.
Detailed description of the TV monitor's display functions, target, and indicators.
Explanation of the display panel showing measurement data, parameters, and status.
Information about the auxiliary button cover and its function for accessing seldom-used buttons.
Functionality and usage of the locking knob for securing the main body to the base unit.
Step-by-step guide outlining the sequence of device operations from power-on to measurement.
Explanation of the auto-off power saving feature and how to recover from it.
Steps required to prepare the device and patient before initiating measurements.
Procedures for performing refractive and corneal curvature measurements on the patient's eye.
Procedure for measuring the corneal size using the device.
Procedure for measuring the pupil size.
Procedure for measuring the pupillary distance (PD) between the eyes.
Procedure for measuring the sagittal radius of the cornea for detailed analysis.
Instructions on how to print measured data and interpret the printout content.
Steps for transferring measured data from the device to an Eye Care card.
Process for importing lensmeter data for patient comparison during examination.
Instructions on how to erase data from the Eye Care card to prepare it for reuse.
Procedure for connecting the optional barcode scanner to the device for patient ID entry.
Steps for scanning and reading patient identification barcodes for data association.
Guide to configuring various device parameters for customized operation and measurement.
Procedure for setting the device's internal date and time for accurate record-keeping.
Instructions on how to input custom comments for printouts and records.
Specific procedures for measuring hard contact lenses using the device.
Steps for replacing the printer paper roll when it is running short.
Procedure for correctly setting the chinrest paper for patient comfort and hygiene.
Instructions for safely replacing blown fuses in the device to restore power.
Methods for cleaning the measuring window to ensure accurate measurements.
Guidelines for cleaning the external surfaces of the device to maintain its appearance.
A list of available replacement parts and their corresponding order numbers.
Detailed technical specifications of the auto ref/keratometer, including ranges and accuracy.
List of standard and optional accessories that can be used with the device.




 Loading...