EasyManua.ls Logo

Niles RCA3 User Manual

Niles RCA3
24 pages
To Next Page IconTo Next Page
Page #1 background imageLoading...
Page #1 background image
TABLE OF CONTENTS
Introduction 2
Getting
Started 4
Installation 4
System
Operation 13
Optional
Accessories 14
Running Sensor
Cable in New
Construction 16
Concealing
Sensor Cable
in Existing
Walls 18
Specifications 22
R
EMOTE
C
ONTROL
A
NYWHERE
! K
IT
RCA3
Remote Control
Anywhere! Kit
WARNING – To prevent possible injury, the
following basic safety precautions should be
observed in the installation and use of your
Remote Control Anywhere Kit.
1. Read through the entire manual – Before attempting
any installation, read this manual thoroughly and keep it for
future reference.
2.
Avoid contact with all high voltage electrical wiring
and equipment!
3. Keep away from water and moisture – Never use or
install electronic products near water, ie., near a bathtub,
sink, washing machine, in a wet basement, near a swim-
ming pool, or anywhere else the product may be exposed
to water or moisture.
4. Power supply cord protection – Do not run the power
cord where it may be subject to wear or abuse. Do not
allow anything to rest on or roll over the power cord which
may damage it.
6.
Lightning – It is suggested that you remove the power
supply from the wall if your system will not be used for long
periods of time. Power surges due to lightning strikes may
damage your equipment.
7.
Check your local building and electrical codes
There may be specific requirements regarding running low
voltage in your area.
DS00408ACN_RCA3 Kit.qxp 1/17/05 3:52 PM Page 1

Other manuals for Niles RCA3

Question and Answer IconNeed help?

Do you have a question about the Niles RCA3 and is the answer not in the manual?

Niles RCA3 Specifications

General IconGeneral
BrandNiles
ModelRCA3
CategoryAccessories
LanguageEnglish

Summary

Important Safety Precautions

Introduction

Tools Needed

Getting Started

Installation

Placing the Connection Hub

Position the Connection Hub so that MicroFlasher wires reach components, keeping it 1' from a TV.

Connecting Sensor Cable to Hub

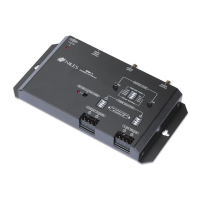
Insert stripped sensor cable wires into the keyed connector plug, ensuring correct orientation with the sensor.

Connecting Power Supply and MicroFlashers

Plug MicroFlashers into 'FLASHER OUTPUTS' and power supply into 'POWER' port. Verify power LED.

Mounting MicroFlasher to A/V Components

Test remote control function, then place MicroFlasher over component's IR sensor window.

Mounting the Connection Hub

Ensure system tested OK, then disconnect power/cables. Mount hub on wall or shelf.

Running the Sensor Cable

Conceal sensor cable between sensor and connection hub. Refer to specific pages for new construction or existing walls.

Reconnecting the Connection Hub

Reconnect sensor plug, flashers, and power supply as outlined in previous steps to complete setup.

Normal Operation

Optional Accessories

Status Feedback Wall Adapter

Connects to receiver's switched outlet to provide status feedback LED on the sensor.

Additional Sensors

The kit includes one sensor; the MSU250 supports a second IR sensor from Niles.

Running Sensor Cable in New Construction

Scheduling and Preparation

Schedule wiring after electrical work. Avoid running sensor cable with electrical cables or through same J-box.

Drilling Techniques

Use appropriate bits, drill in stud centers, protect cables from nails, and avoid load-bearing beams without guidance.

Pulling the Cable

Fasten cable with clamps/staples, avoid sags, protect from damage. Consult local codes for raceways/conduits.

Concealing Sensor Cable in Existing Walls

Identifying Cable Routes & Avoiding Interference

Examine routes, locate studs/joists, avoid electrical wiring by at least 3 feet to prevent interference.

Specifications

MSU250 Specifications

Details for MSU250 IR System, Wiring Requirements, Unit Dimensions, and Power Requirements.

MS200 Specifications

Details for MS200 IR System, IR Receiving Range.

MF1VF Specifications

Details for MF1VF IR System, IR Transmitting Range, IR Transmitting Angle, and Unit Dimensions.

Related product manuals