C397
10
02/2013
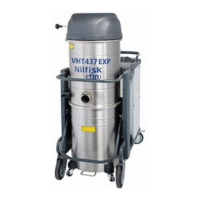
VHT37EXP
US
Primary and absolute lter disassembly
and replacement
WARNING!
When the vacuum cleaner is used to vacuum
hazardous substances, the lters become
contaminated, therefore:
■ Work with care and avoid spilling the vacuumed
dust and/or material;
■ Place the disassembled and/or replaced lter in a
sealed plastic bag;
■ Close the bag hermetically;
■ Dispose of the lter in accordance with the laws in
force.
WARNING!
Filter replacement is a serious matter. The lter must
be replaced with one of identical characteristics,
ltering surface and category.
Otherwise the vacuum cleaner will not operate
correctly.
Primary star lter replacement
Figure 13
1. Vacuum union hose
2. Band latch
3. Lid
4. Hose clamp
Take care not to raise dust when this operation is carried out.
Wear an N100 (P3) mask and other protective clothing
including protective gloves (PPE / DPI) suited to the
hazardous nature of the dust collected, refer to the laws in
force.
Before proceeding with these operations, turn off the vacuum
cleaner and remove the plug from the power socket.
■ Loosen the hose clamp (4).
■ Remove the vacuum union hose (1).
■ Use the band latch (2) to remove the lid (3) together with
the primary star lter.
■ Remove the old star lter from the cage.
■ Fit the new star lter and secure it in the cage with
special ties.
■ Install the lid and the primary star lter in the reverse
order of removal.
■ Dispose of the old star lter according to the laws in
force.
If necessary contact the manufacturer’s Service Center.
Upstream absolute lter replacement
Version for dust harmful for the health
WARNING!
Take care not to raise dust when this operation
is carried out. Wear an N100 (P3) mask and other
protective clothing including protective gloves (PPE
/ DPI) suited to the hazardous nature of the dust
collected; refer to the laws in force.
WARNING!
Do not use the absolute lter again after having
removed it from the vacuum cleaner.
Figure 14
1. Manual lter shaker knob
2. Lid
3. Band latch
4. Stop nut (absolute lter)
5. Absolute lter retaining plate
6. Primary star lter
7. Primary star lter clamp xing screw
8. Primary star lter clamp
9. Absolute lter (HEPA)
10. Vacuum union hose
11. Hose clamp
■ Stop the vacuum cleaner.
■ Loosen the hose clamp (11) with a screwdriver and
remove the vacuum union hose (10).
■ Unscrew the manual lter shaker knob (1).
■ Use the band latch (3) to remove the lid (2).
■ Loosen the xing screw (7) of the primary star lter (6)
clamp (8) using a screwdriver.
■ Remove the lter retaining plate (5) with the absolute
lter installed and unscrew the stop nut (4).
■ Remove the absolute lter (9).
■ Cover the absolute lter (9) with a plastic bag, close
the plastic bag hermetically and dispose of the lter in
accordance with the laws in force.
■ Insert a new absolute lter (9) with the same ltering
characteristics as the removed one.
■ Lock the absolute lter with the nut (4).
■ Tighten the clamp (8) xing screw (7) of the primary star
lter (6) to the absolute lter retaining plate (5).
■ Insert the lid (2) again.
■ Close the cover hermetically by means of the band latch
(3).
■ Fit the vacuum union hose (10) back in place and tighten
the hose clamp (11).
 Loading...