Do you have a question about the Nintendo CONTROL DECK and is the answer not in the manual?
Contact Nintendo Consumer Assistance for troubleshooting and support via telephone.
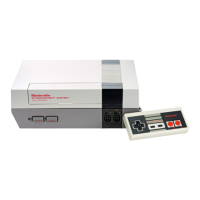
Details the main unit, controllers, power adapter, A/V cable, and RF converters.
Illustrates connection ports on the rear and side of the Control Deck and TV.
Instructions for connecting the AC adapter and game controllers to the Control Deck.
Step-by-step guide to turning on the NES, inserting game paks, and starting play.
Procedure for safely removing and inserting game paks during operation.
Important warnings about using approved accessories, avoiding unauthorized repairs, and general system care.
Guidelines for handling game paks, cleaning connectors, and environmental conditions.
Explains the functions of the SELECT, START buttons, Control Pad, and A/B buttons.
Solutions for blank screens, rolling pictures, fuzzy video, and snow.
Resolving distorted sound, lack of audio, and interference with TV reception.
Explains the warranty coverage, limitations, and requirements for validation.
Steps to follow for obtaining warranty repair or replacement service from Nintendo.
Outlines warranty exclusions, implied warranty limits, and consumer legal rights.
The Nintendo Entertainment System (NES) Control Deck is a home video game console designed to provide users with an immersive and enjoyable gaming experience. It serves as the central unit for playing a wide variety of video games, offering both single-player and multi-player options. The system is designed for ease of use, with straightforward connections to a television set and simple controls for gameplay.
The primary function of the NES Control Deck is to process and display video game content on a television screen. It achieves this by reading game data from removable game paks, executing the game's logic, and generating audio and video signals that are then sent to the TV. The Control Deck features two controller sockets, allowing for either one or two players to participate simultaneously, depending on the game.
The system includes a Power Switch to turn the console on and off, and a Reset Switch to restart games or the system itself. A "Power On and Reinsert Indicator" light on the front of the deck provides visual feedback, particularly when a game pak is not loaded correctly, indicated by flashing.
For connecting to a television, the NES offers two main methods:
The AC Adapter provides power to the Control Deck, plugging into a standard 110/120-volt AC wall outlet and the AC Adapter Jack on the back of the Control Deck.
Operating the NES involves a few simple steps to ensure proper functionality and an optimal gaming experience:
The NES comes with two identical controllers. The controller plugged into socket 1 functions as Controller 1, used for selecting and starting games, and for single-player gameplay. The controller in socket 2 functions as Controller 2, for two-player games.
After playing, simply turn off the power switch on the Control Deck and switch your TV channel selector to the desired channel for regular programming. There is no need to disconnect the RF switch.
To ensure the longevity and proper functioning of your NES Control Deck and its components, several care and precaution guidelines should be followed:
The manual provides a comprehensive troubleshooting guide for common issues such as:
The device complies with FCC regulations for Class B computing devices, designed to provide reasonable protection against interference in residential installations. Users are advised on measures to correct interference if it occurs, such as reorienting the antenna, relocating the NES, or plugging it into a different circuit.
The Nintendo Entertainment System is designed for reliable and enjoyable entertainment, backed by a 90-day limited warranty covering defects in material and workmanship. Users are encouraged to register their product and contact consumer service for any issues.
| Manufacturer | Nintendo |
|---|---|
| Release Year | 1983 |
| RAM | 2 KB |
| Controller Ports | 2 |
| Power Supply | AC Adapter |
| Type | Home video game console |
| CPU | Ricoh 2A03 (based on MOS Technology 6502) |
| Graphics | Ricoh 2C02 |
| Resolution | 256 × 240 pixels |
| Media | Cartridge |
| Sound | Ricoh 2A03 (five channels: two pulse wave channels, one triangle wave channel, one noise channel, and one PCM sample channel) |