Gas Burner Flame
The
as operation of
our refri
erator is controlled b
the correct burner flame which supplies the heat input
to the refri
erator’s coolin
s
stem. The correct burner
flame is dependent upon correct input
as pressure
and the burner and burner orifice bein
clean. The
propane
as pipin
and the suppl
pressure must be
inspected and tested at least twice a
ear. All inspec-
tions and tests must be performed b
the propane
as
supplier or a
ualified service a
enc
.
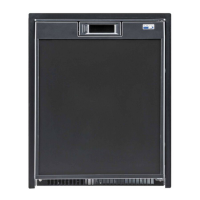
A visual check of the burner flame should be made
re
ularl
. The burner flame can be observed throu
h
the observation port on the left side of the burner box.
The flame should be sharp blue as illustrated in Fi
ure
7 with a stable burnin
appearance. When there is a
constant
ellow component observed or if the flame
appears erratic and unstable, contact
our dealer,
as
supplier, or a Norcold authorized service center. Also
observe the position of the flame; it must be centered
under the flue tube without touchin
the inner wall of
the tube. Norcold stron
l
recommends that an
re-
uired ad
ustments be performed b
our dealer or a
Norcold authorized service center.
Burner Orifice Removal and Cleaning
Procedure
1. Turn off the
as suppl
at the main tank.
2. Turn refri
erator off.
3. Turn off refri
erator’s manual shut-off valve.
4. Remove refri
erator from the enclosure.
5. Remove the screw located on the ri
ht front of
the burner box.
6. Remove the two screws securin
the heat shield
to the refri
erator’s support brackets.
7. Remove the burner box from the coolin
unit.
8. Remove the flare nut from the orifice assembl
.
9. Remove the orifice assembl
from the burner.
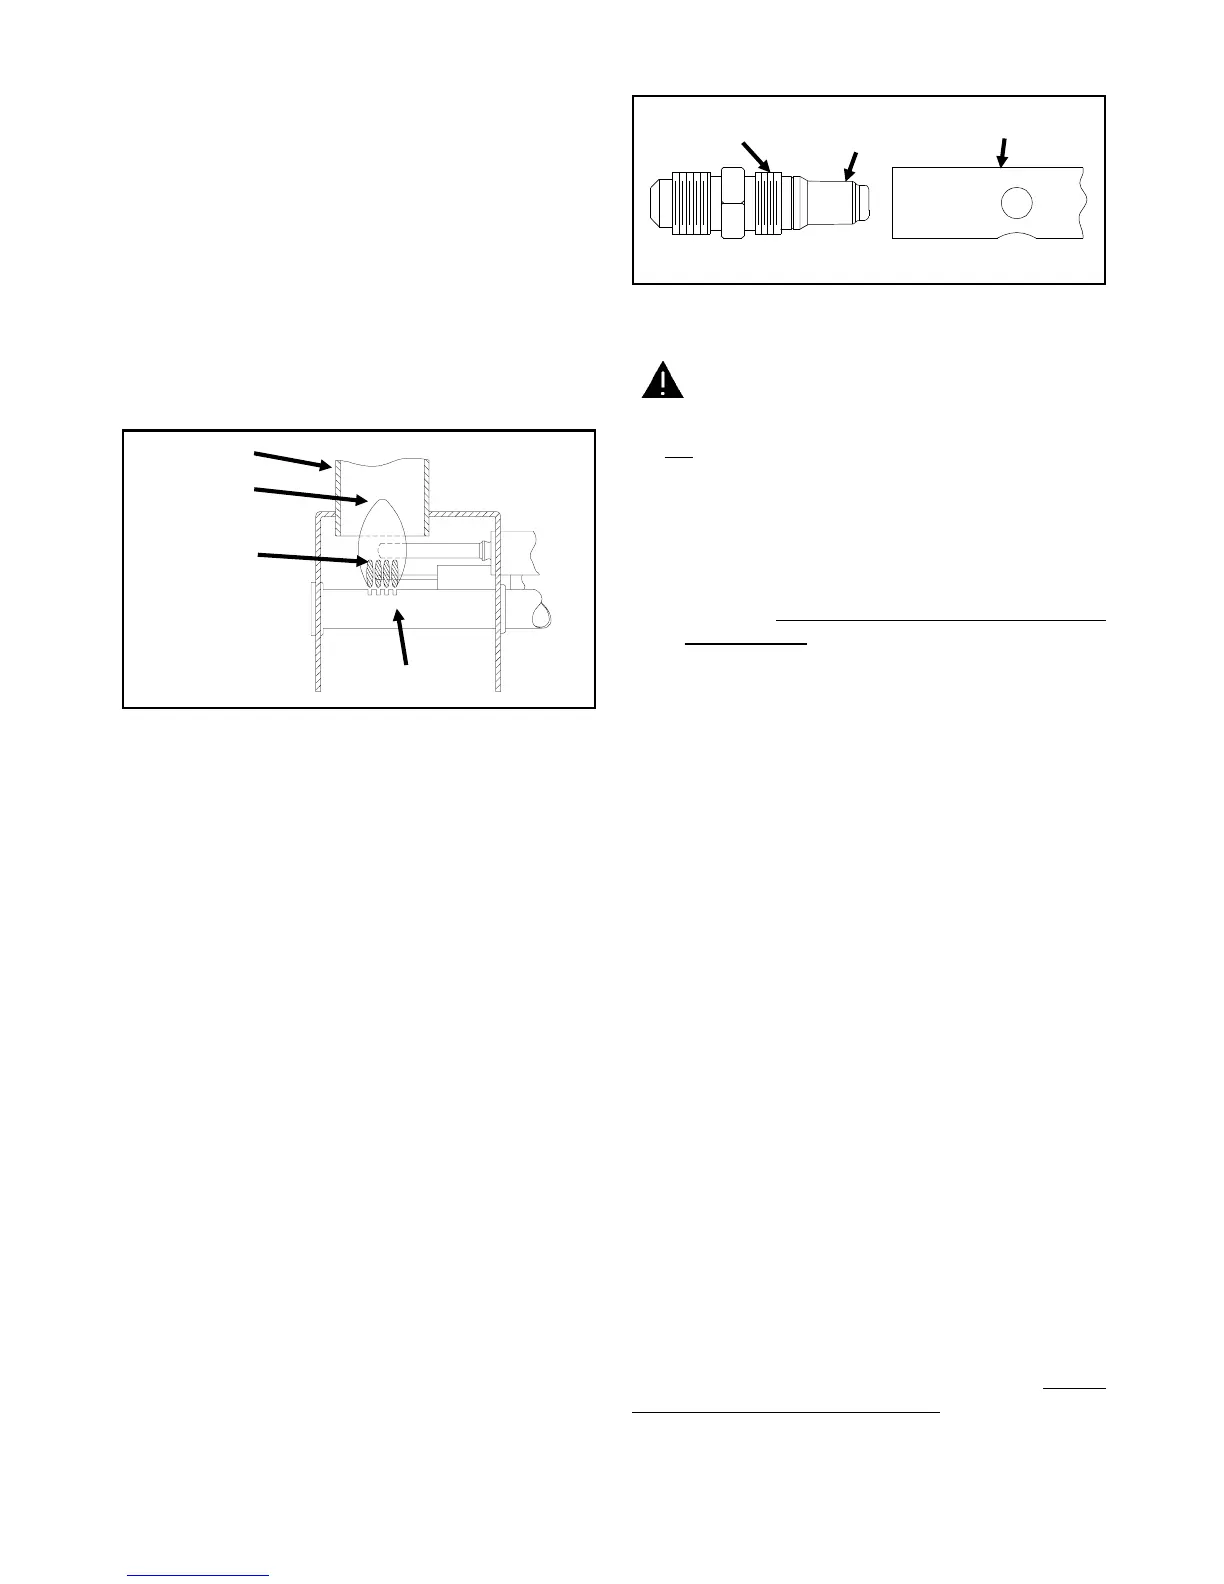
Do not attempt to remove the orifice from the orifice
adapter fitting when cleaning. Removing the orifice will
cause serious damage to the orifice and it’s press-fit
seal and may create propane gas leakage. Leaking
propane gas, if ignited, could cause an explosion re-
sulting in severe personal injury or death.
10. Clean the orifice assembl
with alcohol and air
pressure.
Do not clean the orifice with a pin or
similar object.
11. Clean the burner with alcohol and air pressure.
Make sure the slots of the burner are unobstructed.
12. Re-install the orifice assembl
. Insure orifice is
wrench ti
ht in burner.
13. Reconnect flare nut to orifice assembl
.
14. Re-install the burner box. Insure the burner box
asket seal is in
ood condition before reinstall-
in
. If dama
ed, contact
our dealer or a Norcold
Service Center.
15. Leak test refri
erator fittin
s.
16. Re-install the refri
erator and leak test main sup-
pl
pipin
at the manual shut-off valve.
Removing and Replacing the Refrigerator
To remove the refri
erator, interrupt both the AC
and DC power sources to the refri
erator. Turn off
the propane
as at the main suppl
tank. Remove the
screws at the front securin
the refri
erator to the
enclosure. Slide the refri
erator forward enou
h to
disconnect
as suppl
pipin
at the manual shutoff
valve located at the top of the refri
erator. Discon-
nect the 12 volts DC at the terminal block. Disconnect
the AC power cord from the receptacle. Remove the
intake and exhaust pipin
from the vent terminal hous-
in
. The refri
erator is now read
for removal. When
reinstallin
the refri
erator, make certain that the con-
nections of the intake and exhaust pipin
is properl
sealed. If dama
e occurs to the "O" rin
seals of the
flexible pipin
, contact
our dealer or a Norcold Service
Center to obtain new "O" rin
seals. After reinstallin
,
check the
as fittin
connections for leaks.
Do not
check for leaks with an
open flame.
FLUE TUBE
PALE BLUE
OUTER CONE
SHARP BLUE
INNER CONE
BURNER
Fi
ure 7
Orifice Adapter
Fittin
Press-fitted
Orifice
Burner
One-piece Assembl
Fi
ure 8
WARNING
10