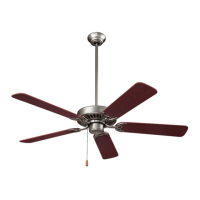
MODELS CFS52BS • CFS52PB • CFS52RB • CFS52WH
Page 1
READ AND SAVE THESE INSTRUCTIONS
STANDARD SERIES
CEILING FANS
WARNING
TO REDUCE THE RISK OF FIRE, ELECTRICAL SHOCK, OR INJURY
TO PERSONS, OBSERVE THE FOLLOWING:
1. Use this unit only in the manner intended by the manufacturer. If
you have questions, contact the manufacturer at the address or
telephone number listed in the warranty.
2. Before servicing or cleaning unit, or installing a light kit, switch power
off at service panel and lock service panel to prevent power from
being switched on accidentally. When the service disconnecting
means cannot be locked, securely fasten a prominent warning
device, such as a tag, to the service panel.
3. Installation work and electrical wiring must be done by a qualified
person(s) in accordance with all applicable codes and standards,
including fire-rated construction codes and standards.
4. When cutting or drilling into wall or ceiling, do not damage electrical
wiring and other hidden utilities.
5. This unit must be grounded.
6. Most outlet boxes commonly used for the support of lighting fixtures
are not acceptable for fan support and may need to be replaced,
consult a qualified electrician if in doubt.
Use only UL Listed outlet boxes marked “FOR FAN SUPPORT”.
The outlet box and support structure must be securely mounted
and capable of reliably supporting a minimum of 50 pounds. Use
only the two steel screws (and lock washers) provided with the
outlet box for mounting
the c
eiling fan to the outlet box The outlet
box must not twist or work loose. DO NOT USE PLASTIC OUTLET
BOXES.
7. After marking electrical connections, spliced conductors should
be turned upward and pushed carefully up into outlet box. The
wires should be spread apart with the grounded conductor and the
equipment-grounding conductor on one side of the outlet box.
8. Electrical diagrams are for reference only. Light kits that are not
packed with the fan must be UL Listed and marked suitable for use
with the model fan you are installing. Switches must be UL General
Use Switches. Refer to the instructions packaged with the light kits
and switches for proper assembly.
9. After installation is complete, make sure that all connections are
secure to prevent the fan from falling. Make sure all wire connections
are secure, and that there are no exposed conductor strands.
10. Do not use water or detergents when cleaning the fan or fan blades.
A dry dust cloth or lightly dampened cloth will be suitable for most
cleaning.
CAUTION
TO REDUCE THE RISK OF PERSONAL INJURY, OBSERVE THE
FOLLOWING:
1. To avoid motor bearing damage and noisy and/or unbalanced
impellers, keep drywall spray, construction dust, etc. off power unit.
2. The fan must be mounted with at least 7 feet of clearance between
fan blades and floor.
3. Make sure that your installation will not allow the fan to come into
contact with any adjacent obstacles such as doors, hanging lamps,
etc.
4. If you are installing more than one ceiling fan, do not mix the blade
sets.
5. Do not bend the blade brackets.
6. Do not operate reversing switch while fan blades are in motion.
Fan must be turned off and blades stopped before reversing blade
direction.
7. Do not insert objects in between rotating fan blades.
8. Be careful when working around or cleaning the fan.
9. Please read specification label on product for further information
and requirements.
WEIGHT OF FAN
The weight of your fan is 17.8 lbs. The weights of light kits, down rods,
and ceiling adapters are listed in the instructions packed with those
accessories.
INSTALLER:
Leave this manual with the
homeowner.
HOMEOWNER:
Use and care instructions on
pages 7 & 8.