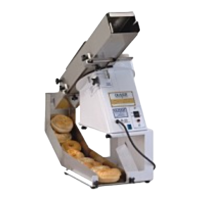
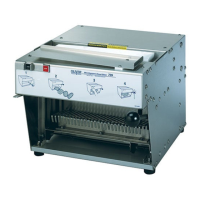
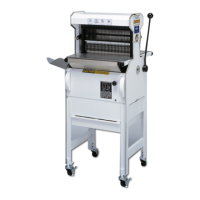
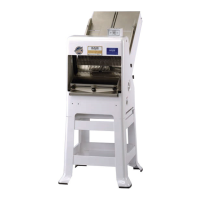
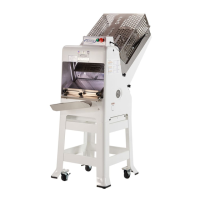
The Oliver Model 702-N, 702-NSE, and 702-NSS Bun Slicers are compact, durable countertop machines designed for slicing a variety of buns with speed and economy. These slicers feature welded steel frames and stainless steel chutes, ensuring robust construction and hygiene.
Function Description:
The primary function of these devices is to slice buns. Users place the product on the chute, and it slides into the blade for slicing. The machines are designed to create either a "hinge" on the bun or a complete sever, depending on the adjustment. The slicing process is initiated by turning a switch to the "ON" position. For optimal operation, it's recommended to not throw the product into the machine; instead, allow it to slide freely or use additional buns to advance the first one into position.
Important Technical Specifications:
General:
- Weight: Approximately 70 pounds.
- Standard Color: Gloss white enamel.
Product Capacities:
- Maximum Product Size: 4-7/8 inches wide and 3 inches high.
- Blade Height (adjustable): From 5/8 inch to 1-1/2 inches.
- Maximum Cutting Depth: 4-3/8 inches.
Electrical Service:
- Standard: 1/3 HP, 1725 RPM, 1-60-115 Volts AC, 6 Amps.
- Optional:
- 1/3 HP, 1725 RPM, 1-60-230 Volts AC, 3.5 Amps.
- 1/3 HP, 1425 RPM, 1-50-220 Volts AC, 3.5 Amps.
Machine Dimensions:
-
Model 702-N:
- Width: 12-5/8" to 13-1/8"
- Length: 29-3/4"
- Height: 22" to 22-3/4"
-
Model 702-NSE:
- Width: 12-1/2" to 13"
- Length: 26"
- Height: 19" to 19-3/4"
-
Model 702-NSS:
- Width: 12-5/8" to 13-1/8"
- Length: 26-1/2"
- Height: 18-7/8" to 19-5/8"
Usage Features:
Adjustments:
- Outside Side Guide: This guide determines the amount of "hinge" left on the product, allowing for adjustment from approximately a 1/2" hinge to a complete sever. It is adjusted by loosening two knobs located below and outside the table, sliding the guide in or out, and then re-tightening the knobs.
- Table Height Adjustment: The table height can be adjusted to set the blade height above the table between 5/8" and 1-1/2". This is done by loosening a large knob on the front corner of the machine's base. A thumb screw below the table is then rotated clockwise to increase table height (decreasing bottom slice thickness) or counter-clockwise to decrease table height (increasing bottom slice thickness). The large knob is re-tightened to secure the table.
- Inside Side Guide: Generally, it is best to leave this guide adjusted to the maximum opening for uninhibited product passage and maximum slicing speed. However, for some products, it may be necessary to use it to reduce jamming. Adjustment involves loosening two knobs on the top and inside of the table, sliding the guide to conform with product width, and then re-tightening the knobs. Liberal adjustment is recommended to accommodate product variances.
- Slow-Down Door Adjustment (Model 702-N only): Located at the discharge end of the chute, this small adjustable door slows the product as it exits the blade. Heavier products typically require a lower door setting (more restriction), while lighter products require less restriction. The door is raised by turning a thumb screw clockwise and lowered by turning it counter-clockwise. If a bun stops beneath the door, the next bun should dislodge it; if not, the door or inside guide should be re-adjusted for less restriction.
Safety Instructions:
- Always read the manual before operation.
- Ensure the machine is connected to a properly grounded electrical supply.
- Always unplug the machine when not in use, and before cleaning or servicing.
- Never insert hands or objects into the chute or near moving parts.
- Do not adjust or service the machine until the blade has stopped.
- Ensure the knife is not rubbing or hitting metal components before restarting.
- All guards must be in place before starting.
- Handle knife blades with care; do not touch the moving knife.
- Use only proper replacement parts.
- Do not place product in the machine before starting the motor, as this can prevent blade rotation and cause motor damage.
Maintenance Features:
Cleaning:
- Regular cleaning is essential. Use a mild detergent solution or spray cleaner on all exterior and interior surfaces.
- Periodically remove the OUTSIDE GUIDE AND CHUTE GUARD ASSEMBLY and BLADE GUARD to brush or vacuum foreign material from below the chute and from the blade compartment.
- Removing the BLADE GUARD: Remove the three knobs holding it in place, then lift it clear.
- Removing the OUTSIDE GUIDE AND CHUTE GUARD ASSEMBLY: Loosen both knobs securing it, then slide the assembly off.
- The BLADE should be cleaned daily, and more frequently when cutting fruity or sticky breads. Cut-resistant gloves should be worn during cleaning.
- The blade can be cleaned in place or removed. Removal is necessary if product builds up and dries on the blade. Attempting to slice with a dirty blade can cause motor overloads.
Lubrication:
- No lubrication is required for these models. The motor is equipped with pre-lubricated sealed bearings. Do NOT attempt to oil or grease the motor.
Changing the Blade:
- Safety First: Always disconnect power and ensure the blade has stopped. Use care when working near the blade.
- Remove the BLADE GUARD (three knobs).
- Remove the OUTSIDE GUIDE AND CHUTE GUARD ASSEMBLY (two knobs).
- Use a 7/16 inch hex wrench to remove the three screws securing the BLADE to the hub, then lift the BLADE.
- Replace the BLADE by reversing the procedure.
- Important: When reinstalling, ensure the points on the teeth are pointed in a counter-clockwise direction. Looking at the shaft end of the motor, the blade should always rotate clockwise.
- Do not start the slicer until all guards are in place, securely fastened, and you have confirmed the blade is not hitting any metal parts.
Troubleshooting (Motor Will Not Start or Suddenly Stopped):
- Check if the machine's plug is removed.
- Verify the outlet is working with another appliance.
- The motor has a thermal overload. If it overheats, it will stop.
- Resetting Thermal Overload: Allow the motor to cool for 1-2 hours. Carefully tip the machine to one side and press the red reset button on the end of the motor FIRMLY. Return the machine to its position, connect to power, and restart.
- If the problem persists, have a qualified electrician check the motor and switch.
- Note: Attempting to start the machine with product already inserted or cutting with a dirty blade can cause overloads.