Installation, Base Unit
G
8
Installation, Base Unit
Information on Selecting the Installation Location
· The base unit should be installed or positioned in a central location (e.g. in the
hallway of an apartment/house) in relation to the area to be monitored in order to
keep all transmission paths as short as possible.
· Place the base unit in a location where a power socket (230 V / 50 Hz) and tele
phone connection socket (for the integrated telephone dialling unit) are available.
· Choose a location within the area being monitored to ensure that no intruders can
approach the base unit and manipulate it.
· The base unit and power adapter plug must not be used in damp rooms (cellar,
bathroom, etc.) or in the direct vicinity of sources of heat.
· The base unit should not be installed/setup on or in the direct vicinity of large
metallic objects or sources of electrical interference because this reduces the
transmission range.
Examples of sources of interference
Metallic objects
Source of electrical interference
Radiators Loudspeaker systems
Mirrors Motors
Concrete steel walls Unshielded electrical apparatus
Metal doors
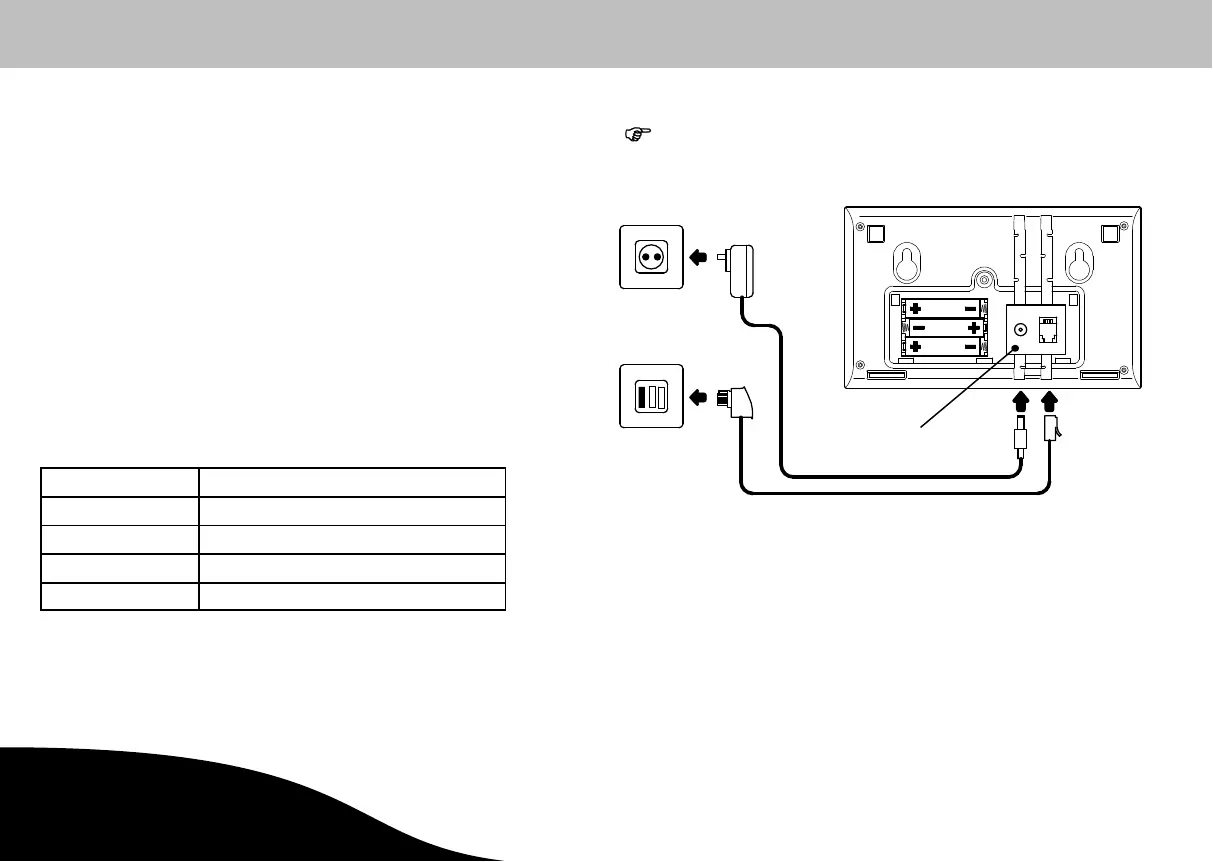
Preparing and Connecting the Base Unit
NOTE: The alarm system can also be operated without a tele
phone connection. In the event the alarm is triggered,
however, the internal telephone dialling unit is not acti
vated!
RJ11
connector
TAE
connector
Power socket
Telephone
connection socket
N
RESET
Power
adapter plug
1. Use a screwdriver to loosen the screw in the battery and connection socket compart
ment on the underside of the base unit.
2. Remove the lid from the battery and connection socket compartment.
3. Plug the RJ11 connector in the base unit socket.
4. Insert three AAA alkaline batteries in the battery compartment (pay attention to
correct polarity!).
5. Connect the power adapter plug to the base unit.
6. Replace the lid on the battery and connection socket compartment.
7. Replace and tighten the screw.
 Loading...