1-62
OEP-3 V1 (UC)
122
Installation and Adjustment
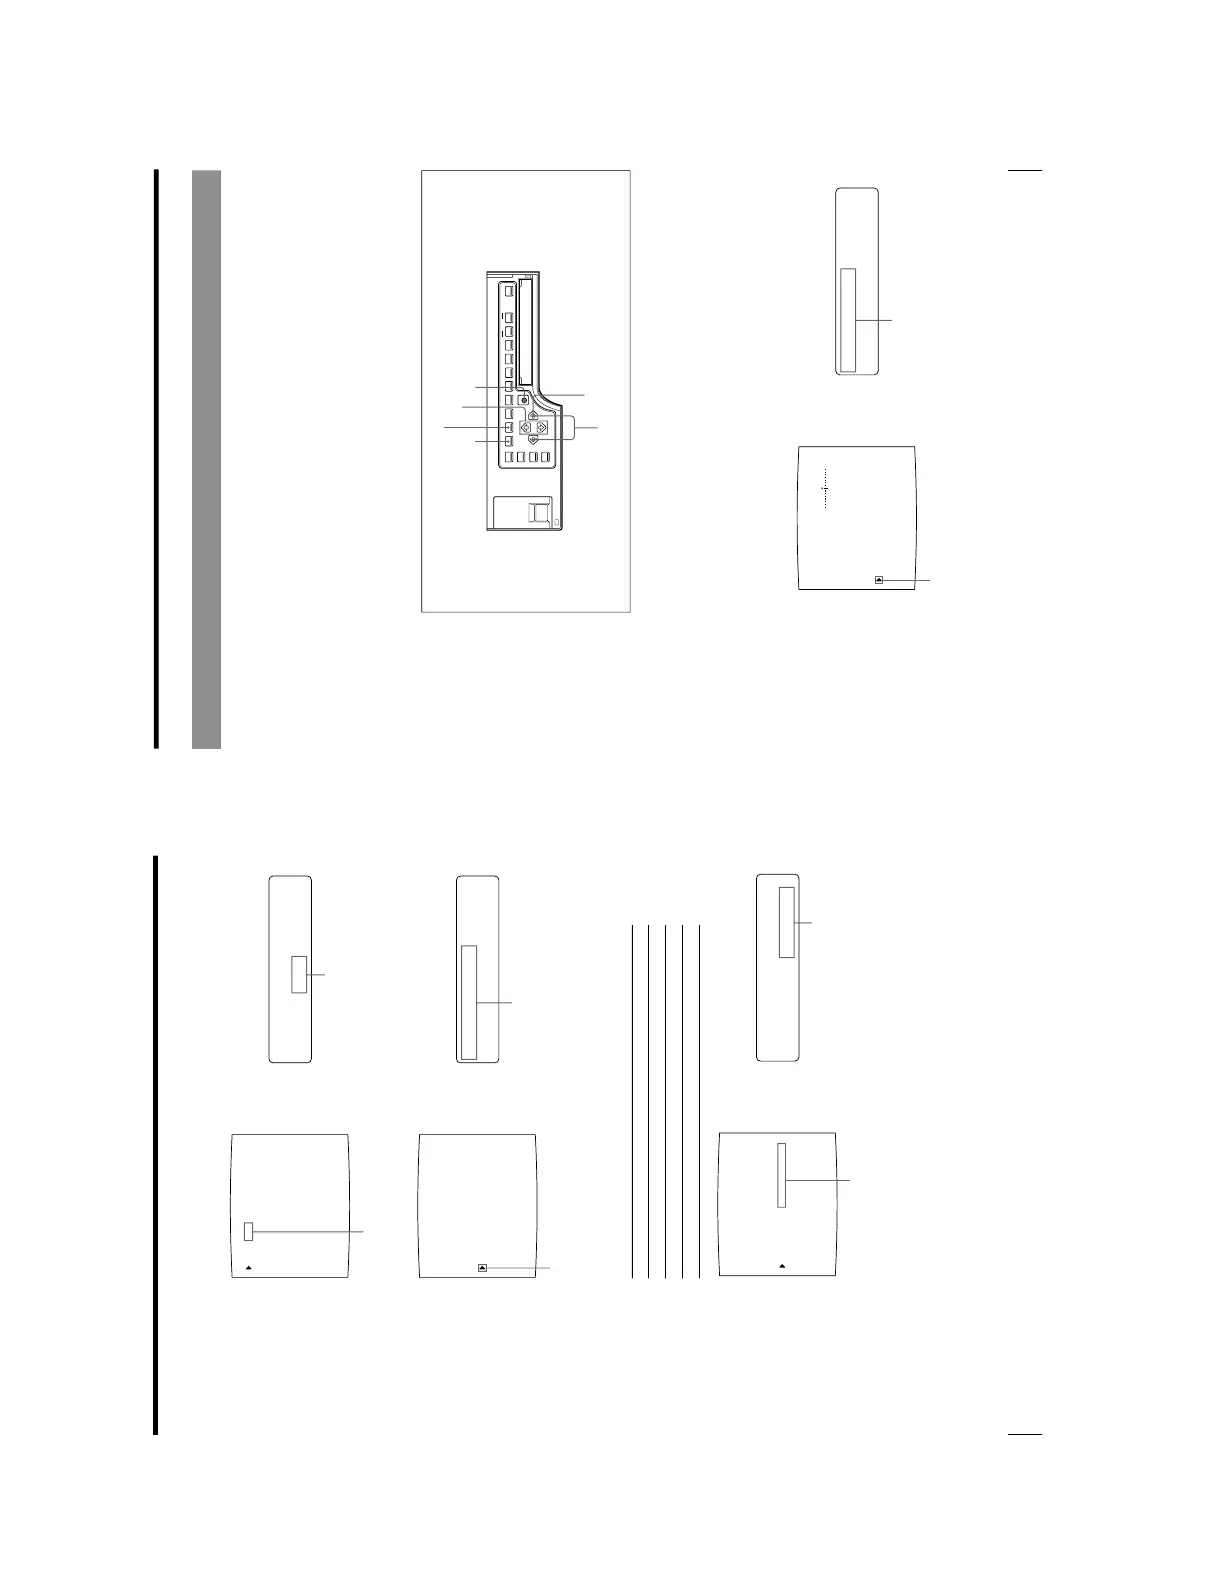
Setting Up the Printer (Continued)
L
GLOSSY /
AM I NAT I ON :
LAYOUT SETUP COLOR : nnn
/ COL / LAY / PRN / IN / OUT /
MEMORY : FRAME / FIELD
MULTI PIX : 1 / 2 / 4 / 8 / 16
SEPARATE : OFF / ON
MIRROR : OFF / MIRROR
LAMINATION : GLOSSY /
WINDOW : PRESS [ > ]
CAPTION : PRESS [ > ]
Q1 A 1
S
L
GLOSSY /
AM I NAT I ON :
LAYOUT SETUP COLOR : 200
/ COL / LAY / PRN / IN / OUT /
MEMORY : FRAME / FIELD
MULTI PIX : 1 / 2 / 4 / 8 / 16
SEPARATE : OFF / ON
MIRROR : OFF / MIRROR
LAMINATION : GLOSSY /
WINDOW : PRESS [ > ]
CAPTION : PRESS [ > ]
Q1 A 1
S
L
/c/LAY/p/i /o/
AYOUT SETUP
LAYOUT SETUP COLOR : 200
/ COL / LAY / PRN / IN / OUT /
MEMORY : FRAME / FIELD
MULTI PIX : 1 / 2 / 4 / 8 / 16
SEPARATE : OFF / ON
MIRROR : OFF / MIRROR
LAMINATION : GLOSSY /
WINDOW : PRESS [ > ]
CAPTION : PRESS [ > ]
Q1 A 1
S
1
Press the MENU button, then select LAY by pressing the G or g button.
The LAYOUT SETUP menu appears on the source image.
2
Select LAMINATION by pressing the F or f button.
3
Select the amination pattern according to the desired finish of printouts by
pressing the G or g button.
When you want to Lamination pattern
Make a glossy printout. GLOSSY
Make a printout with a textured finish. TEXTURE
Make a matte printout. MATTE
4
Press the MENU button.
The regular screen appears.
Switch LAY to green by pressing the
G or g button.
Display LAY in capital letters by
pressing the G or g button.
Position the cursor at LAMINATION by
pressing the F or f button.
Press the F or f button until
LAMINATION appears.
Switch the lamination pattern to green by
pressing the G or g button.
When / is displayed at the right or left end,
another lamination pattern can be selected
by pressing the G or g button.
Display the desired lamination pattern by
pressing the G or g button.
When / is displayed at the right or left end,
another lamination pattern can be selected
by pressing the G or g button.
123
Installation and Adjustment
U
[
>
]
SER NA
PRESS
ME :
SYSTEM SETUP
LCD - CONTR : 7
BAUDRATE : / 24 / 4800 / 96
BEEP : OFF / ON
APPLI. : STANDARD /
IRE : 100 / 11 / 12 / 13
SAVE USER : 1 / 2 / 3 [ EXEC ]
PRN SETUP : PRESS [ > ]
USER NAME : PRESS [ > ]
Q1 A 1
S
COLOR : 200
Registering a User Set
You can store up to three settings of all the printer specifications, set or adjusted by
using the buttons or with the menu, and store those settings as a user set. The
printer retains these setting - even if you turn off the power.
Thus, different operators can make printouts with different settings by recalling the
appropriate user set.
If the data of the recalled user set is modified, the printer operates according to the
modified data. In such a case, the modified data remains effective until another user
set is recalled with the LOAD USER button, even if you turn off the power.
After you finish all of required settings, proceed as follows to register them as a
user set.
1
Display the SYSTEM SETUP menu.
To display the SYSTEM SETUP menu, see steps 1 to 3 in
“Adjusting the
Brightness of the Printer Window Display
” on page 117.
If you want to name a user set, go to step 2.
If you do not want to name a user set, go to step 5.
2
Select USER NAME by pressing the F or f button.
8
2,4,5
3,4,6
4,7
3
LOAD USER button
Position the cursor at USER NAME
by pressing the F or f button.
Display USER NAME by
pressing the F or f button.
Continue to the next page c