EasyManua.ls Logo

Olympus U-LH100-3 - User Manual

Olympus U-LH100-3
36 pages
Print Icon
To Next Page IconTo Next Page
Loading...
INSTRUCTIONS
BXFMA
MOTORIZED ILLUMINATION SYSTEM
WITH MOTORIZED FOCUSING UNIT
This instruction manual is for the Olympus Motorized Illumination System with Motorized Focusing
Unit, Model BXFMA. To ensure the safety, obtain optimum performance and to familiarize yourself
fully with the use of this system, we recommend that you study this manual thoroughly before
operating the system. Retain this instruction manual in an easily accessible place near the work
desk for future reference.
A X 7 6 1 5
BXFMA-F
U-FH
U-IFFH
U-BI30-2, U-TR30-2, etc.
U-LH100-3
Modules described in this manual

Questions and Answers

  • B
    Brian PerryAug 16, 2025
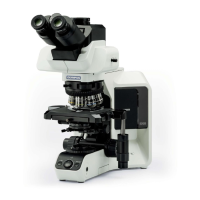
    How to fix Olympus Microscope when the bulb does not light?
    • D
      Derrick CarrAug 16, 2025
      If the Olympus Microscope bulb does not light, ensure the power cord of the BX-UCB (or TH4) is firmly plugged into the power outlet. Also, check that the main switch of the BX-UCB (or TH4) is set to ā€œIā€ (ON). Verify that the transmitted light illumination is correctly set, and if the bulb is burnt out, replace it with a new specified bulb.
  • G
    gonzaleskatherineAug 18, 2025
    What to do if Olympus U-LH100-3 visibility is poor and the image is not sharp?
    • V
      vcarterAug 19, 2025
      If your Olympus Microscope visibility is poor, the image isn't sharp or the contrast is poor, ensure you're using the specified objective and eyepieces. Clean any dirt or dust from the specimen. Also, check that the aperture iris diaphragm is set properly.
  • L
    Lisa MclaughlinAug 21, 2025
    How to fix an obscured or unevenly illuminated field of view on my Olympus U-LH100-3 Microscope?
    • A
      Amy PowellAug 22, 2025
      If the field of view is obscured or not evenly illuminated on your Olympus Microscope, check the following: 1. Ensure the light path selector lever of the trinocular tube is correctly set according to the observation method. 2. Verify the revolving nosepiece is correctly mounted. 3. Center the aperture iris diaphragm. 4. Open the field iris diaphragm until it circumscribes the field. 5. Make sure the bulb is correctly mounted by pushing the pins of the halogen bulb all the way to the stop position.
  • M
    Mark DownsAug 25, 2025
    How to remove dirt or dust visible in the field of view of my Olympus U-LH100-3?
    • R
      Ryan BartlettAug 26, 2025
      If you see dirt or dust in the field of view of your Olympus Microscope, the dirt/dust may be on an eyepiece. Clean it thoroughly.
  • E
    ericawoodsAug 27, 2025
    What to do if the specimen cannot be brought into focus on Olympus Microscope?
    • J
      Jeffrey GarciaAug 28, 2025
      If the specimen cannot be brought into focus on your Olympus Microscope, adjust the hardware (or software) lower limit to an optimum height. If this does not solve the problem, re-place the specimen within the focusing range.
  • Q
    qthomasAug 31, 2025
    Why is the field of view dark on my Olympus U-LH100-3 Microscope even when the bulb is on?
    • B
      bethnormanAug 31, 2025
      If the field of view remains dark even when the bulb operates on your Olympus Microscope, check if the aperture and field iris diaphragms are opened wide enough. Ensure the light path selector lever of the trinocular tube is in the correct position ( or ).
  • M
    Mrs. Robin SalinasSep 2, 2025
    What causes the bulb to intermittently light and go out on an Olympus Microscope?
    • A
      Angel MartinSep 2, 2025
      If the bulb in your Olympus Microscope intermittently lights and goes out, it might be nearly burnt out, so replace it. Also, check all cords and connectors to ensure they are securely connected.
  • M
    michael99Sep 5, 2025
    Why is one side of the image blurred on my Olympus Microscope?
    • E
      Erica MorrowSep 6, 2025
      If one side of the image appears blurred or wavers on your Olympus Microscope, ensure the specimen is correctly placed. Also, check that the revolving nosepiece is correctly mounted. If a heavier weight than restricted (3 kg) is applied to the revolving nosepiece mount area, reduce the number of modules to reduce the weight below the restriction.
  • V
    Vanessa MarshallSep 8, 2025
    Why does the Olympus Microscope bulb burn out so quickly?
    • T
      tracy89Sep 9, 2025
      If the bulb burns out almost immediately in your Olympus Microscope, ensure you are using the correct bulb type.
  • A
    Anthony TurnerSep 12, 2025
    Why doesn't the field of view match between both eyes on my Olympus U-LH100-3?
    • M
      Manuel DavisSep 12, 2025
      If the field of view of one eye does not match that of the other on your Olympus Microscope, adjust the interpupillary distance and the diopter. Ensure that the eyepieces used on the left and right sides are the same type. When looking into eyepieces, do not stare at image from the beginning but see the overall field of view. It is sometimes recommended to turn your eyes away from the eyepieces, look far off and look into the eyepieces again.

Summary

IMPORTANT - Safe Use of Equipment

Precautions When Unpacking the Microscope

Instructions for safely removing the microscope from its packaging.

System Diagram

Nomenclature

Motorized Illuminator with Motorized Focusing Unit BXFMA-F

Identification of parts for the BXFMA-F motorized illuminator.

Reflected Light Brightfield;Darkfield Observation Procedure

Using the Controls

Power Supply Unit TH4

Operational details for the TH4 power supply unit.

Motorized Illuminator with Motorized Focusing Unit BXFMA-F

How to operate the motorized illuminator and focusing unit.

Observation Tube

Adjustments for interpupillary distance, diopter, and eye shades.

Differences in Operating Procedures of Software BX2-BSW

Key differences when controlling the system via BX2-BSW software.

Troubleshooting Guide

Specifications

Motorized Illuminator with Motorized Focusing Unit BXFMA-F

Technical specifications for the BXFMA-F motorized illuminator.

Optical Characteristics UIS2 Series

Assembly

Assembly Diagram

Diagram illustrating the sequence of system module assembly.

Preparations for Assembly

Steps for preparing the system for illuminator installation.

Detailed Assembly Procedure

Specific instructions for assembling components like the halogen bulb.

Lamp Housing Inspection Sheet

Olympus U-LH100-3 Specifications

General IconGeneral
BrandOlympus
ModelU-LH100-3
CategoryMicroscope
LanguageEnglish

Related product manuals