Do you have a question about the Olympus VISERA OTV-S7V and is the answer not in the manual?
Identifies safety-related labels and symbols on the rear of the instrument.
Identifies safety-related labels and symbols on the right side of the instrument.
Identifies manufacturer and authorized representative labels on the back cover.
Describes the designated purpose and scope of the instrument's application.
Provides guidance on safely and effectively using the instrument and related equipment.
Defines key terms and components used throughout the instruction manual.
Outlines the necessary qualifications and training for operating the instrument.
Advises confirming compatibility with ancillary equipment to prevent injury or damage.
Warns against user-serviceable parts and unauthorized modifications to the instrument.
Explains the meaning of DANGER, WARNING, CAUTION, and NOTE signal words used in the manual.
Details critical safety precautions, potential hazards, and essential notes for safe operation.
Addresses data security, virus protection, and appropriate connection/environment configurations.
Provides specific safety guidelines and requirements for using the instrument in cardiac procedures.
Explains various symbols used on the instrument and in its operation.
Identifies and describes the components and controls on the front panel of the OTV-S7V.
Identifies and describes the connectors and terminals on the rear panel of the OTV-S7V.
Details the layout and function of the optional keyboard for controlling the OTV-S7V.
Explains the different B.O.D. types available and their indicators for the OTV-S7V.
Provides instructions for properly installing the OTV-S7V unit, including placement and ventilation.
Details how to connect the OTV-S7V to an Olympus light source using the specified cable.
Guides on connecting the OTV-S7V to various Olympus video monitors for image display.
Explains the procedure for connecting the OTV-S7V to a VTR for recording purposes.
Describes how to connect the OTV-S7V to compatible digital video recorders via IEEE1394.
Details the connection of the OTV-S7V to the SCV-3 unit for image capture.
Guides on connecting the OTV-S7V to OEP-3/OEP color video printers for image printing.
Explains how to connect the OTV-S7V to the UIM for image mixing.
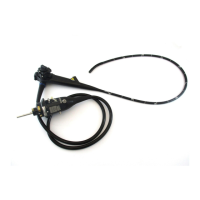
Provides instructions for connecting camera heads or videoscopes to the OTV-S7V, including precautions.
Details the connection of the optional keyboard for OTV-S7V control.
Guides on inserting PC card adapters and Memory Cards into the OTV-S7V for image storage.
Describes connecting other imaging equipment via the output terminal.
Provides essential safety information and procedures for connecting the OTV-S7V to a power outlet.
Outlines the procedure for checking the instrument's functionality after turning it ON.
Details how to inspect the illumination function of the endoscope and light source.
Guides on verifying the proper display of images on the video monitor.
Explains how to inspect the automatic brightness control function of the OTV-S7V.
Advises referring to the recording system manual to confirm proper image recording.
Guides on inspecting the display of mirror and rotated images on the video monitor.
Describes how to inspect the picture-in-picture image display function.
Guides on inspecting the multi freeze image display function for specific OTV-S7V models.
Details inspecting the image orientation function for specific OTV-S7V models.
Explains the procedure for powering on the OTV-S7V and ancillary equipment.
Describes how to navigate and operate the OTV-S7V's menus using switches or a keyboard.
Guides on setting the date and time for the OTV-S7V using menu controls or a keyboard.
Details how to adjust the video monitor display, including color bar generation.
Explains the auto white balance procedure and manual color tone adjustments.
Describes selecting different color modes for optimal image reproduction based on light sources.
Covers automatic and manual brightness adjustments, including safety precautions.
Explains the focus free function, its usage, and troubleshooting for camera heads with this feature.
Details how to adjust image enhancement levels to obtain clearer endoscopic images.
Guides on entering and deleting patient identification data in the OTV-S7V.
Covers displaying, inputting, and deleting patient data using menus or keyboard.
Explains how to configure remote control switches on camera heads/videoscopes for OTV-S7V functions.
Details how to assign functions to specific keyboard keys for OTV-S7V operation.
Explains how to freeze and unfreeze images using menu settings or keyboard/remote controls.
Describes how to use the electronic zoom function via keyboard or remote control.
Explains how to control the standby function of the CLV-S40 light source via remote control.
Guides on saving custom settings and deleting user presets on the OTV-S7V.
Details how to load previously saved user settings for the OTV-S7V.
Lists the default settings for various OTV-S7V functions, allowing users to restore factory configurations.
Explains image release operations using the SCV-3 unit via remote or keyboard.
Details image capture and printing using OEP-3/OEP printers via remote or keyboard.
Guides on recording images to a VTR using remote control switches or keyboard functions.
Explains setting the DV format and recording to digital video recorders.
Covers recording and playing back images using SmartMedia or xD-Picture Cards via PC card adapters.
Details how to mirror or rotate images displayed on the video monitor.
Explains how to display images from external devices as main or sub-images.
Guides on displaying multiple frozen images for moving objects, specifying division number and motion frequency.
Details how to rotate images by 180 degrees for specific OTV-S7V types.
Provides instructions for powering down and disconnecting the OTV-S7V and ancillary equipment after use.
Provides detailed cleaning procedures and precautions for maintaining the OTV-S7V.
Outlines recommended conditions and procedures for storing the OTV-S7V to prevent damage.
Advises following applicable laws and guidelines for the disposal of the product and its components.
Lists common irregularities, their possible causes, and suggested solutions for the OTV-S7V.
Provides instructions and contact information for returning the instrument for repair services.
Lists recommended combinations of equipment and accessories compatible with the OTV-S7V.
Specifies the recommended ambient temperature, humidity, and air pressure for operating the OTV-S7V.
Details the recommended ambient temperature, humidity, and air pressure for transporting and storing the OTV-S7V.
Lists the technical specifications of the OTV-S7V, including power, dimensions, and weight.
Provides information regarding electromagnetic compatibility and compliance with emission standards.
Offers guidance and cautions on the use of RF devices near the instrument.
Provides a table with recommended separation distances for RF equipment based on transmitter power.
| Category | Medical Equipment |
|---|---|
| Brand | Olympus |
| Model | OTV-S7V |
| Resolution | 1920 x 1080 |
| Frame Rate | 60 fps |
| Power Supply | 100-240 VAC, 50/60 Hz |
| Storage Temperature | -20 to 60 °C |
| Compatibility | VISERA system |
| Compatible Scopes | Olympus endoscopes |
| Video Output | DVI-D |
| Light Source Compatibility | Olympus light sources |
| Operating Temperature | 10 to 40°C |
| Relative Humidity | 30% to 85% |