EasyManua.ls Logo

Olympus VISERA ELITE II User Manual

Olympus VISERA ELITE II
4 pages
To Next Page IconTo Next Page
Page #1 background imageLoading...
Page #1 background image
VISERA ELITE II Quick Reference Guide
Disclaimer: Information provided in this guide is not exhaustive. Please refer to the complete Instructions For Use for each
item of equipment which should be thoroughlyread and understoodprior to handling, use and storage of the equipment.
Light SourceCamera HeadSwitch On
Switch on the camera system using the workstation master
switch which will then turn from white to green.
There is a secondary power switch on the transformer
under the workstation. This should remain switched on.
Insert the camera head into the camera processor,
ensuring the connector is the correct way up.
Connect the light guide cable to the output socket.
If required, turn the lamp off by pressing and holding the
lamp button.
Note: The “Lamp” status is stand-by when the light guide
connector of the endoscope or the light guide cable is not
connected to the output socket of the video system
centre while the lamp is turned ON.
Caution: Do not touch the endoscope’s distal end and light
guide connector while the examination lamp is lit up. The
endoscope becomes hot while the examination lamp is lit
up and could cause operator burns.
UP mark
Video connector
Electrical contacts
Video connector socket
UP mark
Video connector
The colour bars on the monitor will now be replaced with
an image from the camera head.
Output socket
Video connector socket
OT
V
Lamp
Lamp status
Issue 1
05/02/2021
KMF-08927
NCDR 02863
Question and Answer IconNeed help?

Do you have a question about the Olympus VISERA ELITE II and is the answer not in the manual?

Olympus VISERA ELITE II Specifications

General IconGeneral
BrandOlympus
ModelVISERA ELITE II
CategoryMedical Equipment
LanguageEnglish

Summary

System Power On

Workstation Master Switch

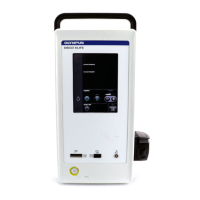
Switch on the camera system using the workstation master switch, turning it from white to green.

Transformer Power Switch

Note that the secondary power switch on the transformer under the workstation should remain switched on.

Camera Head Connection

Processor Insertion

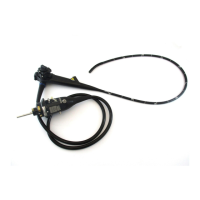
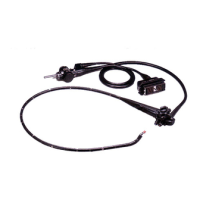
Insert the camera head into the processor, ensuring the connector is oriented correctly.

Image Display

The colour bars on the monitor will be replaced with an image from the camera head.

Light Source Operation

Connecting Light Guide Cable

Connect the light guide cable to the output socket of the video system centre.

Lamp Control and Status

Turn the lamp off by pressing and holding the button; note the stand-by status.

Safety Precautions

Avoid touching hot components when the examination lamp is lit to prevent burns.

Camera Head Attachment

Telescope Mounting

Attach the camera head to the telescope by rotating the endoscope mount.

Securing the Telescope

Releasing the camera head mount secures the telescope in place.

White Balancing Procedure

Performing White Balance

Cover the telescope tip with a white swab and press the white balance button until complete.

Status and Brightness

White balance status changes; optimal brightness is preset, requiring no adjustment.

Camera Head Controls

Magnification and Focus

Adjust image magnification and focus using rings or buttons on the camera head.

Programmable Buttons

Check programmable buttons' functions via 'info' and 'scope information' on the processor.

Troubleshooting Guide

No Power Issues

Verify all devices are switched on and the transformer isolation switch is active.

No Image Issues

Check monitor power, unplug camera head, and contact support if no colours appear.

Dark Image Issues

Check telescope condition, light lead fit, and connection firmness.

Related product manuals