17
If overwrite-recording is started at the
beginning of a track
Recording was stopped here.
Recording was started here.
Newly recorded track
If overwrite-recording is started in the
middle of a track
Recording was started here.
Newly recorded track
Recording was stopped here.
1
2
or
EDIT / NO
YES
LEVEL-SYNC indicator
REC indicator
TRACK
TOC
231 45678910
L
R
-40 -30 -20 -10 -4 -2 0
DIGITAL
-
SYNC
IN
1
44.1kHz
LEVEL
6
7
s PLAY
Recording to an MD
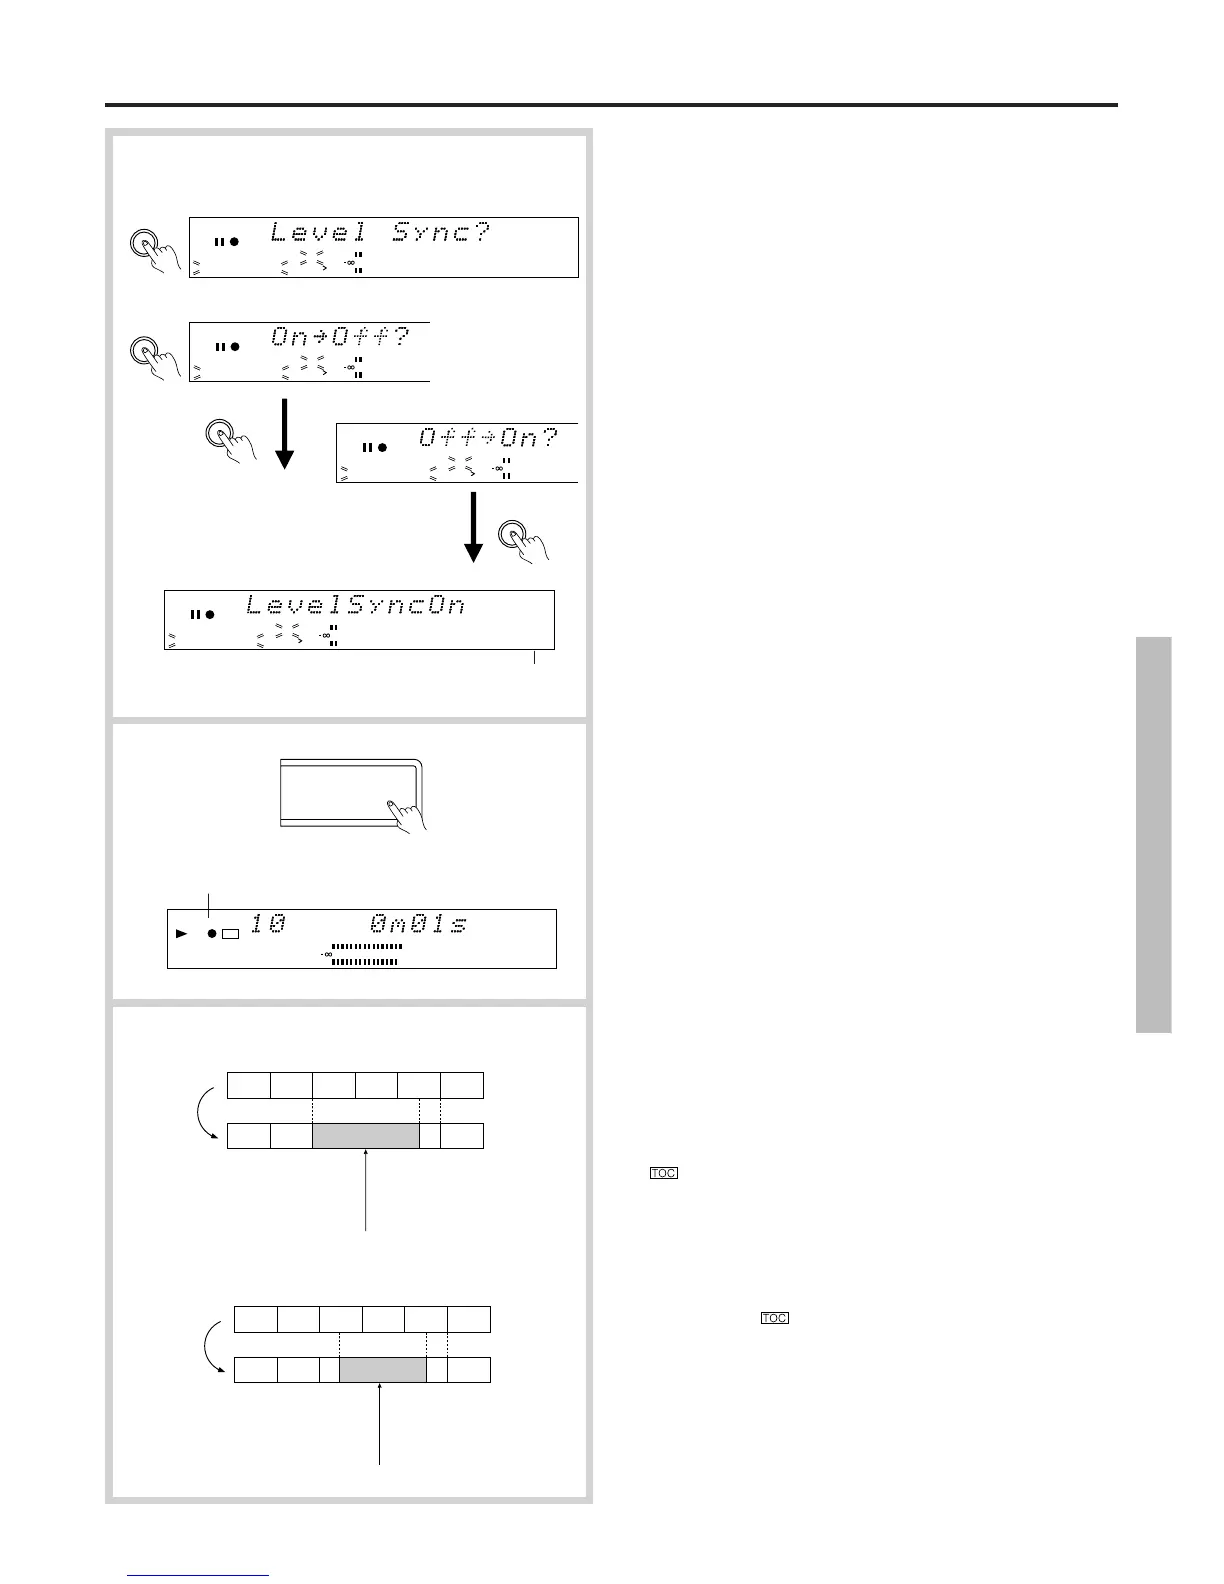
6. Set the "Level Sync" mode for automatic recording of the track
numbers.
• If the Rec source is "CD" or "MD", track numbers are recorded
automatically. So simply go ahead to the next step.
LevelSync is the function which marks track numbers when the
source input level starts raising from a minimum point. If the
LevelSync function is on, the track numbers will automatically be
marked while recording onto the MD.
When the LEVEL-SYNC indicator is lit, the LevelSync function is
on. If you set LevelSync to Off, the indicator will be turned off.
To change the LevelSync setting, execute the following steps while
the MD is recording or in recording pause.
First press the EDIT/NO button ("Level Sync?" appears) and then
the YES button ("Off→On?" or "On→Off?" is shown depending on
the current setting). To change the current setting, press the YES
button; Otherwise, press the EDIT/NO button.
To manually record a track number...
During recording, press the o REC button when you wish to mark
the track number.
Note:
In order for the MD recorder to record the track numbers
automatically, the digital input signals must include the information
of the beginning and ending points of the recorded tracks. If your
input source cannot output this information, however, the track
numbers will not be recorded automatically. In this case, use the
Level Sync function.
7. Start recording.
Press the s PLAY button and then start playing the recording
source immediately.
The MD recorder stops automatically when recording of the disc is
completed up to the final track.
To stop recording temporarily...
Press the g PAUSE button. To resume recording, press the s PLAY
button again.
To stop recording and check the contents of recording...
Press the e STOP button. When recording has been stopped, the first
of the newly recorded track numbers is shown in flashing display,
allowing you to playback the newly recorded contents from the
beginning by pressing the s PLAY button.
To playback from the beginning of the MD, immediately after
recording is stopped, press the e STOP button again. Then, press the
s PLAY button to start playback.
To eject the MD...
Press the e STOP button and then the r EJECT button.
Note:
If
is flashing when you press the r EJECT button or the
STANDBY/ON button, it means the MD recorder is writing the
recorded contents onto the MD. During this period, do not disconnect
the power cord or apply strong vibrations to the MD recorder. Doing so
may prevent normal recording onto the MD.
If the MD recorder's power cord is plugged into the SWITCHED power
outlet on the rear panel of the amplifier etc., do not power off the
amplifier until the
indicator disappears.
Overwrite-recording
If you start recording while erasing tracks following the specified track
(which is called “overwrite-recording”) and stop before the previously
recorded track has been completely erased, the unerased part of the
track following the point which the recording has been stopped will be
recorded as an independent new track.
During overwrite-recording, the "TRACK" indicator flashes.
EDIT / NO
YES
123456
↓↓
12 3 45
↑ ↑
123456
↓↓
12 56
↑ ↑
34
231 45678910
11 12 13 14 15 16 17
20
L
R
-40 -30 -20 -10 -4 -2 0
DIGITAL IN
1
44.1kHz
231 45678910
11 12 13 14 15 16 17
20
L
R
-40 -30 -20 -10
231 45678910
11 12 13 14 15 16 17
20
L
R
-40 -30 -20 -10
231 45678910
11 12 13 14 15 16 17
20
L
R
-40 -30 -20 -10 -4 -2 0
-
SYNCLEVEL
DIGITAL IN
1
44.1kHz