18 19
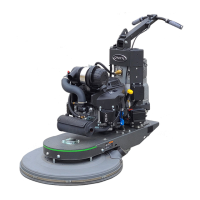
The position of the two front wheels has signicant aect on the performance and handling of the
machine, including:
Pad pressure = The amount of force the pad has against the oor
Forward propulsion = The feeling of forward pull or drive caused by pad friction
Machine torque = The feeling that the machine wants to constantly turn, usually toward the left
When your machine was assembled, the wheels were installed in positions determined to allow for best
performance under most conditions. However, depending on oor type, oor nish type, pad type, and
operator preference, these wheel positions can be changed to aect machine performance.
For the purpose of clarity, the following terms will be used in this section:
Forward = closer to the front of the machine
Rearward = closer to the rear of the machine
Up = closer to the sky
Down = closer to the ground
Left = the left side when viewed from the Operator’s position
Right = the right side when viewed from the Operator’s position
Through wheel adjustment, the following changes can be made to the machine performance:
WHEEL POSITION ADJUSTMENT
Desired Change
Increase pad pressure
Decrease pad pressure
Increase forward propulsion
Decrease forward propulsion
Increase machine torque
Decrease machine torque
To change the wheel position:
1. Stop the engine.
2. Adjust handle position to highest position and rock machine back, until handle grips are resting on
ground.
3. Remove the small cotter pin / hair pin from the wheel axle.
4. Remove the wheel axle.
5. Remove the wheel and any spacer.
6. Reposition the wheel and spacer in desired hole.
7. Insert the wheel axle.
8. Insert the cotter pin / hair pin.
CAUTION: Whenever working on a machine in the rocked back position, ask an assistant to
hold the handle and prevent the machine from falling forward.
Adjustment to Make
Move both wheels (left and right) Rearward
Move both wheels (left and right) Forward
Oset the two wheels, so the right wheel is Higher (more “up”) than left
Align the two wheels, so the left and right wheel are the same height
Move both wheels (left and right) Down
Move both wheels (left and right) Up
MAINTENANCE SCHEDULE
Daily 25hr 200hr
Check Engine Oil Level X
Check for Loose Hardware X
Check for Fuel or Oil Leakage X
Check/Clean Intake Air Filter X
Check/Clean Bonnet Filter X
Check, Clean, and/or Replace Dust Bag X
Check Pad X
Check Shroud & Shroud Seal X
Check Engine Mounts X
Check Belt for Wear or Slippage X
Check Pulleys, Drive Shaft, and Bearings X
Check Wheels & Bearings X
Overall Checkup at Authorized Service Center X
WARNING: To ensure personal safety, adjustments should ONLY be made by a qualied
technician or an authorized service enter.
WARNING: Prior to any maintenance, ensure engine is turned o and disconnect spark plug
wire from spark plug. Never attempt service or maintenance on a running engine.
MAINTENANCE
 Loading...