EN-6
3
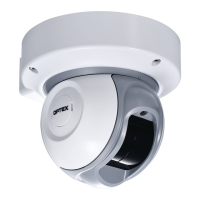
BEFORE INSTALLATION
3-1
REMOVING THE FRONT COVER
Note >>
The procedure to open the front cover is required when connecting the LAN cable to
the maintenance port. (refer to 5-6)
Caution >>
Do not touch the laser window exept it’s frame.
Do not touch inside.
1
Loosen the screw on the front
cover and pull the front cover
forward with a snap.
2
Rotate the front cover at opposite
side of the screw upward and
remove the hooks (x2).
3-2
MOUNTING THE FRONT COVER
1
Snap the front cover into the main
unit.
2
Tighten the screw.
Note >>
The laser window needs to be
removed when pressing the
reset button or replacing it.
Caution >>
Be sure to turn OFF the
power supply when mounting
or removing the laser window.
Caution >>
Be sure to turn OFF the power supply when mounting
or removing the laser window.
3-3
REMOVING THE LASER WINDOW
As shown in the figure below, use the supplied allen key to put out the hook
upward in a leverage motion.
3-4
MOUNTING THE LASER WINDOW
As shown in the figure below, insert the foot of the laser window until it clicks.
3-5
WIRING CABLE ENTRY
Use a screwdriver to open a knockout.
2 wiring holes
Make a slit with a cutter.
-Wiring hole on the back side
Caution >>
Be sure to open a knockout to the
downward direction.
When performing wiring on the
back side, Apply the supplied
packing on the depression on
the back side of base.
Note >>
1. Loosen the screw.
2. Pull the cover
forward.
Tighten the screw.
1. Use the allen key
to remove the
hook.
2. Open it slightly
and then pull
out upward.
-Wiring hole on the side
Remove the blanking caps of the wiring holes on the side using a tool such as a
coin.
1.
2.
1 knockout
1. Insert the hook.
2. Push the unit until it clicks.
Pass the wiring through the slit of
the packing.