OSAKA – USER MANUAL – F 500 / F 500-RS – V.1 – Page 1
made, the display will flash the active set point code for about 1 sec.
(SP, Eco).
If are programmed switch mode events by Real Time Clock the
action of the keys force status until the next event.
= 3 - Pressing the key for at least 1 second, it is possible to switch
the instrument from the ON status to Stand-by status and vice
versa. If switch-on/stand-by events are programmed using the
clock, action by this mode has priority over the event.
= 4 - Pressing the key for at least 1 sec activates/deactivates a
“Turbo” cycle.
= 5 - Forcing a programmed Switch-on/Switch-off (Stand-by) event
- Pressing the key for at least 1 sec switches the instrument from
the ON state to the Stand-by state and vice versa, until the next
event. Therefore, if switch-on/stand-by events are programmed
using the clock, action by this mode forces the state until the next
event.
= 6 - HACCP Alarm Reset - Pressing the key for at least 1 sec
resets stored HACCP alarms. The reset is confirmed by the display
indicating “---” for approx. 1 sec.
= 7 - HACCP Alarm Recording Disabled - Pressing the key for at
least 1 sec disables/enables recording of stored HACCP alarms.
After the selection is made the display will flash “Hon” (HACCP
alarms enabled) or “HoF” ( HACCP alarms disabled) for approx. 1
sec.
4.13 - EVENTS THAT CAN BE PROGRAMMED TO OCCUR AT
DEFINED TIMES
All events are programmable using the 14 parameters “c.01” ...
“c.14” contained in the “
]
cE” group.
After selecting the desired parameter, press the SET key repeatedly
to cycle through the following:
“h.” and the hours (e.g. “h.13”)
“n.” and the minutes (e.g. “n.45”)
“d.” and the day of the week (e.g. “d.1”)
“t.” and the type of event to be performed at the programmed time
(e.g. t.1).
Note: see section on programming event-related parameters in
chapter 2
The days are numbered as follows:
d. 1 = Monday
d. 2 = Tuesday
d. 3 = Wednesday
d. 4 = Thursday
d. 5 = Friday
d. 6 = Saturday
d. 7 = Sunday
d. 8 = every day
d. 9 = Monday, Tuesday, Wednesday, Thursday, Friday
d. 10 = Monday, Tuesday, Wednesday, Thursday, Friday, Saturday
d.11 = Saturday and Sunday
d.oF = no day (event disabled)
The 14 event-programming parameters allow a maximum of 14 x 7
= 98 weekly events to be scheduled (using d.8).
The following events can be programmed:
t.1 = switch instrument ON
t.2 = put instrument in Stand-by
t.3 = switch auxiliary output ON
t.4 = switch auxiliary output OFF
t.5 = Start defrost (to enable scheduled defrosting, also program
“d.dC” = cL)
t.6 = Switch to Eco mode (SPE)
t.7 = Switch to normal mode (SP)
A manual intervention, e.g. to change the mode (eco or normal) or
activate/deactivate the auxiliary output, is effective only until the
next scheduled event.
For example, if the instrument is in economical mode and is forced
manually to normal mode it will stay in normal mode until the next
event that switches it to economical mode.
Programming example
The user wishes to set the following:
– 4 defrosts every working day at 7.00, 12.00, 17.00 and 22.00
– 2 defrosts every Sunday at 7.00 and 19.00
(also program “d.dC” = cL)
– 1 switch every working day from normal to economical mode at
20.00 and 1 switch from economical to normal mode at 6.00.
– no switches on Sundays
– 1 switch of the auxiliary output to ON every working day at 8.00
and 1 switch every day to OFF at 21.00.
– no switches on Sundays.
4.14 - RS 485 SERIAL INTERFACE
The instrument can be equipped with a RS 485 serial
communication interface, by means of which it is possible to
connect the regulator with a net to which other instruments
(regulators of PLC) are connected, all depending typically on a
personal computer used as plant supervisor.
Using a personal computer it is possible to acquire all the function
information and to program all the instrument’s configuration
parameters. The software protocol adopted is a MODBUS-RTU
type, widely used in several PLC and supervision programs
available on the market (F 500 / F 500-RS series protocol manual is
available on request).
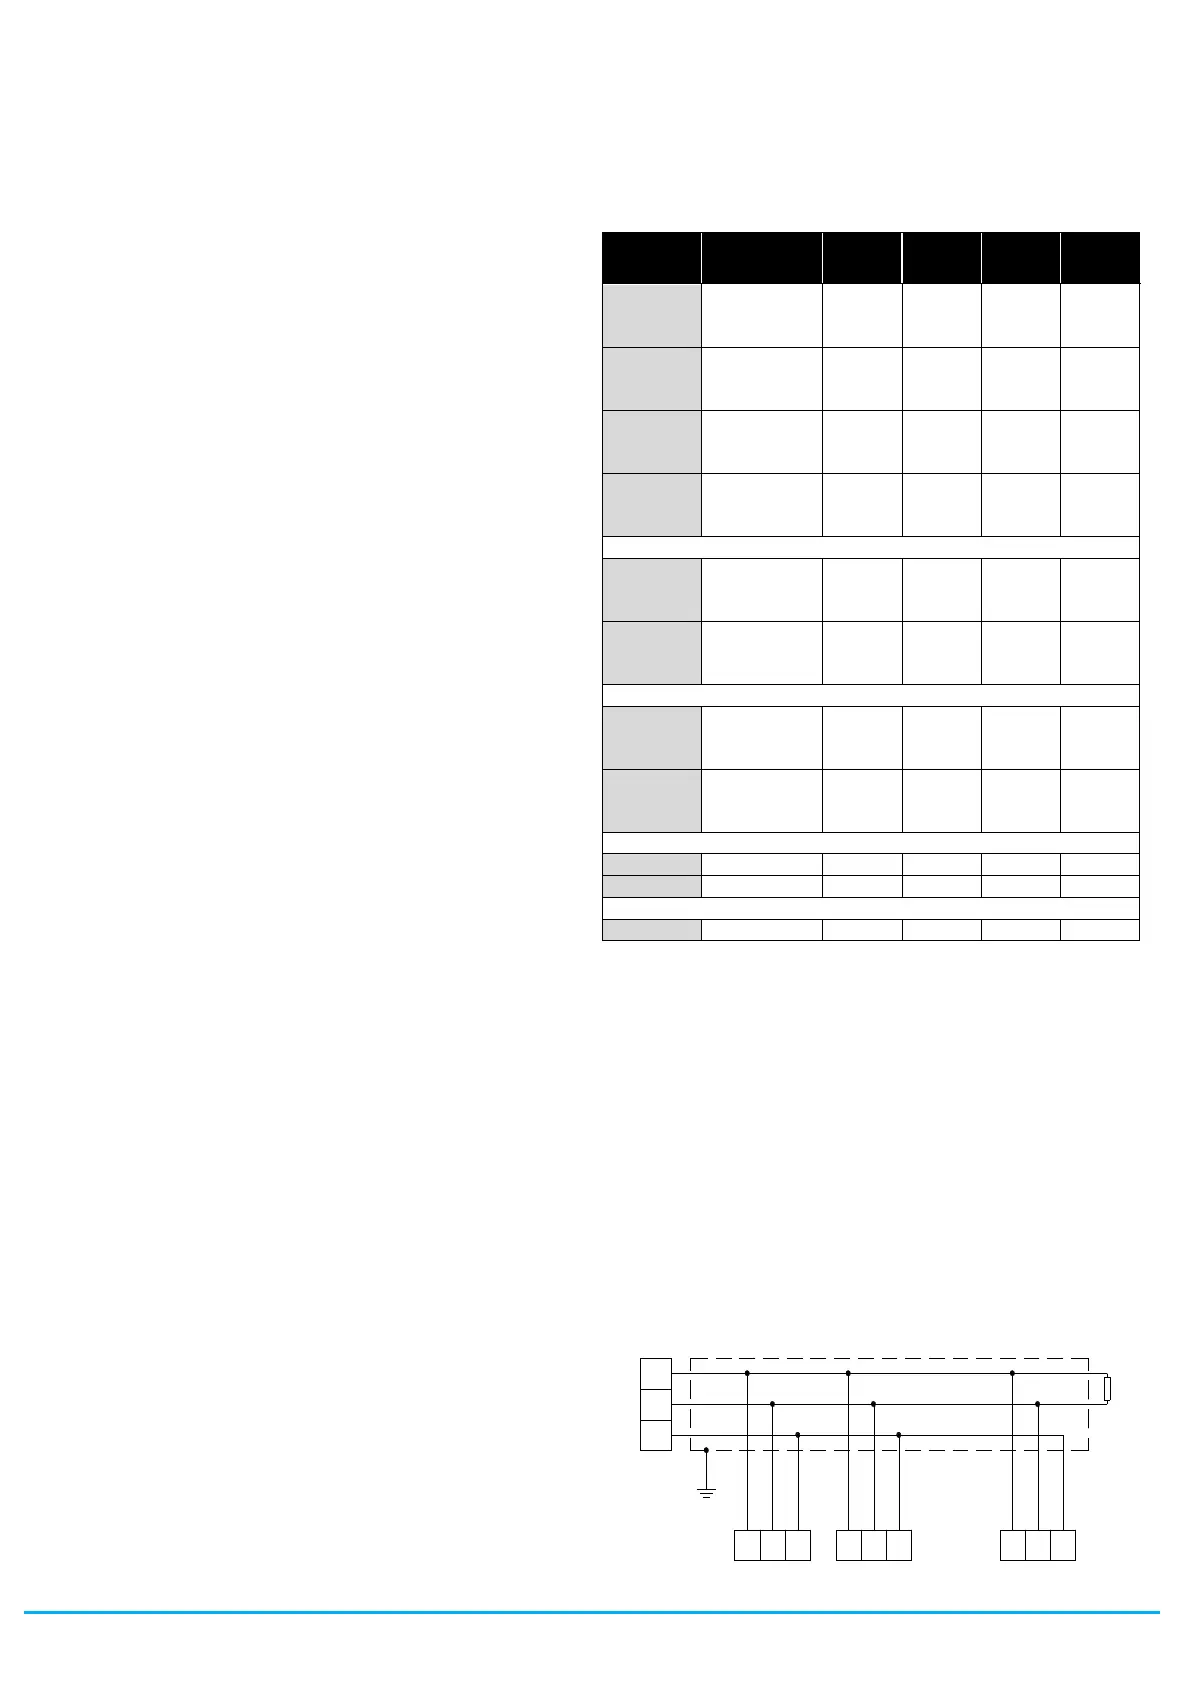
The instrument is equipped with two terminals called D+ and D-
which have to be connected with all the namesake terminals of the
net. For the wiring operation it is advisable to adopt a screened
cable wired as in the drawing.
X 3 4 n .2X 3 4 n .1
14
G N D
15
D+ D-
16
D+ D-
X 3 4 n .N
G N D D+ G N DD-
sh ie ld
D+
In te rfa c e
R S 4 85
G N D
D-
H O S T
(P C /P LC )
1 2 0 o hm
Rt
14 15 16 14 15 16


 To Next Page
 Loading...