OSAKA – USER MANUAL – F 500 / F 500-RS – V.1 – Page 1
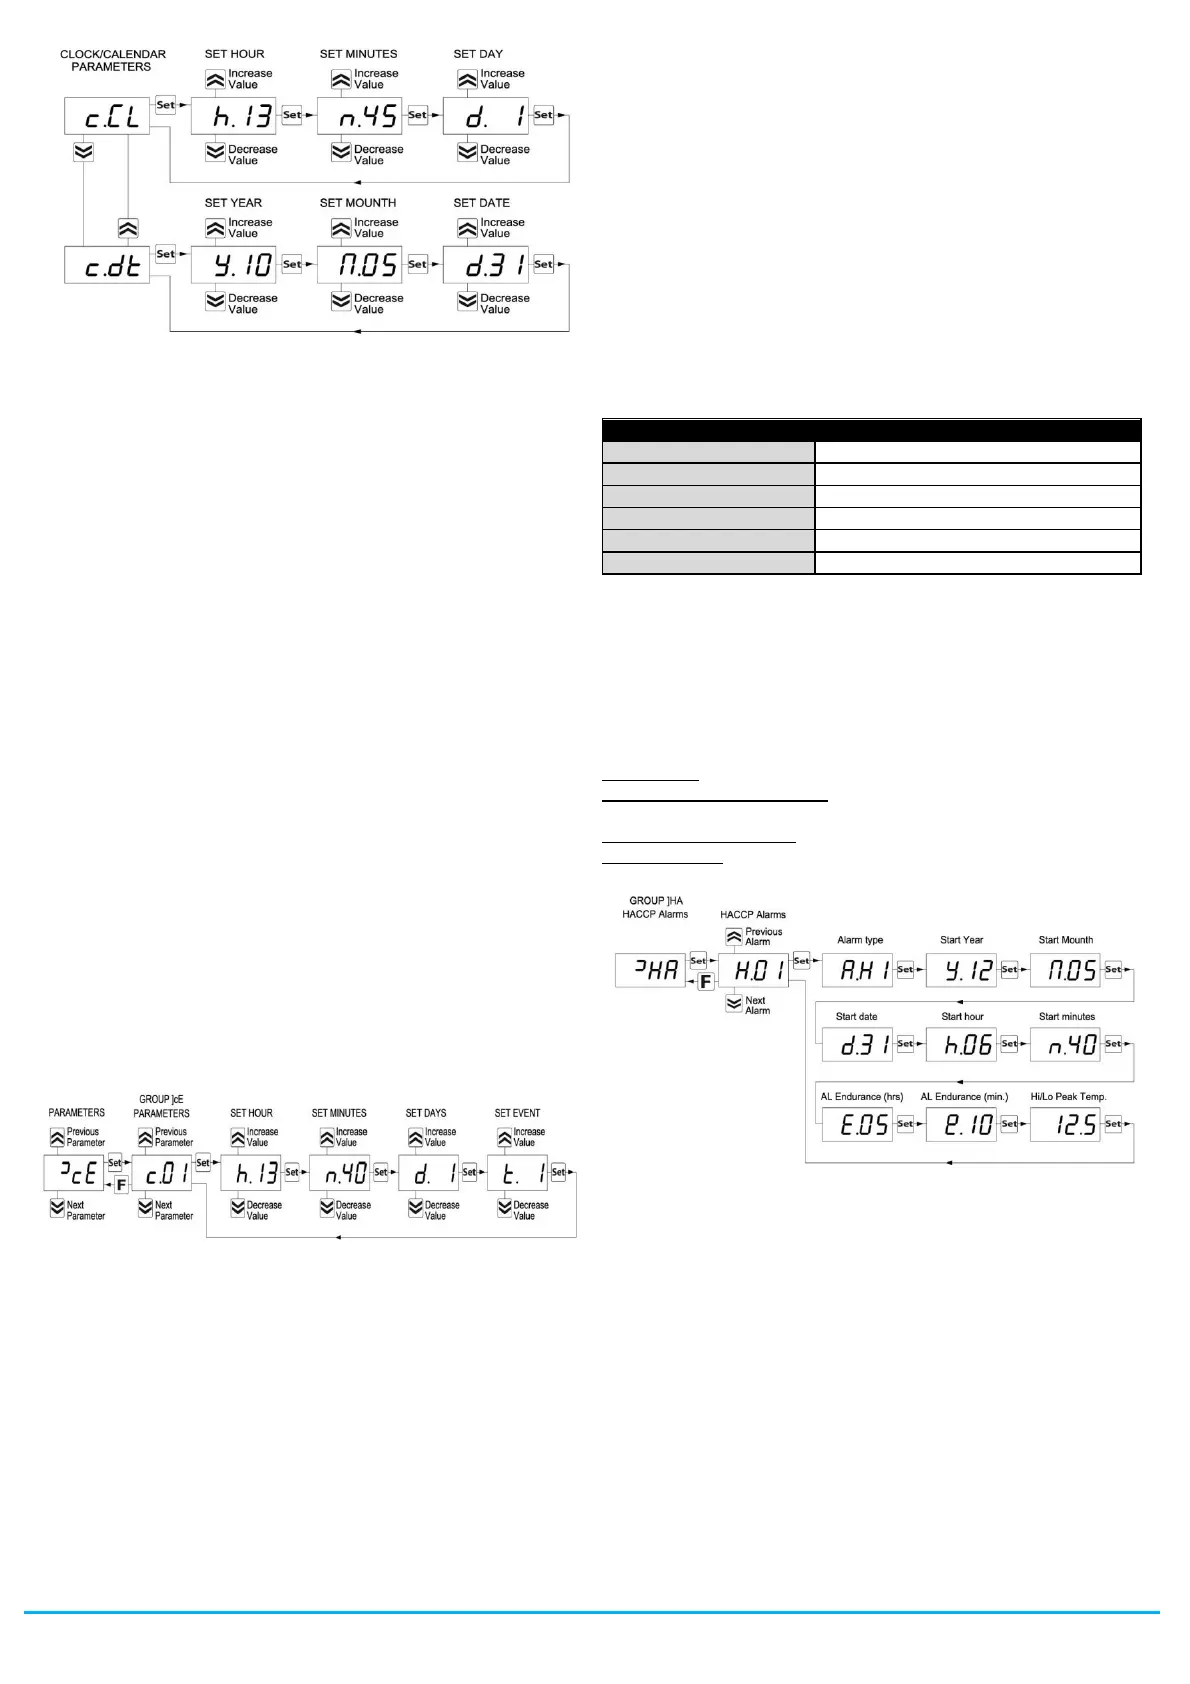
After selecting the “c.CL” parameter, press the SET key repeatedly
to cycle through the following in the order shown:
“h.” and the hours (e.g. “h.14”)
“n.” and the minutes (e.g. “n.52”)
“d.” and the day of the week (e.g. “d.1”)
The days are numbered as follows:
d. 1 = Monday
d. 2 = Tuesday
d. 3 = Wednesday
d. 4 = Thursday
d. 5 = Friday
d. 6 = Saturday
d. 7 = Sunday
+ the option oF which considers the clock to be disabled.
After selecting the “c.CL” parameter, press the SET key repeatedly
to cycle through the following in the order shown:
“y” and current year (ex. “y.10)
“M” and current month (ex. “M.05”)
“d” and current date (ex. “d.31”)
When the internal clock is running, the Clock LED will come on.
If it is on and steady, this indicates that, since the time the clock
was enabled, the power supply to the instrument has never failed
and therefore the current time is presumably correct.
If it is flashing, this indicates that at some point since the clock was
enabled the power supply has certainly failed and therefore the
current time may not be correct.
In this condition, pressing any key cancels the signal and the LED
returns to solid (on and not flashing).
2.8 - PROGRAMMING EVENTS TO OCCUR AT DEFINED TIMES
All events are programmable through the 14 parameters “c.01” ...
“c.14” contained in the “
]
cE” group.
Exactly as for current time, because the parameters for time-related
functions require multiple values to be input, these parameters are
programmed in the following way:
After selecting the desired parameter, press the SET key repeatedly
to cycle through the following:
“h.” and the hours (e.g. “h.13”)
“n.” and the minutes (e.g. “n.40”)
“d.” and the day of the week (e.g. “d.1”)
“t.” and the type of event to be executed at the programmed time
(e.g. t.1).
The days are numbered as follows:
d. 1 = Monday
d. 2 = Tuesday
d. 3 = Wednesday
d. 4 = Thursday
d. 5 = Friday
d. 6 = Saturday
d. 7 = Sunday
d. 8 = every day
d. 9 = Monday, Tuesday, Wednesday, Thursday, Friday
d. 10 = Monday, Tuesday, Wednesday, Thursday, Friday, Saturday
d.11 = Saturday and Sunday
d.oF = no day (event disabled)
The instrument offers 14 event programming parameters, allowing a
maximum of 14 x 7 = 98 weekly events to be scheduled (using d.8).
For the types of events that can be programmed, see the relevant
section.
2.9 - DISPLAYING HACCP ALARMS
The so-called HACCP (Hazard Analysis and Critical Control Points)
function causes the instrument to record the last 10 alarms that
have occurred together with information that is useful for
determining the criticality of the alarm.
The function is available only for instruments that have the calendar
clock.
The following HACCP alarms can be stored in memory:
Maximum temperature alarm H1
Minimum temperature alarm L1
Maximum temperature alarm H2
Minimum temperature alarm L2
Power failure alarm (black-out)
These alarms are displayed by the same display procedure as for
the programming parameters by accessing parameters “H.01” ...
“H.10” contained in the
]
HA group.
Exactly as for current time and events, because the parameters
relating to time-related functions require multiple values to be input,
these parameters are programmed in the following way:
After selecting the desired parameter, press the SET key repeatedly
to cycle through the following:
- Alarm type (A. = see HACCP alarm codes)
- Alarm start time HACCP ( y. =year, M. =month, d. =day, h.
=hours, n. =minutes)
- HACCP alarm duration ( E. = hours, e. = minutes)
- Critical temp. (max. peak if Hi alarm or min. peak if Lo or other
alarm)
The instrument automatically sorts these parameters from most
recent (H.01) to oldest (H.10) whenever an alarm is recorded or
deleted.
If more than 10 alarms occur, the instrument deletes the information
about the oldest alarm by overwriting it with the most recent alarm.
When this occurs the instrument increments by one the value of the
“H.dL” parameter by which it is possible to display the number of
alarms the instrument has been forced to delete when these
exceeded the permitted memory.
After selecting the parameter for the alarm which the user wishes to
display, if the label flashes this indicates that the alarm has never
been displayed (and therefore not recognised).
To recognise it, simply access the parameter via the SET key and
display it.
The next time the parameter label is displayed it will be shown solid
(not flashing).
If the alarm is still ongoing at the time of its display, the data are
displayed but the alarm is not recognised.
 Loading...