Do you have a question about the Oval ALTI mass CA025 and is the answer not in the manual?
General specifications for Type U sensor units (CA00A, CA001, CA003), covering materials, connections, and limits.
Detailed specifications for Type U sensor units CA00A, CA001, and CA003, including materials and process connections.
General specifications for Type S sensor units, covering stainless steel and titanium tube types.
General specifications for Type B sensor units, including models CB006 to CB050.
Specifications for the PA0K transmitter, including power source, communication, and output signals.
General guidelines for selecting location, avoiding environmental factors like vibration and water exposure.
Avoids installation practices causing meter inaccuracy, such as highest points or suction sides of pumps.
Standard piping conditions, recommending reducers/tapered pipes for diameter changes and avoiding pipe stress.
Standard piping conditions, emphasizing no flow straighteners, avoiding vibration, and providing shutoff valves.
Guidelines for flange type installation, focusing on alignment, gaskets, and bolt tightening.
CAUTION: Remove protective seals before installation; ensure proper alignment of flanges and bolts.
CAUTION: Proper pipe support is crucial; never hold down the sensor unit directly.
CAUTION: Guidelines for installing separately mounted transmitters, avoiding difficult access and extreme environments.
Instructions for making power and output signal connections to the transmitter housing terminals.
Details accessing terminals for power and signal wiring connections via the terminal box.
Wiring diagram for transmitter power and output signals, including terminal identification.
Details terminal identification for power, signal, and communication, along with cable conditions.
Wiring diagram showing connection between separately mounted sensor unit and transmitter via interconnect cable.
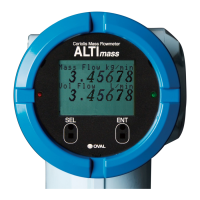
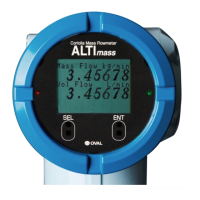
Describes the LCD display layout, including measurement, status/error messages, and scrolling indicators.
Details the LCD display components: top row for measurements, middle for status/error messages, bottom for scrolling.
Introduces parameters and functions, covering access to the MODE SELECT menu and Write Protect mode.
Details the procedure to access the MODE SELECT menu for parameter configuration and function execution.
Describes the procedure for entering numerical parameter values, using temperature damping factor as an example.
Explains how to select menu items for parameter configuration, using temperature unit selection as an example.
NOTE: Covers enabling and setting up a password to safeguard transmitter settings.
Details the steps for enabling the password function and creating a 4-digit numeric password.
Introduces self-diagnostic capabilities for early identification and troubleshooting of issues.
Diagnostic test to check the probe circuitry for problems, with corrective actions for detected issues.
Diagnostic test to check the drive coil for problems, indicating potential sensor connection issues if errors occur.
Diagnostic test for transmitter problems, including checks for connections, EEPROM, and temperature.
Diagnoses installation for pipeline vibration at zero flow, assessing signal stability and suggesting damping adjustments.
Diagnoses installation for pipeline vibration at normal flow, assessing signal stability and suggesting damping adjustments.
Features simulated output and input monitor functions for loop checks and signal diagnostics.
Describes simulating analog output (4-20mA) for testing cable faults and equipment performance.
Explains how to simulate pulse output at any desired frequency for testing.
Detects zeroing errors and minimizes offset flowrate drift, essential for accurate measurement.
Procedure for performing zeroing using the LCD display switches, including confirmations and results.
Procedure for zeroing using a status input signal, including preparation and running the zeroing process.
NOTE: Procedure for adjusting analog output levels (4mA and 20mA trims) if necessary.
NOTE: Procedure for resetting counters and totalizers (1 and 2) to zero, explaining synchronization with pulse outputs.
NOTE: Explains setting up pulse outputs as independent, double pulse, or bidirectional outputs.
Details setup for pulse output 1, including assignment, frequency, flow rate, low cutoff, and error handling.
Details setup for pulse output 2, covering assignment, frequency, flow rate, low cutoff, and error handling.
NOTE: Outlines setting up analog outputs for mass flow, volume flow, density, temperature, and drive output.
NOTE: Allows assigning one output for status information, flow direction, or alarm states.
Assigns status information like sensor error, transmitter warning, or calibration error to the status output.
Assigns high/low alarm output to status output for alarms related to flow, density, temperature, and counters.
NOTE: Allows assigning output fixation, zeroing, or totalizer resets to the status input.
NOTE: Enables quick grasp of installation conditions via alarms for flowrate, temperature, density, and total flow.
Lists error types, descriptions, coping actions, and influences on output signals for troubleshooting.
Lists status messages, descriptions, and corresponding LED indications and output influences.
Maintenance and checking items for ensuring long-term use, including checks for cables, grounding, and integrity.
| Brand | Oval |
|---|---|
| Model | ALTI mass CA025 |
| Category | Measuring Instruments |
| Language | English |