OPERATION AND ADJUSTMENT
Operation
TO
START
OPERATOR:
-, transmitter button
_,s
pushbutton
TO
STOP OPERATOR
Press transmitter button
1 time
1 time
1 time
Press pushbutton 1 ti
me
(Operator
will restart in opposite
direction.)
Door restarts in
"OPEN"
cycle
ofter
power
failure,
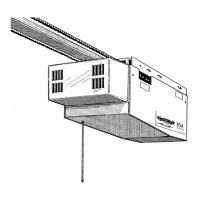
Sensitivity
Adjustment
This adjustment controls
the
amount
of
force
the
operator
can
apply
in
the
"Down"
direction
before reversing
if
door travel
is
obstructed.
For minimum closin<J force, adjust screw for less
sensitivity.
Because
each
door/operator
combination is not
the
some,
the
"Down"
sensitivity
must
be
set for
each
installation.
Adjustments must be
made
with
at
least 1/2 turn increments (See
Fig.
1
below).
For
maximum sensitivity (minimum permitted closing
force),
alternately
turn
adjusting screw counterclockwise
and
operate
door
in
closing
cycle.
Repeat until door will not close without reversing.
Next,
turn
adjusting screw clockwise until door
can
be
operated
through a
complete
closing
cycle
without reversing.
To
test,
place
a
firm
but
pliable
item, such as a paste board
carton
or a
plastic
trash
can
(laid
on
its side)
in
the
path
of
door and start
operator
to
close.
Door should reverse without crushing
object.
Test sensitivity
periodically.
MORE
()
LESS
SENSITIVITY SENSITIVITY
FIGURE
1
Your
Radio
Control
System
Your
Trinary Digital Radio Control
is
designed to
give
years
of
trouble-free
service.
The concept
of
Digital Control is to al low
you,
the
homeowner,
the
availobil
ity
of
chongi
ng
the
frequency
coding
of
your control, should
you
experience
"phantom"
opera-
tion.
Phantom
operation
is
the
inadvertent opening
or
closing
of
your
garage door by on outside signal source
other
than
your own o
hond-held
transmitter.
Should you experience this inadvertent
operation,
follow these
simple
steps to change the Frequency coding .of your transmitter(s)
and
recP.iver.
We
DO
NOT recommend changing frequency coding
UNLESS you are
experiencing
"phantom"
operation.
Page
18
How
To
Change
Frequency
Coding
1 • Disconnect power
to
door
opener.
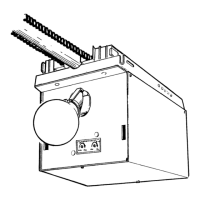
2.
Remove door
opener
cover
to
expose
receiver
circuit
board.
3.
Open
transmitter
access
door as shown.
Insert small screwdriver in
ac-
cess door slot and snap out
code
switch
access
door.
aATTERY
tNDtCATOft LIGHT
FIGURE
2
TRANSMITTER
4,
To
change
the
frequency
code
simply
change
the
position
of
one
or two
of
the
code
switches on
the
Receiver and Transmitter(s)
circuit
board.
PLEASE
NOTE: The code switches
(three
position)
of
the
Receiver
and
T ransmitter(s) must correspond
to
each
other.
Example:
If
code switch
No.
1
is
"+"in
the
Receiver,
code
switch
No.
1 must
be"+"
in
the
Transmitter(s).
If
code switch
No,
2 is
"-"in
the
Receiver, code switch
No.
2 must
be"-"
in
the the
T ransmitter(s), and so
on.
FREQUENCY
CODE
'SWITCHES
FIGURE
3
~-----NOTE:--~--
The transmitter frequency code must
agree
with
the
receiver
frequency
code.
5.
If you have purchased only one Transmitter
and
you wish
to
purchase
o second
one,
specify
the
frequency code found on the
white
sticker on
the
bock
of
the
Transmitter
or
Receiver
case.
FREQ
340-AVO~-----l
MFG.
810915
EXAMPLE:
Specify frequency number
and letters when ordering
a second transmitter.
When
you
receive
the
new transmitter
it
will NOT work with your
present Digital
receiver
if
you have previously
changed
the
frequency
code
switches in
the
receiver.
You
MUST
position
the
new transmitter
frequency code switches
to
the some
"+",
"0",
"-"
sequence as your
receiver
frequency code switches.
(REFER
TO
ITEM
4)
6.
Replace door
opener
cover.
7.
Reconnect power
to
door
opener.
NOTE:-~~~~~--.
Warranty on
the
Control will be nullified
if
service
other
than
specified in
the
service hints
is
not performed
at
the
factory.