EasyManua.ls Logo

Ozito SCMS-2125 - User Manual

Ozito SCMS-2125
8 pages
Print Icon
To Next Page IconTo Next Page
Loading...
ozito.com.au
DOUBLE BEVEL
SLIDE COMPOUND
MITRE SAW
254mm (10”)
INSTRUCTION MANUAL
SPECIFICATIONS
Motor: 2100W
No Load Speed: 4,000/min
Blade: Ø254mm x Ø25.4 x 48T
Mitre Angle: 0-45° left & right
Bevel Angle: 0-45° left & right
Max. Cutting Capacity:
Mitre 0° x Bevel 90°: 75 x 320mm
Mitre 45°x Bevel 90°: 75 x 220mm
Mitre 0°x Bevel 45°: 45 x 320mm
Mitre 45°x Bevel 45°: Left 42 x 220mm
Right 25 x 220mm
SCMS-2125
STANDARD EQUIPMENT
Material Clamp
Compound Mitre Saw
Material Support Bar x 2
Hex Key, 5 & 6mm
Dust Bag
WARRANTY
0819
IN ORDER TO MAKE A CLAIM UNDER THIS
WARRANTY YOU MUST RETURN THE PRODUCT
TO YOUR NEAREST BUNNINGS WAREHOUSE WITH
YOUR BUNNINGS REGISTER RECEIPT. PRIOR TO
RETURNING YOUR PRODUCT FOR WARRANTY
PLEASE TELEPHONE OUR CUSTOMER SERVICE
HELPLINE:
Australia 1800 069 486
New Zealand 0508 069 486
3 YEAR REPLACEMENT WARRANTY
Your product is guaranteed for a period of 36 months from the
original date of purchase and is intended for DIY (Do It Yourself) use
only. If a product is defective it will be replaced in accordance with
the terms of this warranty. Warranty excludes consumable parts, for
example: blade, carbon brushes and dust bag.
WARNING
The following actions will result in the warranty being void.
If the tool has been operated on a supply voltage other
than that specified on the tool.
If the tool shows signs of damage or defects caused
by or resulting from abuse, accidents or alterations.
Failure to perform maintenance as set out within the instruction
manual.
If the tool is disassembled or tampered with in any way.
Professional, industrial or high frequency use.
TO ENSURE A SPEEDY RESPONSE PLEASE
HAVE THE MODEL NUMBER AND DATE OF
PURCHASE AVAILABLE. A CUSTOMER SERVICE
REPRESENTATIVE WILL TAKE YOUR CALL
AND ANSWER ANY QUESTIONS YOU MAY
HAVE RELATING TO THE WARRANTY POLICY
OR PROCEDURE.
OZITO
Australia/New Zealand (Head Office) 1-23 Letcon Drive, Bangholme, Victoria, Australia 3175.
The benefits provided under this warranty are in addition
to other rights and remedies which are available to you at law.
Our goods come with guarantees that cannot be excluded
at law. You are entitled to a replacement or refund for a major
failure and for compensation for any other reasonably foreseeable
loss or damage. You are also entitled to have the goods repaired
or replaced if the goods fail to be of acceptable quality and the
failure does not amount to a major failure.
Generally you will be responsible for all costs associated with
a claim under this warranty, however, where you have suffered
any additional direct loss as a result of a defective product you
may be able to claim such expenses by contacting our customer
service helpline above.
Question and Answer IconNeed help?

Do you have a question about the Ozito SCMS-2125 and is the answer not in the manual?

Summary

SPECIFICATIONS

STANDARD EQUIPMENT

3 YEAR REPLACEMENT WARRANTY

KNOW YOUR PRODUCT

Retractable Safety Guard

Protects hands and limbs during operation.

Material Support Bar

Aids in securing timber for cutting.

Material Clamp

Secures workpiece to the mitre table for stable cuts.

Fence

Guides the workpiece against the blade for accurate cuts.

Mitre Table

Rotating surface for setting mitre angles.

Mitre Table Lock

Secures the mitre table at the desired angle.

Bevel Angle Pointer

Indicates the selected bevel angle.

Lock Down Pin

Secures the cutting head in the upright position.

Spindle Lock Button

Locks the spindle for blade changes.

Trigger

Controls the power on/off of the saw.

Carry Handle

For lifting and transporting the mitre saw.

Slide Lock

Secures the sliding mechanism during cuts.

Bevel Lock

Secures the cutting head at the desired bevel angle.

Bevel Release

Allows adjustment of the bevel angle.

Dust Bag

Collects sawdust during operation.

Laser Guide

Projects a laser line for accurate cutting.

Mitre Angle Pointer

Indicates the selected mitre angle.

Table Insert

Removable insert around the blade.

Mitre Release

Allows adjustment of the mitre angle.

Release Lever

Lever for releasing the cutting head.

SETUP & PREPARATION

ASSEMBLY

Instructions for assembling the mitre saw and its components.

SET-UP AND ADJUSTMENTS

Bench Mounting

How to securely mount the saw to a workbench or stand.

Slide Lock

How to use the slide lock for narrow cuts.

Mitre Angle Adjustment

Steps to adjust the mitre angle of the saw.

Bevel Angle Adjustment

Steps to adjust the bevel angle of the saw.

Trenching

How to set the depth of cut for trenching operations.

OPERATION

TYPES OF CUTS

Explains different types of cuts: straight, mitre, bevel, compound.

OPERATING THE SAW

Turning On and Off

Procedure for powering the mitre saw on and off.

Slide Action

How to operate the sliding mechanism for wide pieces.

Laser Guide

Instructions for using and maintaining the laser guide.

Workpiece

Guidance on correctly positioning the workpiece.

Material Clamp

Importance and use of the material clamp.

MAINTENANCE

Changing the Blade

Step-by-step guide for safely replacing the saw blade.

Carbon Brushes

Information on carbon brush wear and replacement.

Fence Alignment

Procedure for ensuring the fence is perpendicular to the blade.

Dust Bag

Maintenance of the dust bag and extraction system.

TROUBLESHOOTING

DESCRIPTION OF SYMBOLS

CARING FOR THE ENVIRONMENT

SPARE PARTS

ELECTRICAL SAFETY

GENERAL POWER TOOL SAFETY WARNINGS

MITRE SAW SAFETY WARNINGS

Overview

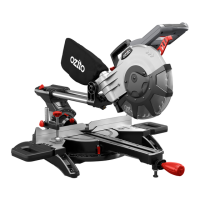
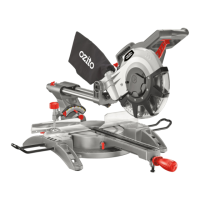
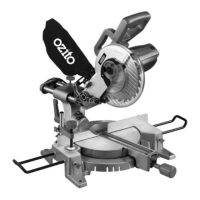
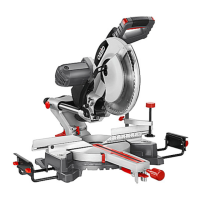
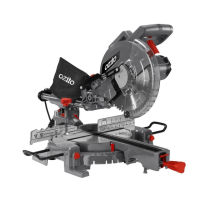
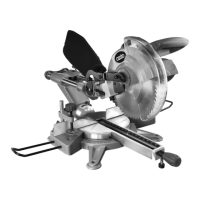
This document describes the Ozito Double Bevel Slide Compound Mitre Saw, model SCMS-2125, a 254mm (10") power tool designed for DIY use.

Function Description

The Ozito Double Bevel Slide Compound Mitre Saw is a versatile power tool designed for making various types of cuts in wood. It features a sliding mechanism for cutting wider workpieces and a double bevel capability, allowing the cutting head to tilt both left and right. This enables the user to perform straight cuts, mitre cuts, bevel cuts, and compound mitre cuts. The saw is equipped with a laser guide to provide an exact cutting line, enhancing accuracy. A material clamp helps secure the workpiece, and material support bars provide stability for longer pieces. The retractable safety guard ensures user protection during operation.

Important Technical Specifications

  • Motor: 2100W
  • No Load Speed: 4,000/min
  • Blade: Ø254mm x Ø25.4 x 48T (10-inch blade)
  • Mitre Angle: 0-45° left & right
  • Bevel Angle: 0-45° left & right
  • Max. Cutting Capacity:
    • Mitre 0° x Bevel 90°: 75 x 320mm
    • Mitre 45° x Bevel 90°: 75 x 220mm
    • Mitre 0° x Bevel 45°: 45 x 320mm
    • Mitre 45° x Bevel 45°: Left 42 x 220mm, Right 25 x 220mm
  • Power Supply: Designed for 230V and 240V (interchangeable for Australia and New Zealand).
  • Insulation: Double insulated, meaning no earth wire is required.
  • Residual Current Device (RCD): Recommended for use with a 30mA or less RCD.

Usage Features

The mitre saw offers several features to enhance usability and precision:

  • Assembly: The saw is unpacked by lifting it from its box using the carry handle and placing it on a level work surface. The cutting head is released from its transport position by holding it down and releasing the lock-down pin.
  • Dust Bag: A dust bag is included for dust collection. It is attached by squeezing the clamp and placing it over the dust extraction port. For best results, a dust extractor is recommended.
  • Material Clamp: The material clamp assists in securing timber during cuts and can be mounted on either the left or right side of the blade, depending on the cut type. For bevel cuts, it should be on the opposite side of the bevel to avoid interference.
  • Material Support Bars: Two material support bars are inserted into holes on both sides of the base and tightened with screws, providing support for longer workpieces.
  • Bench Mounting: The saw base has mounting holes for securing it to a workbench or mitre saw stand using screws or bolts (not included). It can also be mounted on a 13mm (or thicker) plywood piece for portability.
  • Slide Lock: For narrow wood pieces, the slide mechanism may not be necessary. The cutting head can be pushed back and the slide locking knob tightened to prevent sliding.
  • Bevel Angle Adjustment: To adjust the bevel angle, the bevel lock is loosened, and the cutting head is tilted to the desired angle (left or right) as indicated by the bevel angle pointer. The bevel lock must be tightened before cutting to prevent movement and serious injury.
  • Mitre Angle Adjustment: The mitre table lock is loosened, and the mitre release is pulled to set the desired mitre angle (left or right) as shown by the mitre angle pointer. The mitre table has positive click stops at 0°, 15°, 22.5°, 31.6°, and 45° for quick setting. The mitre table lock must be tightened before cutting.
  • Trenching: This feature allows for restricting the depth of cut to create a "trench." The trenching stop is moved to the right, and the trenching depth adjustment screw is rotated. The cutting head is lowered to check the depth, and the trenching depth lock nut secures the setting.
  • Spindle Lock: The spindle lock prevents the blade from rotating, used when installing, changing, or removing the blade. It is engaged by depressing and holding the button while rotating the blade until it clicks into position.
  • Retractable Safety Guard: This guard provides protection and retracts over the upper guard as the saw is lowered into the workpiece. It can be manually retracted by sliding the release lever right and pressing the handle down.
  • Laser Guide: A laser line is projected onto the material, providing an exact guide for the cut. It is switched on/off using a dedicated switch. Users are warned not to stare directly at the laser beam.
  • Operating: To turn the saw on, the trigger switch is squeezed. Releasing the trigger turns it off. The blade must be at full speed before cutting to prevent dulling or lock-up.
  • Slide Action: When cutting wide pieces of wood, the slide lock should be loose. The carriage is pulled fully, the release lever is slid right, and the handle is pressed down, then the carriage is pushed toward the rear fence.
  • Workpiece Placement: The workpiece should be placed flat on the mitre table with one edge securely against the rear fence. If warped, the concave side should face the rear fence.
  • Types of Cuts: The manual details how to perform straight cuts (90° mitre, 0° bevel), mitre cuts (angled mitre, 0° bevel), bevel cuts (0° mitre, angled bevel), and compound mitre cuts (angled mitre, angled bevel). It emphasizes ensuring the saw is locked into position for all cuts.

Maintenance Features

  • Blade Changing:
    1. Disconnect from power supply.
    2. Raise the cutting head.
    3. Raise and hold the lower guard.
    4. Loosen the guard cover screw with a 5mm Hex Key and swing the blade bolt cover away.
    5. Place a 6mm Hex Key onto the blade bolt.
    6. Depress the spindle lock button and rotate the Hex Key until the spindle lock engages.
    7. Loosen the blade bolt by turning the Hex Key clockwise (it's a left-hand thread).
    8. Remove the blade bolt and outer flange, then remove the blade.
    9. Install the new blade, ensuring the inner flange stays in place and the blade teeth point downwards, matching the arrow on the upper blade guard.
    10. Replace the outer flange and blade bolt.
    11. Place the 6mm Hex Key, depress the spindle lock, and tighten the blade bolt anti-clockwise.
    12. Swing the blade bolt cover back and secure it.
    13. Ensure the lower guard operates smoothly.
    • Warnings: Never use a blade larger than the stated capacity, too thick to allow proper engagement of the outer blade washer, or without the correct blade bush.
  • Carbon Brushes: These are wearing components. If the saw sparks or stops, the carbon brushes are worn out and need replacement. This should be done by an electrician or power tool repairer. Both brushes must be replaced simultaneously.
  • Sparking: A small amount of sparking through housing vents is normal.
  • Fence Alignment: The fence must be perpendicular (90° angle) to the saw blade for accurate cuts.
    1. Perform a test cut on scrap material.
    2. Check the cut with an accurate square.
    3. If inaccurate, unplug the tool, lower and lock the blade assembly.
    4. Place a carpenter's square along the blade (not teeth) and the fence.
    5. Loosen the fence bolts slightly, tap the fence into position with a soft mallet, retighten, and recheck.
  • Dust Bag: The dust extraction port can block. The dust bag should be emptied when no more than half full for efficient operation. Periodically clean the laser outlet with a dry soft cloth to remove dust build-up.
  • General Maintenance: Periodically check that all nuts, bolts, and other fixings are properly tightened.

Warranty Information

The product comes with a 3-year replacement warranty for DIY use, valid from the original date of purchase. Consumable parts like the blade, carbon brushes, and dust bag are excluded. To make a claim, the product must be returned to a Bunnings warehouse with the register receipt. The warranty is void if the tool is operated on an incorrect voltage, shows signs of abuse, accidents, alterations, lack of maintenance, disassembly, tampering, or professional/industrial use.

Ozito SCMS-2125 Specifications

General IconGeneral
BrandOzito
ModelSCMS-2125
CategorySaw
LanguageEnglish

Related product manuals