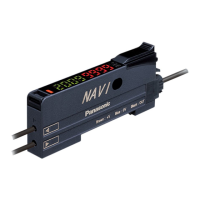
Press the MODE
key 5 times.
Press the
Jog switch.
Press the
Jog switch.
Press the
Jog switch.
Turn the Jog switch
5 times toward
the ‘
’ direction.
Turn the Jog switch
twice toward
the ‘’ direction.
After the digital display will blink
twice, the amplifier will automatically
return to ‘RUN mode’.
9-4. Setting Reset Function
This function will cause all configuration settings to revert to factory settings. However, any settings that have
been saved within the data bank will not be changed.
If the information stored within the data bank is to be changed, then data bank settings must be overwritten with
new settings by using the ‘7-3. Data Bank Save Setting Function’ from ‘PRO3 Mode’, described on p.42.
1 Press the [MODE key] 5 times to select ‘PRO mode’.
2 Turn the [Jog switch] 5 times toward the ‘
’ direction, to
select ‘PRO5 mode’.
3 Press the [Jog switch] to enter the ‘code setting’ state.
4 Turn the [Jog switch] twice toward the ‘
’ direction, to enter
the ‘reset setting’ state.
5 If the [Jog switch] is pressed, the letters ‘ ’ will be
displayed.
7 After ‘ ’ blinks twice, the amplifier will automatically
return to ‘RUN mode’ (normal sensing operation).
6 If the [Jog switch] is pressed, all configuration settings to
revert to factory settings.
53
 Loading...