12
Preparations/Basics
DVQX1391 (ENG)
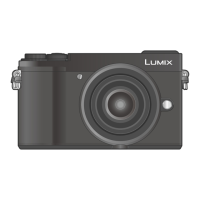
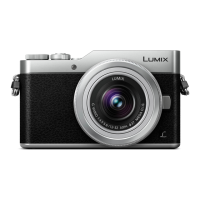
1 Shutter button (→24)
2
Front dial (→25)
3
Shoulder strap eyelet (→16)
4
Exposure compensation dial (→31, 35)
5
Mode dial (→26)
6
Camera [ON/OFF] switch (→20)
7
Motion picture button (→48)
8
Flash (→23)
9
Hot shoe (Hot shoe cover) (→13)
10
Focus distance reference mark
11
Eyecup
12
Viewfinder (→22)
13
Eye sensor (→22)
14
Dioptre adjustment dial (→22)
15
Stereo microphone (→23)
16
Lens release button (→20)
17
Lens lock pin
18
Mount
19
Sensor
20
Lens fitting mark (→19)
21
Self-timer indicator /
AF Assist Lamp (→23)
22
[LVF] button (→22) / [Fn3] button (→29)
23
Focus mode lever (→32, 33)
24
[
] (Flash open) button
• The flash opens, and recording with the
flash becomes possible.
• When taking pictures with flash with the
lens hood attached, the lower portion of
the photo may turn dark and the control
of the flash may be disabled because
the photo flash may be obscured by the
lens hood. We recommend detaching
the lens hood.
25
[AF/AE LOCK] button
• You can take pictures by locking the
focus and/or exposure.
26
Charging lamp (→18, 19) /
WIRELESS connection lamp (→65)
27
[
] ([Post Focus]) button (→40) /
[Fn1] button (→29)
28
[
] (Delete) button (→53) /
[Q.MENU/
] (Cancel) button (→29) /
[Fn2] button (→29)
29
[
] (Playback) button (→52)
30
Cursor button (→25)
31
[MENU/SET] button
• Confirmation of setting contents, etc.,
is performed.
32
[DISP.] button
• Use this to change display.
33
Rear dial (→25)
34
Speaker (→23)
35
Socket cover (→18)
36
[HDMI] socket
• You can view pictures on a TV screen
by connecting your camera to your TV
with the HDMI micro cable.
37
[USB/CHARGE] socket (→18)
38
Card/Battery door (→17)
39
Release lever (→17)
40
DC coupler cover (→93)
41
Tripod mount
• Do not attach this unit to tripods that
have screws with a length of 5.5 mm
(0.22 inch) or more. Doing so may
damage this unit or the unit may not be
secured properly on the tripod.
42
Touch screen (→27) / monitor (→75)
●
Always use a genuine Panasonic
AC adaptor (DMW-AC10E: optional).
(→93)
When using an AC adaptor, ensure
that the Panasonic DC coupler
(DMW-DCC11: optional) and AC
adaptor (DMW-AC10E: optional) are
used.
●
Keep the hot shoe cover out of reach
of children to prevent swallowing.

 Loading...