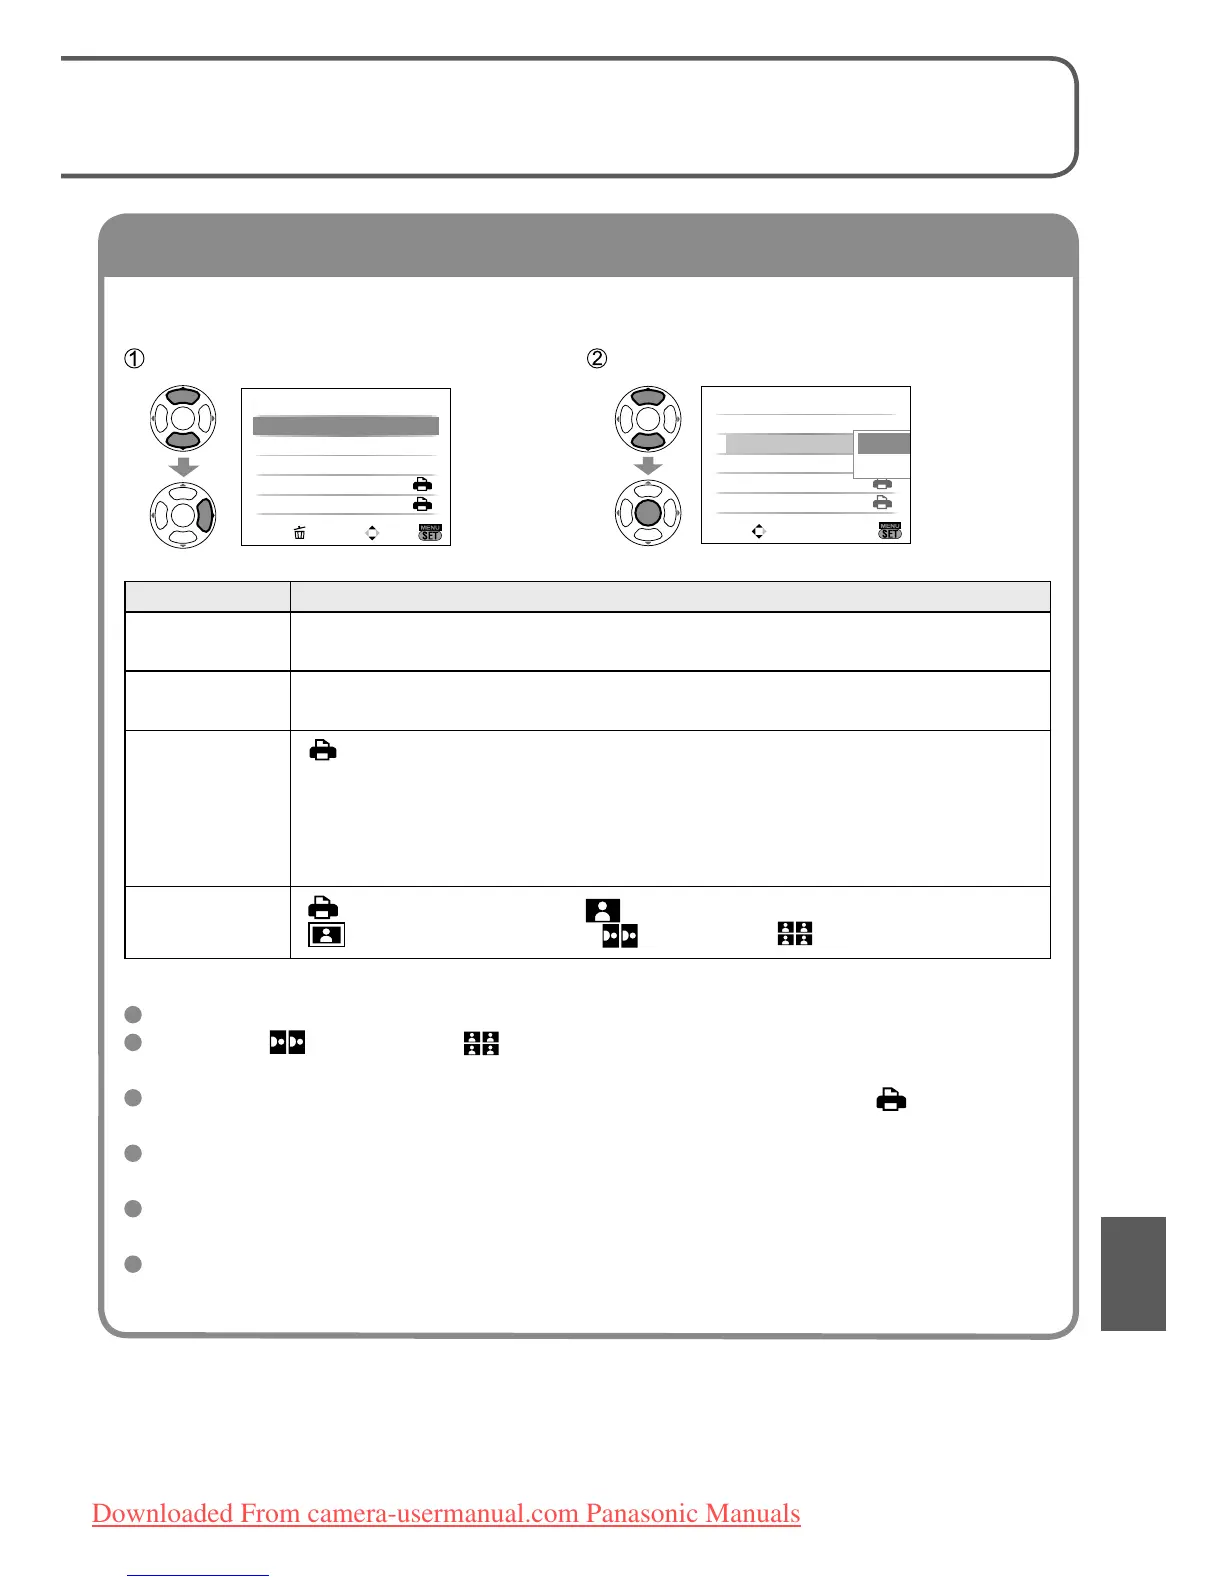
Printing multiple pictures
Select ‘MULTI PRINT’
in step
5 on the
previous page
Select item
(See below for details)
Select ‘PRINT START’
PLEASE SELECT
THE PICTURE TO PRINT
PictBridge
MULTI PRINT
MENU
PRINT
SELECT
1/5
100–0001100–0001
1/5
MULTI SELECT
SELECT ALL
DPOF PICTURE
FAVORITE
PictBridge
SET
SELECT
CANCEL
OFF
1
PRINT START
PRINT WITH DATE
NUM. OF PRINTS
PAPER SIZE
PAGE LAYOUT
MULTI SELECT
SET
SELECT
CANCEL
• To cancel → Press
‘MENU/SET’
•
MULTI SELECT
:
Scroll between pictures with ▲▼◄►, select pictures with display
button to print. (Press display button again to release selection.)
Press ‘MENU/SET’ when selection is complete.
• SELECT ALL :Print all pictures.
•
DPOF PICTURE
: Print pictures selected in ‘DPOF PRINT’ (P.78).
• FAVORITE : Print pictures selected as ‘FAVORITE’ (P.77).
(displayed only when ‘FAVORITE’ pictures present and setting set to ‘ON’).
Select ‘YES’ if print confirmation screen is displayed.
An orange ● displayed during printing indicates an error message.
Print may be divided into different stints if printing several pictures.
(Remaining sheets display may differ from set number.)
Print with date and text
With ‘TEXT STAMP’
Recording date and following information can be embedded into photographs (P.73).
Recording date NAME and AGE from ‘BABY’ and ‘PET’ scene modes
‘TRAVEL DATE’ elapsed days and destination Text registered in ‘TITLE EDIT’
• Do not add date printing in stores or with printers to pictures ‘TEXT STAMP’ is
applied (text may overlap).
Printing date without ‘TEXT STAMP’
Printing in store: Only recording date can be printed. Request date printing in store.
•
Making ‘DPOF PRINT’ (P.78) settings on the camera in advance allows settings for
numbers of copies and date printing to be designated before giving the card to the store.
• When printing pictures of 16:9 aspect ratio, check in advance that the store can
accept this size.
Using computer : Print settings for recording date and text information can be made
using the supplied CD-ROM (PHOTOfunSTUDIO-viewer-).
Using printer : Recording date can be printed by setting ‘DPOF PRINT’ on the
camera, or by setting ‘PRINT WITH DATE’ (P.85) to ‘ON’ when
connecting to a printer compatible with date printing.
(Make settings before selecting ‘PRINT START’)
Select item Select setting
SET
SELECT
CANCEL
PRINT START
PRINT WITH DATE
NUM. OF PRINTS
PAPER SIZE
PAGE LAYOUT
SINGLE SELECT
OFF
1
PRINT START
PRINT WITH DATE
NUM. OF PRINTS
PAPER SIZE
PAGE LAYOUT
SINGLE SELECT
OFF
1
SET
SELECT
OFF
ON
Item Settings
PRINT WITH
DATE
OFF/ON
NUM. OF
PRINTS
Set number of pictures (up to 999 pictures)
PAPER SIZE
(printer takes priority)
L/3.5”×5” (89×127 mm)
2L/5”×7” (127×178 mm)
POSTCARD
(100×148 mm)
16:9 (101.6×180.6 mm)
A4 (210 ×297 mm)
A3 (297×420 mm)
10×15 cm (100×150 mm)
4”×6” (101.6×152.4 mm)
8”×10” (203.2 ×254 mm)
LETTER (216×279.4 mm)
CARD SIZE (54×85.6 mm)
PAGE
LAYOUT
(printer takes priority) / (1 picture, no border) /
(1 picture, with border) / (2 pictures) / (4 pictures)
Items may not be displayed if incompatible with printer.
To arrange ‘2 pictures’ or ‘4 pictures’ in the same picture, set the number of
prints for the picture to 2 or 4.
To print to paper sizes/layouts not supported by this camera, set to and make
settings on the printer. (Consult your printer’s operating manual.)
‘PRINT WITH DATE’ and ‘NUM. OF PRINTS’ items are not shown when DPOF
settings have been made.
Even if DPOF settings are made, dates may not be printed with some shops or
printers.
When setting ‘PRINT WITH DATE’ to ‘ON’, check the date printing settings on the
printer (printer settings may be prioritized).
Downloaded From camera-usermanual.com Panasonic Manuals
 Loading...