16
RQT9874
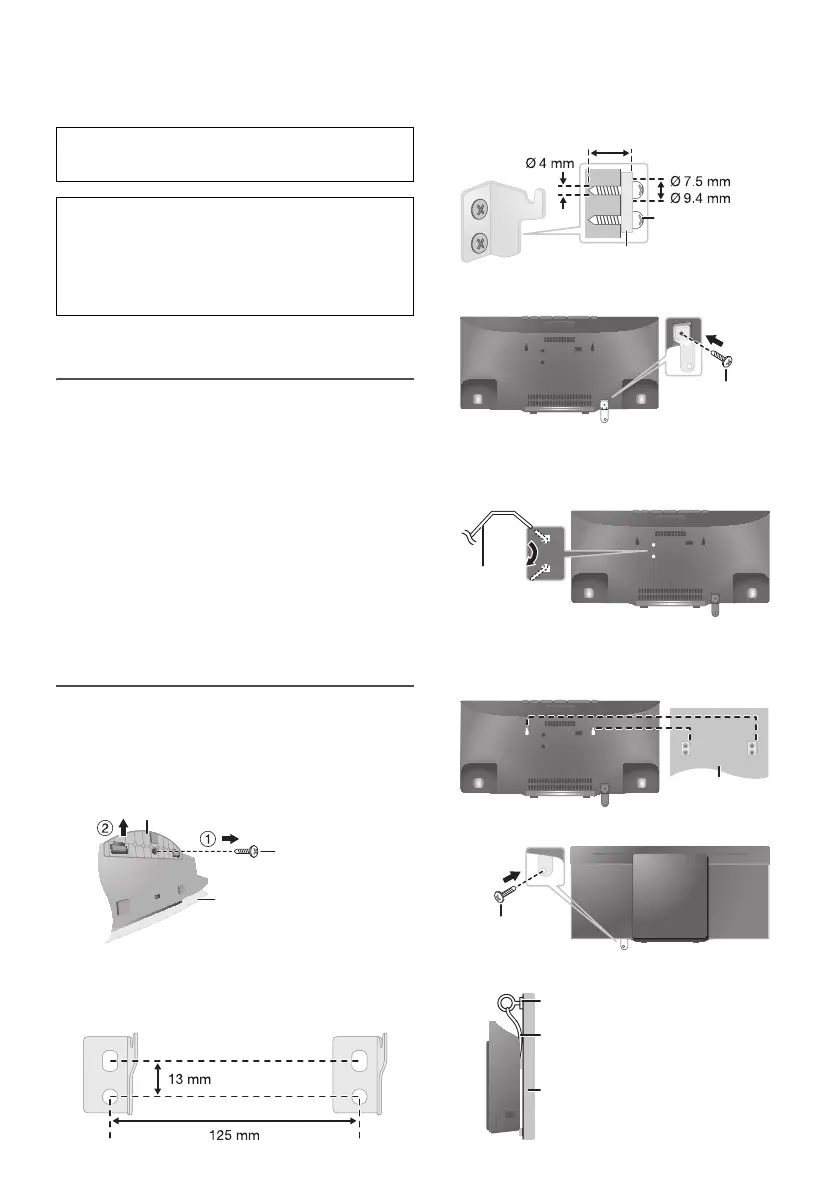
Attaching the unit to a wall (optional)
You can use the supplied wall mount brackets to attach
this unit to the wall.
Preparation
Disconnect the antenna(s) and the AC mains lead.
Installation accessories
█ Supplied accessories
2 Wall mount brackets
1 Safety holder
1 Screw
█ Additional accessories
(commercially available)
5 Screws
1 Screw eye
1 Cord (with a diameter of about 1.5 mm)
Installation instructions
1 Detach the pedestal of the unit.
Put a protection layer below the unit to prevent
scratches.
Remove the screw from the bottom of the unit.
2 Measure and mark the position of the wall mount
brackets on the wall.
Make sure the space on the wall is more than
60 cm (width) by 40 cm (height).
3 Fix the wall mount brackets to the wall.
Use a level to align the wall mount brackets.
4 Fix the safety holder to the unit with the supplied
screw.
5 Attach a cord to the unit to prevent the unit from
falling.
Bend the cord twice from the tip, each at 45° and
5 mm apart for it to go through the holes.
6 Connect the antenna(s) and the AC mains lead
(Z“Making the connections”).
7 Hook the unit onto the wall mount brackets.
8 Fix the safety holder to the wall.
9 Attach the cord to the wall.
Panasonic cannot be held responsible for any property
damage and/or serious injury, including death resulting
from improper installation or incorrect handling.
CAUTION!
• The installation should be done by a competent
installation specialist.
• Keep the wall mount brackets, safety holder and
screws
out of reach of children to prevent swallowing.
• Make sure the screws, the cord and the wall can
support the weight of more than 30 kg.
Screw
Protection layer
(not supplied)
Pedestal
Wall mount bracket
to
Screw
(not supplied)
At least 30 mm
Cord (not supplied)
Screw eye (not supplied)
Wall
SC-HC29.19 EB.EC RQT9874-1R EN.fm Page 16 Friday, April 18, 2014 9:46 AM
 Loading...