Do you have a question about the ParaBody 350 and is the answer not in the manual?
Crucial safety rules for equipment use to prevent injuries and ensure safe operation.
Comprehensive list of tools needed for the ParaBody 350 Home Gym assembly process.
Visual reference for identifying correct bolt lengths during the assembly steps.
Exhaustive list of all parts, their descriptions, quantities, and part numbers for the home gym.
Loosely connect front and rear uprights to the base, using specified bolts and nuts.
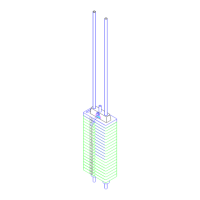
Install weight stack cushions, plates, and head plate assembly onto guide rods.
Attach the top boom and bearing housing, then securely tighten all structural frame connections.
Install the press arm, pulleys, and adjustable glide, connecting them to the top boom and upright.
Assemble and attach the pec seat, back pads, and press seat assemblies, ensuring proper height adjustment.
Install the leg curl extension, swivel pulley bracket, and pec arms, securing them with bearings and capnuts.
Assemble the calf block, apply non-skid strip, and attach roller pads to the uprights and extensions.
Route and secure the weight stack cable to the top boom and front upright, threading through pulleys.
Connect the cable to the selector shaft and attach the floating pulley assembly for correct tension.
Connect the pec dec cable to the pec arms and attach pulleys to the top boom using L-brackets.
Assemble the U-bracket, connect cables and pulleys, and correctly route the ab crunch cable.
Attach pulleys to the swivel bracket and plates, preparing for the leg curl extension cable.
Install the floating pulley, base pulleys, and route the leg curl extension cable correctly.
Verify head plate seating and adjust all cable tensions for optimal performance and safety.
Connect the lat bar to the weight stack cable and the triceps strap to the ab crunch cable.
Attach the ankle strap or low row bar to the leg curl extension cable using the provided chain and snap links.
| Stations | 3 |
|---|---|
| Weight Stack | 210 lbs |
| Weight Capacity | 300 lbs |
| Frame Material | Steel |
| Exercises | Bench press, butterfly, lat pulldown, low row, leg extension, preacher curl |