EasyManua.ls Logo

ParaBody cm3 User Manual

ParaBody cm3
28 pages
To Next Page IconTo Next Page
Page #1 background imageLoading...
Page #1 background image
1
CM3 GYM SYSTEM
1CLASS H
PART # 7596801
REV. A
Version: CM3-103
Revision: 07/30/03
USER’S GUIDE
WARNING:
Read and follow all directions
for each step to insure proper
assembly of this product.
Question and Answer IconNeed help?

Do you have a question about the ParaBody cm3 and is the answer not in the manual?

ParaBody cm3 Specifications

General IconGeneral
BrandParaBody
Modelcm3
CategoryHome Gym
LanguageEnglish

Summary

Safety Information

Key Safety Rules

Follow essential rules for safe operation, including pre-use checks and user conduct.

Step 1: Base and Upright Assembly

Steps 2 & 3: Headplate and Weight Plate Assembly

Step 4: Guide Rods & Weight Stack Assembly

Install Guide Rods

Insert and lubricate guide rods into the base and through the shroud bracket if applicable.

Assemble Weight Stack Components

Slide spacers, cushions, weight plates, head plate, and shaft collars onto guide rods.

Step 5: Boom Plate Attachment

Step 6: Arm Supports & Weight Stack Labels

Step 7: Arm Attachment

Step 8: Seat Pad Attachment

Step 9: Seat Adjustment Components

Step 10: Leg Pedestal Attachment

Attach Leg Pedestal to Upright

Assemble leg pedestal to upright using caps, bolt, washers, and lock nut.

Step 11: V-Pulley Plates & V-Groove Pulleys

Step 12: Boom Pulleys & Plates

Assemble Boom Pulley Plates & Pulleys

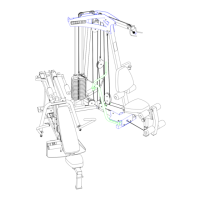
Assemble boom pulley plates and 3-1/2" pulleys to boom plates using bolt, spacers, cable guard, lock nut.

Step 13: Pulley & Cable Guard Attachment

Step 14: Weight Stack Pin & Cable Routing

Assemble Pin & Route Stack Cable

Assemble weight stack pin to shaft and screw weight stack cable into the shaft.

Route Cable & Assemble Pulleys

Route weight stack cable around pulleys and assemble pulley plates with pulley and bolt.

Step 15: Pulley & Cable Connections

Attach Pulley to Boom Plates

Assemble 3-1/2" pulley to boom plates using bolt, washers, guide cables, spacers, lock nut.

Attach Stack Cable to Bracket

Screw the threaded end of the weight stack cable into the pulley bracket.

Step 16: Boom Cable Routing & Spacer Attachment

Route Boom Cable Over Pulleys

Route boom cable over specified pulleys on left/right boom plates and V-groove pulleys.

Attach Pulley to Pulley Bracket

Assemble 3-1/2" pulley to pulley bracket using bolt/lock nut, looping boom cable first.

Step 17: Guide Bracket & Short Cable

Slide Guide Bracket Through Cables

Carefully slide the guide bracket through the guide cables.

Assemble Short Cable & Turnbuckle

Assemble short cable and turnbuckle to each guide cable and adjust for tension.

Step 18: Leg Cable & Pulley Attachments

Attach Leg Cable/Pulley to Pedestal

Secure leg cable ball end and 3-1/2" pulley to leg pedestal using bolts, spacers, washers, locknuts.

Attach Pulley to Upright for Leg Cable

Securely assemble 3-1/2" pulley to upright for leg cable using bolt, spacers, and locknut.

Attach Pulley to Base Plates for Leg Cable

Assemble 3-1/2" pulley to base plates using bolt, washers, guide cables, spacers, lock nut.

Step 19: Pulley Plate & Cable Connection

Step 20: Base Pulley & Leg Cable

Step 21: Arm Cable & Pulley Assembly (Left)

Step 22: Base Pulley Attachment

Step 23: Pulley Bracket Pulley Attachment

Step 24: Right Arm Cable & Pulley Assembly

Step 25: Final Tightening Procedure

Secure All Frame Connections

Securely tighten all loose frame connections as indicated in the figure for final assembly.

Step 26: Seat Pad Attachment to Upright

Step 27: Roller Pad Installation

Step 28: Handle & Strap/Bar Attachment

Step 29: Cable Tension Adjustments

Adjust Cable Tension with Turnbuckles

Adjust turnbuckles on guide cables to add tension and secure with jam nuts.

Address Head Plate Seating Issues

Fix head plate seating problems by pushing down, inserting pin, and performing repetitions.

Fine-tune Cable Slack

Adjust cable threaded ends on pulley brackets if excess slack exists and retighten jam nuts.

Related product manuals