10
V1.0/08/13
ENGLISH
Starting the Test Kit
4. Starting the Test Kit
CAUTION!
Risk of injury through damaged test kit.
► Check the test kit for signs of damage prior to use!
► Never put a damaged test kit into operation!
► Send damaged test kits back to the manufacturer for repair!
ATTENTION!
Risk of material damage through soiling.
► Keep the test object, adapters and seals free of soiling!
ATTENTION!
Risk of material damage through exceeding the torque.
► Never exceed the maximum torque of 25 Nm for the ServiceJunior and
test object!
Pay attention that the O-ring on the connection nut of the pressure hose is fit-
ted correctly.
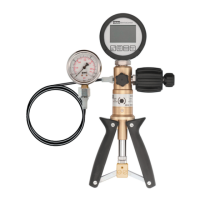
1 Screw the ServiceJunior to the ServiceJunior connection and tighten to the maxi-
mum torque of 25 Nm.
2 Select an appropriate adapter and seal for the test object.
3 Insert the appropriate adapter in the connection nut of the pressure hose and
tighten it.
4 Mount the seal on the test object connection and screw the test object in the ap-
propriate adapter at the maximum torque of 25 Nm.
Ä The test kit is ready to operate.
 Loading...