GB MT
32
- search for signs of damage
- replace damaged parts with
equivalent ones or have the device
repaired.
• Do not try to repair the device
by yourself unless you have
professional training. All work
not mentioned in this instruction
manual may only be performed
by our service centre. Many acci-
dents are caused by poorly maintained
appliances.
• Only use accessories that are
recommended by PARKSIDE.
Unsuitable accessories can result in
electric shock or re.
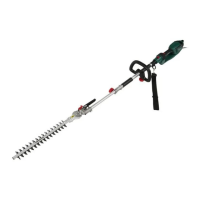
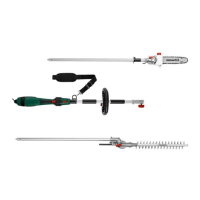
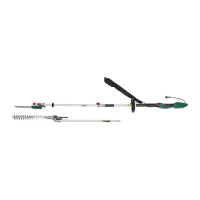
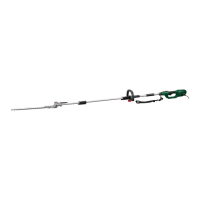
Assembly of the pole
saw
Pull out the power plug before carry-
ing out any work on the equipment.
Use only original parts.
1. Unpack the device and check it for
completeness.
Assembly of the middle
tubular shaft (9) (optional):
The long-shaft hedge trimmer can
be used optionally with or without
the middle tubular shaft (9).
2. Remove the cap (23) from the middle
tubular shaft (9).
Loosen the star wheel (11).
Slide the middle tubular shaft (9) onto
the tubular shaft on the appliance hous-
ing (12) in a slight rotating movement.
When doing so, the retaining knob (10)
locks into place. Fix the two tubular ele-
ments in place with the rotary knob (11).
Only tighten the rotary knob
(11) by hand! The use of
maximum manual force will
damage the tubular shaft.
Assembly of the front tubular
shaft (6):
3. Remove the cap (23) on the front tu-
bular shaft (6). Loosen the star wheel
(8/11). Slide the front tubular shaft (6)
optionally onto the middle tubular shaft
(9) or onto the tubular shaft (12) on the
appliance housing in a slight rotating
movement. The safety button (7) locks
into place. Fix the two tubular elements
in place with the rotary knob (8/11).
Only tighten the rotary knob
(8/11) by hand! The use of
maximum manual force will
damage the tubular shaft.
4. Place the round handle (13) onto
the tubular shaft of the device hou-
sing (12). Fold on the counter-holder
(24) of the round handle and screw
it on together with the large washer
(25) and the rotary knob (26).
5. The assembly of the round handle (13)
depends on whether the central tube
shaft (9) is used or not.
Structure without central tube shaft (9):
The round handle (13) must be mount-
ed between the two soft handles (27).
Structure with central tube shaft (9):
Depending on body size, the round
handle (13) can be mounted
a) between the two soft grips (27)
or
b) between the swivel star tube shaft
 Loading...