Do you have a question about the PAX A920 Pro and is the answer not in the manual?
Remove battery cover to check for and remove security tab. Reinsert and close.
Ensure the paper roll is correctly inserted for printing.
Press and hold the right-hand side button to turn the terminal on or off. Wait for software downloads.
Connect the USB-C charger to the terminal when the battery is red.
Terminal connects via 4G SIM. For stable connection, use Wi-Fi by selecting network and entering password.
Launch the app after powering on and connecting to the internet. Set manager PIN.
Launch Teya Payments app, enter amount, confirm. Print customer or merchant receipt if desired.
Navigate to Transactions and refunds, select transaction, issue refund, enter PIN, confirm amount.
Totals reset at 5 AM. View current day's earnings via Summaries > Opened summary.
Transactions settle next business day. Weekend/holiday settlements are on Monday/next business day.
Access features like Tips and Pay by Link via Manage features in the app menu using manager PIN.
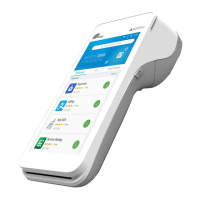
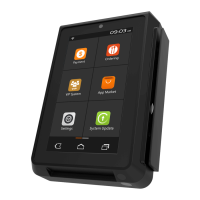
The PAX A920 Pro is a portable payment terminal designed for efficient and versatile transaction processing. This device facilitates various payment methods and offers features for managing transactions, refunds, and connectivity, making it suitable for a range of business environments.
The primary function of the PAX A920 Pro is to process payments. It supports multiple payment methods, including mag stripe cards, contactless cards, and traditional chip cards (implied by the presence of a card reader and general payment terminal functionality). The device is equipped with a built-in printer for generating customer and merchant receipts, ensuring a physical record of transactions. It operates on a pre-installed 4G SIM card for mobile internet connectivity, allowing for transactions to be processed on the go. Additionally, it supports Wi-Fi for a more stable connection when available. The terminal runs a dedicated Payments app, which is the central interface for all transaction-related activities. It also includes features for managing refunds, viewing transaction summaries, and accessing additional functionalities like tips and "Pay by Link."
Getting Started: To begin using the terminal, users must first remove a security tab from the battery. The device is then switched on using the power button located on the right-hand side. The Payments app, which is pre-installed, is launched from the home screen to initiate operations.
Taking Payments: Processing a payment involves launching the Teya Payments app, entering the transaction amount, and confirming. Users have the option to print either a customer receipt or a merchant receipt after the transaction is complete.
Refunding Transactions: The terminal provides a straightforward process for issuing refunds. From the home screen, users can access the "Transactions and refunds" menu. They then select the specific transaction to be refunded and choose "Issue refund." The system prompts for a four-digit manager PIN for security. Users can opt for a full refund or enter a partial amount. After confirming the amount and, if required, the card number with the customer, the refund is completed. The "Transactions and refunds" menu also allows users to search for past transactions using filters or by tapping the card icon.
Connectivity: The PAX A920 Pro comes with a pre-installed 4G SIM card, ensuring automatic connection to the mobile internet. For enhanced stability, users can connect to Wi-Fi by swiping down from the top of the screen, selecting the Wi-Fi icon, choosing their network, and entering the password. The device displays the connectivity status, indicating whether it's connected via cellular or Wi-Fi.
Battery and Charging: The terminal's battery status is displayed on the screen, indicating whether it's fully charged or currently charging. If the battery indicator is red, it signifies a need for charging. The device can be charged by plugging a USB-C charger directly into the terminal and a power socket or by using a charging base.
Viewing Transaction Summaries: The terminal automatically resets transaction totals at 5 AM daily, with settlements typically occurring on the next business day. To view these totals, users can access "Summaries" from the app menu. "Opened summary" displays earnings for the current day, while "Closed summary" (under "Summaries") provides a history of past transactions. Users can choose to "Print and close" or "Just print" the summary.
Accessing Additional Features: The terminal offers additional features such as "Tips" and "Pay by Link." These can be accessed through the "Manage features" option in the app's menu, which requires a four-digit manager PIN for security.
User Interface: The device features a touchscreen interface with clear icons and menus for navigation. Status indicators for battery, connectivity, and time are visible at the top of the screen. A volume button is also present for audio control.
Battery Management: The initial setup involves removing a security tab from the battery, which is a one-time maintenance step. The battery cover can be removed by swiping a button on its underside, allowing access to the battery for inspection or replacement if necessary.
Paper Roll Management: The terminal requires a paper roll for printing receipts. Users need to ensure the paper roll is correctly inserted and ready to print, which is a routine maintenance task.
Software Updates: If the terminal starts downloading software upon startup, users are advised to wait a few minutes until the process finishes. This indicates that the device is capable of receiving and installing updates to its operating system or applications, ensuring optimal performance and security.
PIN Security: The manager PIN, which is crucial for accessing certain features and processing refunds, can be changed at any time under "PIN security" in the main menu. This allows users to maintain control over their device's security.
Troubleshooting and Support: The manual provides a QR code for users to scan if they need more information or support, indicating an accessible resource for troubleshooting and further assistance.
| Operating System | Android 8.1 |
|---|---|
| Display | 5.5-inch IPS, 1280 x 720 pixels |
| Memory | 2GB RAM, 16GB Flash |
| Connectivity | 4G, Wi-Fi, Bluetooth |
| Card Reader | EMV, NFC, magnetic stripe |
| Camera | 5MP |
| Security | PCI PTS 5.x |
| Printer | Integrated thermal printer |