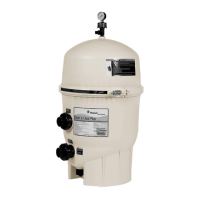
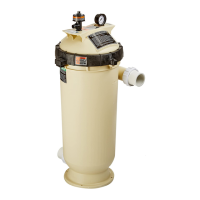
The Pentair Clean and Clear® RP Cartridge Filter is a pool and spa filtration system designed to provide clean water through a cartridge element. It operates under pressure and requires proper installation, operation, and maintenance to ensure safe and reliable service.
Function Description:
The primary function of the Pentair Clean and Clear® RP Cartridge Filter is to remove dirt, debris, and other foreign matter from pool and spa water. Water flows through the cartridge element, which traps impurities, and then returns clean water to the pool or spa. The filter is designed to operate safely when the lock ring is properly installed and there is no air in the water system.
Important Technical Specifications:
- Maximum Working Pressure: 50 psi. The filter should never be subjected to pressures exceeding this limit, even during hydrostatic pressure tests.
- Filter Models and Sizes:
- Model 160354: 100 sq. ft. filter area, requires 61 inches vertical clearance.
- Model 160355: 150 sq. ft. filter area, requires 76 inches vertical clearance.
- Model 160353: 200 sq. ft. filter area, requires 76 inches vertical clearance.
- Recommended Flow Rates (Residential): 0.5 GPM per sq. ft. of filter area.
- 100 sq. ft. filter: 100 GPM (6,000 GPH, 36,000 GPH for 6 hours, 48,000 GPH for 8 hours).
- 150 sq. ft. filter: 150 GPM (9,000 GPH, 54,000 GPH for 6 hours, 72,000 GPH for 8 hours).
- 200 sq. ft. filter: 150 GPM (9,000 GPH, 54,000 GPH for 6 hours, 72,000 GPH for 8 hours).
- Maximum Flow Rates (Commercial): 0.375 GPM per sq. ft. of filter area.
- 100 sq. ft. filter: 38 GPM (2,280 GPH, 13,680 GPH for 6 hours, 18,240 GPH for 8 hours).
- 150 sq. ft. filter: 56 GPM (3,360 GPH, 20,160 GPH for 6 hours, 26,880 GPH for 8 hours).
- 200 sq. ft. filter: 75 GPM (4,500 GPH, 27,000 GPH for 6 hours, 36,000 GPH for 8 hours).
- Pressure Gauge (Pentair P/N 190058): Essential for monitoring system operation.
- Replacement Parts:
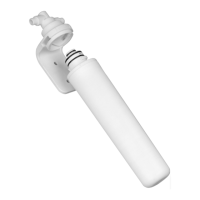
- High Flow Manual Air Relief Valve (98209800)
- Lids (178548 for 100 sq. ft., 178546 for 150/200 sq. ft.)
- Lock Ring Assembly (59052900)
- Body O-Ring (87300400)
- Air Bleed Sock Kit (59016200)
- Center Cores (59053700 for 100 sq. ft., 59053800 for 150/200 sq. ft.)
- Cartridge Elements (R173215 for 100 sq. ft., R173216 for 150 sq. ft., R173217 for 200 sq. ft.)
- Tank Bottom (178731)
- Drain Cap Assembly (154712Z before 10/17, 190030Z after 10/17)
- Union Nut "C" Clip (178732)
- Union Nut (U11-200PS)
- Union Diamond Seal (178746)
- Union, Threaded Half (178733)
Usage Features:
- Installation: Must be installed on a level concrete slab by a qualified pool technician, adhering to local codes and ordinances. The filter should be positioned so that instructions, warnings, and the pressure gauge are visible and readable. Sufficient clearance is required around the filter for visual verification of the lock ring and for lid removal during servicing. Electrical controls (ON/OFF switches, timers, control systems) must be installed to allow operation without placing any part of the user's body over or near the pump strainer lid, filter lid, or valve closures.
- Plumbing: All plumbing connections must comply with local codes. PTFE or silicone-based lubricants should be used on O-rings for union and bulkhead couplings; petroleum-based products will damage the equipment.
- Startup Procedure:
- Ensure the pump is off and automatic controls are shut off.
- Open the High Flow™ manual air relief valve.
- Wait until all pressure is relieved (pressure gauge reads zero).
- Verify the O-ring is in position in the lower tank half and place the filter lid firmly on the tank half.
- Place the lock ring over the tank lid, centering it on the threads, and turn clockwise until safety latches click and the ring hits the stops. Do not overtighten.
- Open the High Flow™ manual air relief valve fully (quarter turn counterclockwise) to release trapped air.
- Stand clear of the filter tank and start the pump.
- Close the manual air relief valve once a steady stream of water appears.
- If a solid stream of water does not appear within 30 seconds or if the pressure gauge indicates pressure before water outflow, shut off the pump immediately, open return line valves, and clean the air relief valve.
- Operation under Pressure: The system operates under high pressure. It is crucial to relieve pressure before servicing any part of the circulating system to prevent the lid from separating, which can cause severe injury or death.
- Air in System: Air entering the filter is dangerous. Common causes include low water level in the pool/spa, clogged skimmer basket, split suction cleaner hose, or leaks in the pump hair and lint pot lid or suction line. Air bubbles from return lines or discharge from the air relief valve with the pump running indicate air in the system.
Maintenance Features:
- Pressure Gauge Maintenance: The pressure gauge is a critical indicator of system operation. It should read zero when the system is off and pressure is relieved, indicate pressure when operating, and be readable and undamaged. Replace if it does not meet these requirements (Pentair P/N 190058).
- Cleaning the Manual Air Relief Valve:
- Shut off the pump and relieve pressure (gauge must read zero).
- Open the manual air relief valve by turning the valve cover assembly a quarter turn counter-clockwise until it snaps open.
- Pull out the locking tabs and unlock the valve stem and cover assembly from the valve body with a counter-clockwise turn.
- Pull the valve stem and cover assembly straight up.
- Clean off any debris from the valve stem and body.
- Verify the filter tank's air passage is open by inserting a 5/16" drill bit through the valve body.
- Check that the valve stem O-rings are in good condition, properly positioned, and lubricated with a silicone-based lubricant (petroleum-based products will cause damage).
- Reinstall the valve stem and cover assembly with a downward and clockwise motion until it snaps into position.
- Cleaning the Filter Cartridge Element:
- Turn off the pump and any automatic controls.
- Open the filter High Flow™ manual air relief valve and the waste drain valve/cap.
- Remove the hair and lint strainer pot lid and clean the basket.
- Disconnect the air relief drain hose (if installed).
- Remove the lock ring by depressing safety latches and rotating counterclockwise, then remove the tank lid.
- Remove the element assembly by lifting it straight up from the handles.
- Remove the cartridge element from the center support tube.
- Use a garden hose with a nozzle to spray water at the cartridge element to dislodge accumulated foreign matter, cleaning both the outside and inside.
- For pools/spas with high levels of perspiration, suntan lotions, or oils, soak the cartridge for at least one hour (overnight is most effective) in a commercial filter cleaner, one cup trisodium phosphate (TSP) to five gallons of water, or one cup dishwasher detergent to five gallons of water. Follow manufacturer instructions for cleaners.
- Rinse the cartridge thoroughly to remove oils and cleaning solutions. Failure to remove all oils and cleaning solutions before acid soaking will result in permanent restriction of water flow and premature cartridge failure.
- Direct water spray to wash out the inside of the tank body and bottom manifold.
- Check the gasket around the outer lip of the bottom plate, ensuring it is firmly and evenly set.
- Turn the cartridge element over several times during washing for thorough cleaning.
- Clean and remove debris from inside the filter tank, O-ring, and O-ring groove.
- Replace the clean cartridge element on the support tube and install the assembly into the filter tank body, aligning the arrow on the support tube with the inlet port, ensuring it is fully seated. Ensure the internal air relief screen is attached to the top of the element support tube.
- Replace the tank lid, ensuring it is fully and firmly seated.
- Place the lock ring over the tank lid, centering it on the threads, and turn clockwise until safety latches click and the ring hits the stops. Do not overtighten.
- Generously coat the O-ring with silicone lubricant before reassembling if the tank was opened or the element assembly removed. Do not use petroleum-based lubricants.
- Replace the drain cap and reinstall the manual air relief valve drain hose if used.
- Replacing the Cartridge Element: Cartridge element life varies with pool conditions but typically averages three years under normal conditions. Follow the "Cleaning the Filter" steps to replace the element.
- Initial Cleaning for New Pools/Cleaned Elements: Introduce 0.5 pounds of diatomaceous earth per 100 square feet of filter area into the system after the pump is primed and operating. Mix diatomite with water and pour into the skimmer to enhance filtration.