-9-
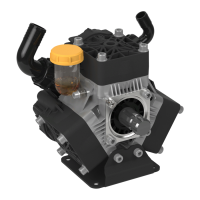
On Models 9305C-HM3C-SP, 9505C-HM3C-BS and
9305C-HM3C, install the washer on the shaft prior to
installing the impeller nut.
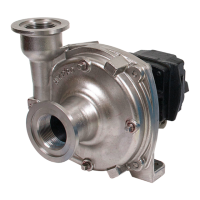
Figure 9
3. Using a screwdriver and hammer, tap out the stationary
portion of the Mechanical Seal from the motor side of the
Mounting Flange. (If the motor is not removed, the seal
can be pried out with a small screwdriver.)
The seal will be damaged by removal in this manner. A
new seal must be used when pump is reassembled.
Clean-Up Of Pump Housing
1. Using a circular bottle-type wire brush with air or hand
drill, clean the Outlet Port, Inlet Port and the sealing
areas of the o-ring on the Pump Casing and Mounting
Flange. Using the port brush, clean the seal cavity in the
Mounting Flange. [The last step should not be performed
on the 9300P.]
2. After wire brush cleaning, it is recommended that the
Pump Casing and Mounting Flange be further cleaned in
a solvent tank to remove rust and corrosion particles.
Seal Replacement/Pump Housing Reassembly
If the hydraulic motor requires repair, proceed to
Disassembly and Repair of the Hydraulic Motor in the
next column.
1. Lubricate the seal cavity in the Mounting Flange with
WD-40
®
, LPS or equivalent. Do not lubricate the shaft.
2. Install the stationary portion of the Mechanical Seal by
sliding over the Shaft with the ceramic side out.
Make sure both the seal cavity and seal are clean and
lubricated.
3. To seat the seal in the seal cavity, use a piece of 3/4”
PVC pipe 4” to 6” [101.6 to 152.4 mm] in length. Lubricate
sealing surface on seal after it is seated. Do not lubricate
the shaft.
4. To install the rotary portion of the mechanical seal, place
it over the shaft with the carbon side facing in, and press
against the stationary portion (See Figure 9).
5. Install rubber gasket 1700-0100 over shaft against rotary
portion of seal.
The threads of the Plastic Seal Nut are fine and can
be easily cross threaded. To prevent cross threading,
turn the Plastic Seal Nut counterclockwise until area
of thread engagement is detected; then turn the Plastic
Seal Nut clockwise until it is secure. Do not over tighten
the Plastic Seal Nut.
6. InsertaWoodruffKeyintotheShaftkeyslot;thenplace
theImpellerontheShaftandalignitwiththeKey and
press against the Mechanical Seal Assembly. Apply a
blue thread locking compound to the Impeller Nut, and
using a 5/8’’ socket wrench and using a screwdriver to hold
the Impeller, install the Impeller Nut. [On polypropylene
models, insert the Woodruff Key into the Shaft key slot.
Place the Impeller on the Shaft and align it with the Key;
then press against the Mechanical Seal Assembly. Place
the Metal Seal Washer on the Shaft. Apply a drop of blue
thread locking compound on the Impeller Nut and secure
the Impeller to the Shaft as described previously.]
7. Install the o-ring on the mounting flange. Replace the
o-ring if worn or damaged.
8. Place the pump casing on the mounting flange, insert
and tighten the bolts.
Disassembly and Repair of the Hydraulic Motor
The work area and motor should be as clean as
possible to prevent contamination of parts.
1. Remove the Mounting Flange from the motor body and
place Hydraulic Motor in vise.
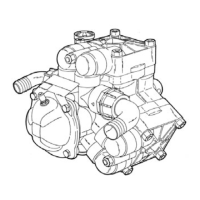
2. Remove Tank Port Adapter and Pressure Port Adapter
with large crescent wrench or 1-1/16” and 1-3/8” box end
wrench (See Figure 10).
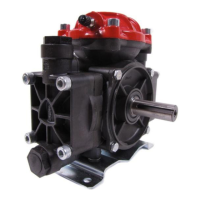
3. Using a 9/16” box end wrench, loosen the nut on the By-
pass Adjusting Screw (See Figure 10a).
4. Using a small screwdriver, remove the Bypass Adjusting
Screw from the Motor. (This will remove the Screw, Nut,
Washer and Thread-Seal Gasket.)
5. Using a 1/4” Allen wrench, remove the Socket Head Cap
Screws from the Motor End Plate (See Figure 10).
6. If Motor End Plate will not lift off easily, use a small screw-
driver to carefully pry apart the boss portion of the End
Plate and Gerotor Housing until free (See Figure 11). If
Gerotor Housing will not lift off easily, carefully pry apart
Figure 10
Figure 10a
L-1526 (12/12, Rev. B)
 Loading...