11
- Make sure that the new saw blade is well centered at the inner ange when mounting the blade.
- Make sure the direction of rotation from the blade is the same as the rotation direction of the tool,
refer to the direction arrow at the tool and the direction arrow at the saw blade
- Reinstall the outer flange, washer and tighten the blade clamp screw.
- Make sure the saw blade can run freely by turning the blade by hand.
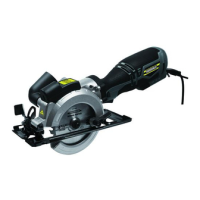
Parallel cut adjustment
Loosen the Parallel guide lock screw (F)
Slide parallel guide (G) through the slots in the base plate (L) to the desired width.
Tighten the Parallel guide lock screw (F) to secure it into position.
Ensure that the Parallel guide rests are parallel to the base plate to ensure a straight parallel cut.
Switching on and off
NOTE
Before engaging the on/off switch, check the saw blade to see if it is fitted properly
and runs smoothly, and the blade clamp screw is properly tightened.
- Connect the plug to the power supply.
- To start the tool, depress the lock-off button (C) and
then depress the switch trigger (B).
- To stop the tool release the switch trigger (B).
- Wait until the saw blade comes to a complete stop
before putting the machine down.
Fig. 3
F
L
G
F
B
C
Fig. 4
 Loading...