Do you have a question about the Performax 241-0992 and is the answer not in the manual?
| Brand | Performax |
|---|---|
| Model | 241-0992 |
| Category | Power Tool |
| Language | English |
Always wear eye protection, hearing protection, and a dust mask when operating the tool.
Keep the work area clean and well lit. Avoid explosive atmospheres and keep children away.
Stay alert, use PPE, prevent unintentional starting, avoid overreaching, and dress properly.
Have the power tool serviced by a qualified repair person using only identical replacement parts.
Use correct blades, ensure secure fitting, avoid hot blades, use sharp/undamaged blades.
Keep cords clear of the work area, use heavy enough gauge cords, and ensure they are in good condition.
Use a separate circuit, protected by a 15 AMP fuse/breaker, and ensure the switch is OFF before connecting.
Explains symbols for voltage, current, speed, and electrical construction types.
Explains symbols for warnings, safety glasses, direct current, and off position.
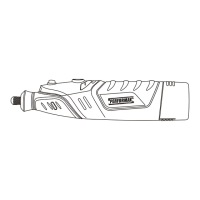
Diagram identifying key parts like speed control, trigger, blade holder, and laser.
Location of the hex key used for adjusting the edge guide.
Instructions for attaching and adjusting the edge guide for cutting narrow edges.
How to select one of four blade angles for variable orbital action.
Operation of the switch to turn the laser and LED worklight on or off.
How to adjust the jigsaw speed using the control wheel.
Instructions for operating the trigger switch and engaging the lock-on feature.
Steps to attach the vacuum adapter for sawdust collection.
How to use the vacuum port switch for dust management.
Lists various materials like wood, drywall, metal, and styrofoam that can be cut.
Guidelines for marking, securing the workpiece, and starting a cut.
Procedure for making plunge cuts, with warnings and recommendations.
Instructions for performing bevel cuts, referencing earlier angle adjustment steps.
Use only original parts, avoid solvents on plastic, do not modify the tool, and clean frequently.
Notes that bearings are pre-lubricated for the life of the unit.
A detailed diagram showing all parts of the jigsaw with numerical labels.
Detailed list of jigsaw parts with key numbers, part numbers, and quantities.
Continuation of the detailed parts list with key numbers, part numbers, and quantities.
Details on returning the product within 30 days for a full refund.
Information on the limited warranty for defects in material or workmanship.