POLYCOM
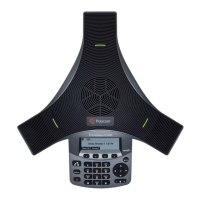
SoundStation IP6000
Before you start
The IP conference phone package that you
have received from us contains the following:
IP conference phone, power supply adapter as
optional accessory, and cables. Turn the IP
teleconference phone upside down and plug
the black Ethernet cable to the phone’s “LAN”
socket. Plug the other end to the IP phone
socket of the modem, router or switch. If the
switch does not support power supply via
Ethernet cable, you should have an additional
device with the phone (Ethernet injector).
Connect the injector to the electric socket
and plug an Ethernet cable to both ends of
the injector (one for the phone, one for your
CPE). Check the phone’s LCD. The LCD
should display the Polycom logo followed by
the text: “Loading application” “Initialising
network”, while the LED indicators at the top
of the phone should be on. After a few
minutes, the phone will display the date, time
and the last three digits of your phone
number in the upper left corner. You can start
using the phone now. The telephone director
of your company is embedded directly in the
phone.
Enter the phone´s menu. To browse through
the menu, use “up, down” arrows and the
“Select” button. Go to “Functions…” and
select Directory… The newly displayed list
includes all contacts within your company.
For the next step, prepare the information
acquired within service provision, your
telephone number and the access password.
Username is your telephone number. Here
you can configure the Virtual PBX as per your
needs portal-uc.gtsce.com. Help for all
functions is available upon clicking the “Help”
button. Additional manuals are available
upon clicking “Download”.
1. Making a call
Enter the phone number and confirm it by
pressing the Dial context button. Finish the
call using the End call context button.2.
2. Controls in general
The phone features context based buttons
allowing you to browse through the phone.
Context based buttons change their function
automatically depending on the actual status
of the phone.
I.e.: the sequence Menu-2-4-1 means pushing
the button sequence MENU, 2, 4, 1. To return
to default menu, press the EXIT button
repeatedly.
“MENU” button – is used for entering the
phone’s configuration menu.
“Redial” button – is used for redialling the last
dialled number.
“Dial” button – is used for confirming the
digits displayed on LCD (making a call).3.
3. Telephone directory
Virtual PBX uses the telephone directory of
the platform which always contains all active
users. You can add, edit or delete items of the
personal directory via the portal.uc.gtsce.com
portal.
4. Searching in tel. directory
Press MENU Functions… Directory….
The directory will be uploaded in the phone.
Use the up and down arrows to browse
through the directory, press “Dial” to dial the
selected contact.
5. Call lists
Press the context button Menu Functions…
call lists….; this will display a list of all calls.
To select more specific history, press the
“up” or “down” navigation buttons as
required. This will display “missed calls…,
answered calls…, dialled numbers….“. To dial
a number from the list, press Select. To delete
lists of calls: Press the button Menu
Functions… call lists…; this will display lists
of all calls, specifically “missed, answered,
dialed”. To select one of them, press “up” or
“down” navigation buttons as required. Press
“Select” to delete all calls in that list.
6. Redial
Press the Redial button. This will redial the
last dialled number.
7. Call forwarding
Call forwarding with consultation; this may
only be used during a call in progress using
the context buttons “More forward”.
Conference call for 3 participants: Call the
first person. Press the context buttons “More
conference”. This will put the active calls
with the first person on hold and you will hear
the dial tone. Call the third participant and
press the context buttons “More
conference” again.