EasyManua.ls Logo

Porter-Cable PC60TAG User Manual

Porter-Cable PC60TAG
18 pages
To Next Page IconTo Next Page
Page #1 background imageLoading...
Page #1 background image
www.portercable.com
INSTRUCTIVO DE OPERACIÓN, CENTROS DE
SERVICIO Y PÓLIZA DE GARANTÍA.
ADVERTENCIA: LÉASE ESTE INSTRUCTIVO
ANTES DE USAR EL PRODUCTO.
CATALOG NUMBER
N° DE CATALOGUE
CATÁLOGO N°
PC60TAG
PC60TCTAG
Instruction manual
Manuel d’instructions
Manual de’instrucciones
4-1/2 inch (114mm) Cut Off Tool / Grinder
Meuleuse d’angle de 4-1/2 po. (114mm)*
Esmeriladora angular de 114mm (4-1/2 pulg.)
Question and Answer IconNeed help?

Do you have a question about the Porter-Cable PC60TAG and is the answer not in the manual?

Porter-Cable PC60TAG Specifications

General IconGeneral
No Load Speed11, 000 RPM
Spindle Thread5/8-11
Voltage120V
Spindle LockYes
Wheel Diameter4-1/2 inch
Amperage6.0 Amps
No Load Speed (RPM)11, 000 RPM
Wheel Thickness1/4 inches
Arbor Size5/8 inches

Summary

General Power Tool Safety Warnings

WORK AREA SAFETY

Safety precautions for the work environment.

ELECTRICAL SAFETY

Precautions related to electrical hazards and tool usage.

PERSONAL SAFETY

Guidelines for operator safety and protection.

POWER TOOL USE AND CARE

Use the correct power tool for your application

Guidance on selecting and using the appropriate tool for the task.

Do not use the power tool if the switch does not turn it on and off

Importance of functional switches and tool repair.

Disconnect the plug from the power source and/or the battery pack

Safety measures before making adjustments or storing the tool.

SERVICE

Have your power tool serviced by a qualified repair person

Recommendation for professional servicing with identical parts.

SAFETY INSTRUCTIONS FOR ALL OPERATIONS

KICKBACK AND RELATED WARNINGS

Maintain a firm grip on the power tool and position your body and arm

Techniques to resist kickback forces by maintaining grip and body position.

Never place your hand near the rotating accessory

Warning to keep hands away from the rotating accessory to prevent injury.

Do not position your body in the area where power tool will move if kickback occurs

Advice on body positioning to avoid being hit by the tool during kickback.

SAFETY WARNINGS SPECIFIC FOR GRINDING AND ABRASIVE CUTTING-OFF OPERATIONS

Use only wheel types that are recommended for your power tool and the specific guard

Mandates using recommended wheel types and guards for specific applications.

The guard must be securely attached to the power tool and positioned for maximum safety

Instructions on securely attaching and positioning the guard for maximum protection.

ADDITIONAL SAFETY WARNINGS SPECIFIC FOR ABRASIVE CUTTING-OFF OPERATION

Do not "jam” the cut-off wheel or apply excessive pressure

Avoid jamming or over-pressuring the cut-off wheel to prevent binding.

Do not position your body in line with and behind the rotating wheel

Proper body positioning to avoid kickback during cutting operations.

SAFETY WARNINGS SPECIFIC FOR SANDING OPERATIONS

Do not use excessively oversized sanding disc paper

Warning against using oversized sanding discs to prevent hazards.

SAFETY WARNINGS SPECIFIC FOR WIRE BRUSHING OPERATIONS

Be aware that wire bristles are thrown by the brush even during ordinary operation

Awareness of wire bristles being thrown during operation.

ADDITIONAL SAFETY INFORMATION

ALWAYS WEAR CERTIFIED SAFETY EQUIPMENT

Requirement to wear certified safety gear for various operations.

FUNCTIONAL DESCRIPTION

Slider switch

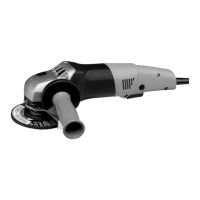
Identifies the slider switch and its function.

Cord

Refers to the power cord of the tool.

Tool free guard

Identifies the tool-free guard mechanism.

Body grip

Describes the main body grip of the tool.

Side handle (3 positions)

Details the auxiliary side handle and its positioning.

Spindle lock button

Explains the function of the spindle lock button.

Hub wrench

Identifies the included hub wrench.

Guard (Type 27 or Type 1 if so equipped)

Describes the type of guard used with the tool.

Assembly

AUXILIARY HANDLE

Guidance on using the auxiliary handle for better control.

Accessories

MOUNTING GUARD (FIGURES B & C)

Instructions for mounting the guard onto the tool.

ADJUSTING THE GUARD (FIGURE D)

Instructions for adjusting the guard if it becomes loose.

OPERATION

SWITCH

Instructions on how to operate the tool's switch.

ROTATING THE GEAR CASE (FIG. E)

Steps for rotating the gear case

Step-by-step guide to rotating the gear case and reassembling.

SPINDLE LOCK

MOUNTING AND USING DEPRESSED CENTER GRINDING WHEELS AND SANDING FLAP DISCS

Mounting and Removing Hubbed Wheels

Procedures for mounting and removing hubbed wheels.

MOUNTING NON-HUBBED WHEELS

Procedures for mounting non-hubbed wheels.

SURFACE GRINDING WITH GRINDING WHEELS

Steps for performing surface grinding with grinding wheels

Detailed steps for surface grinding operations.

EDGE GRINDING WITH GRINDING WHEELS

Procedures for performing edge grinding with grinding wheels

Detailed steps for edge grinding operations.

SURFACE FINISHING WITH SANDING FLAP DISCS

Steps for surface finishing using sanding flap discs

Detailed steps for surface finishing with flap discs.

MOUNTING SANDING BACKING PADS

Instructions for mounting sanding backing pads

Procedures for attaching sanding backing pads to the spindle.

USING SANDING BACKING PADS

Guidance on using sanding backing pads and discs effectively

Best practices for using sanding pads and discs of various grits.

PRECAUTIONS TO TAKE WHEN SANDING PAINT

PERSONAL SAFETY

Safety measures for personal protection during paint sanding.

ENVIRONMENTAL SAFETY

Safety measures for environmental protection during paint sanding.

CLEANING AND DISPOSAL

Procedures for cleaning and disposing of materials safely

Guidelines for tool cleaning and waste disposal.

MOUNTING AND USING WIRE BRUSHES AND WIRE WHEELS

MOUNTING WIRE CUP BRUSHES AND WIRE WHEELS

Instructions for mounting wire cup brushes and wheels.

USING WIRE CUP BRUSHES AND WIRE WHEELS

Guidance on using wire brushes and wheels for various tasks.

MOUNTING AND USING CUTTING (TYPE 1) WHEELS

MOUNTING CLOSED (TYPE 1) GUARD

Instructions for mounting the closed Type 1 guard.

MOUNTING CUTTING WHEELS

Instructions for mounting cutting wheels.

USING CUTTING WHEELS

Guidelines for using cutting wheels safely and effectively.

Maintenance

CLEANING

Instructions for cleaning the tool.

LUBRICATION

Information on tool lubrication.

TROUBLESHOOTING

Common problems and their possible solutions.

SERVICE AND REPAIRS

ACCESSORIES

Information regarding the use of accessories.

THREE YEAR LIMITED WARRANTY

1 YEAR FREE SERVICE

Details of the one-year free service included with the tool.

90 DAY MONEY BACK GUARANTEE

Information about the 90-day money-back guarantee.

WARNING LABEL REPLACEMENT

Instructions for obtaining replacement warning labels.

Related product manuals